Install in an Air Gap Environment
You can install a self-hosted version of Palette into a VMware environment without direct internet access. This type of installation is referred to as an air gap installation.
In a standard Palette installation, the following artifacts are downloaded by default from the public Palette repository.
-
Palette platform manifests and required platform packages.
-
Container images for core platform components and 3rd party dependencies.
-
Palette Packs.
The installation process changes a bit in an air gap environment due to the lack of internet access. Before the primary Palette installation step, you must download the three required Palette artifacts mentioned above. The other significant change is that Palette's default public repository is not used. Instead, a private repository supports all Palette operations pertaining to storing images and packages.
The following diagram is a high-level overview of the order of operations required to deploy a self-hosted instance of Palette in an airgap environment.
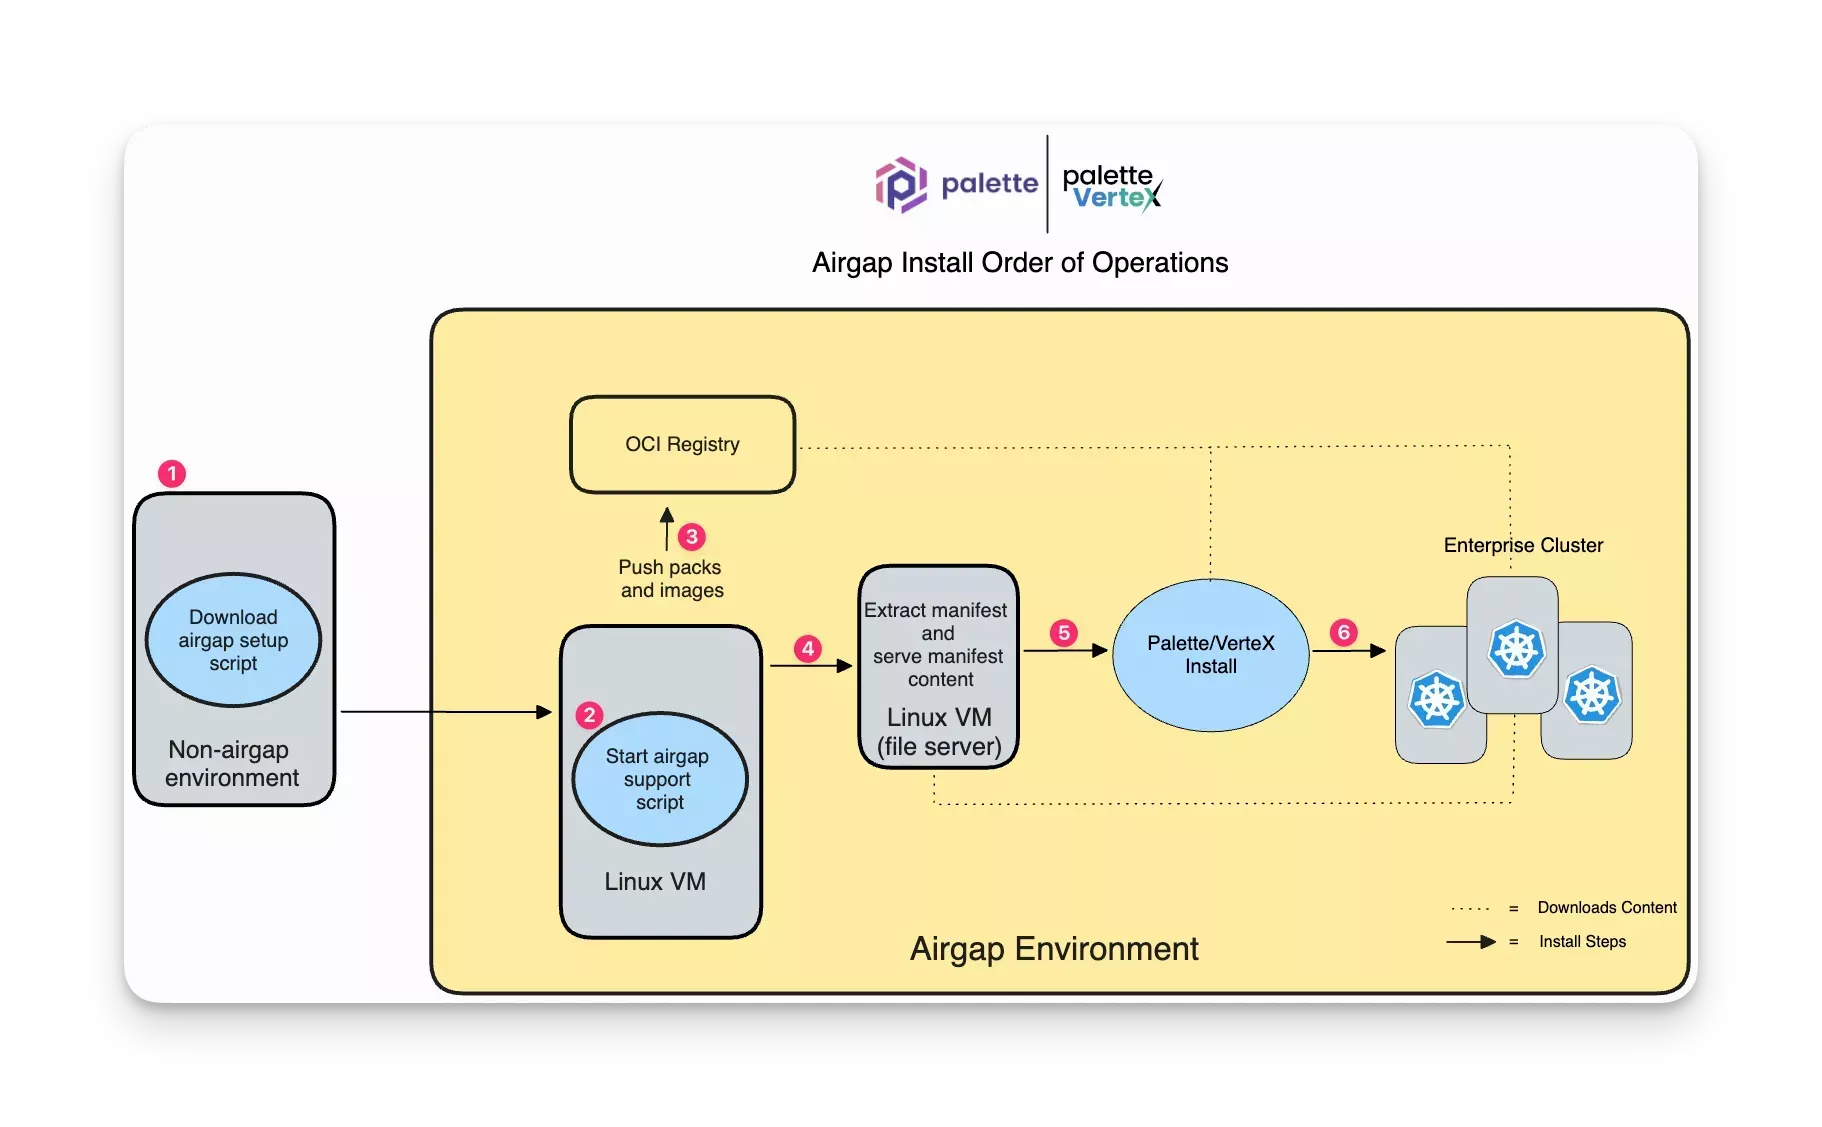
The airgap installation can be simplified into five major phases.
-
Download the Open Virtual Appliance (OVA) image and deploy the instance hosting the private repository that supports the airgap environment.
-
The private Spectro Cloud repository is initialized, and all the Palette-required artifacts are downloaded and available.
-
The Palette Install OVA is deployed, configured, and initialized.
-
The scale-up process to a highly available three-node installation begins.
-
Palette is ready for usage.
This guide focuses on the first two installation phases, as the remaining ones are covered in the Instructions guide.
Prerequisites
-
The following minimum resources are required to deploy Palette.
- 2 vCPU
- 4 GB of Memory
- 100 GB of Storage. Storage sizing depends on your intended update frequency and data retention model.
-
Ensure the following ports allow inbound network traffic.
- 80
- 443
- 5000
- 8000
-
Request the Palette self-hosted installer image and the Palette air gap installer image. To request the installer images, please contact our support team by sending an email to support@spectrocloud.com. Kindly provide the following information in your email:
- Your full name
- Organization name (if applicable)
- Email address
- Phone number (optional)
- A brief description of your intended use for the Palette Self-host installer image.
Our dedicated support team will promptly get in touch with you to provide the necessary assistance and share the installer image.
If you have any questions or concerns, please feel free to contact support@spectrocloud.com.
Deploy Air Gapped Appliance
-
Log in to vCenter Server by using the vSphere Client.
-
Navigate to the Datacenter and select the cluster you want to use for the installation. Right-click on the cluster and select Deploy OVF Template.
-
Select the airgap OVA installer image you downloaded after receiving guidance from our support team.
-
Select the folder where you want to install the Virtual Machine (VM) and assign a name to the VM.
-
Next, select the compute resource.
-
Review the details page. You may get a warning message stating the certificate is not trusted. You can ignore the message and click Next.
-
Select your storage device and storage policy. Click on Next to proceed.
-
Choose a network for your appliance and select Next.
-
Fill out the remaining template customization options. You can modify the following input fields.
| Parameter | Description | Default Value |
|---|---|---|
| Encoded user-data | In order to fit into an XML attribute, this value is base64 encoded. This value will be decoded, and then processed normally as user-data. | - |
| ssh public keys | This field is optional but indicates that the instance should populate the default user's authorized_keys with the provided public key. | - |
| Default User's password | Setting this value allows password-based login. The password will be good for only a single login. If set to the string RANDOM then a random password will be generated, and written to the console. | - |
| A Unique Instance ID for this instance | Specifies the instance id. This is required and used to determine if the machine should take "first boot" actions | id-ovf |
| Hostname | Specifies the hostname for the appliance. | ubuntuguest |
| URL to seed instance data from | This field is optional but indicates that the instance should 'seed' user-data and meta-data from the given URL. | - |
-
Click on Next to complete the deployment wizard. Upon completion, the cloning process will begin. The cloning process takes a few minutes to complete.
-
Power on the VM and click on the Launch Web Console button to access the instance's terminal.
-
Configure a static IP address on the node by editing /etc/netplan/50-cloud-init.yaml.
sudo vi /etc/netplan/50-cloud-init.yaml
Use the following sample configuration as a starting point but feel free to change the configuration file as required for your environment. To learn more about Netplan, check out the Netplan configuration examples from Canonical.
network:
  version: 2
  renderer: networkd
  ethernets:
    ens192:
      dhcp4: false
      addresses:
        - 10.10.244.9/18 # your static IP and subnet mask
      gateway4: 10.10.192.1 # your gateway IP
      nameservers:
        addresses: [10.10.128.8] # your DNS nameserver IP address.
To exit Vi, press the ESC key and type :wq followed by the Enter key.
- Issue the
netplancommand to update the network settings.
sudo netplan apply
- Give the instance one to two minutes before issuing the following command. The next step is to start the airgap
setup script that stands up the Spectro Repository. Issue the command below and replace
X.X.X.Xwith the static IP you provided to the Netplan configuration file.
sudo /opt/spectro/airgap-setup.sh X.X.X.X
Record the output of the setup command as you will use it when deploying the Quick Start appliance later on in the installation process.
Example Output:
Setting up Manifests
Setting up Manifests
Setting up SSL Certs
Setup Completed

Details:
  -------
Spectro Cloud Repository
UserName: XXXXXXXXX
Password: XXXXXXXXXX
Location: https://10.10.249.12
Artifact Repo Certificate:
LS0tLS1CRUdJ.............<condensed>

Pack Registry
URL: https://10.10.249.12:5000
Username: XXXXXXXXX
Password: XXXXXXXXX
- If you need to configure the instance with proxy settings, go ahead and do so now. You can configure proxy settings by using environment variables. Replace the values with your environment's respective values.
export http_proxy=http://10.1.1.1:8888
export https_proxy=https://10.1.1.1:8888
export no_proxy=.example.dev,10.0.0.0/8
- The next set of steps will download the required binaries to support a Palette installation, such as the Palette Installer, required Kubernetes packages, and kubeadm packages. You can download these artifacts from the instance, or externally and transfer them to the instance. Click on each tab for further guidance.
You must download the following three resources. Our support team will provide you with the credentials and download URL. Click on each tab to learn more about each resource and steps for downloading.
- Palette Installer
- Kubernetes Packages
- Kubeadm Packages
Download the binary by using the URL provided by the Palette support team. Change the version number as needed.
curl --user XXXX:YYYYY https://<provided-by-support>/airgap/packs/airgap-v3.3.15.bin \
 --output airgap-k8s-v3.3.15.bin
If you receive a certificate error, use the -k or --insecure flag.
Assign the proper permissions and start the download script.
sudo chmod 755 ./airgap-k8s-v3.3.15.bin && sudo ./airgap-k8s-v3.3.15.bin
Example Output:
sudo ./airgap-k8s-v3.3.15.bin
Verifying archive integrity...  100%   MD5 checksums are OK. All good.
Uncompressing Airgap K8S Images Setup - Version 3.3.15  100%
Setting up Packs
Setting up Images
  - Pushing image k8s.gcr.io/kube-controller-manager:v1.22.10
  - Pushing image k8s.gcr.io/kube-proxy:v1.22.10
  - Pushing image k8s.gcr.io/kube-apiserver:v1.22.10
  - Pushing image k8s.gcr.io/kube-scheduler:v1.22.10
  …
Setup Completed
Download the binary by using the URL provided by the Palette support team. Change the version number as needed.
curl --user XXXX:YYYYY https://<provided-by-support>/airgap/packs/airgap-k8s-v3.3.15.bin \
 --output airgap-k8s-v3.3.15.bin
If you receive a certificate error, use the -k or --insecure flag.
Assign the proper permissions and start the download script.
sudo chmod 755 ./airgap-k8s-v3.3.15.bin && sudo ./airgap-k8s-v3.3.15.bin
Example Output:
sudo ./airgap-k8s-v3.3.15.bin
Verifying archive integrity...  100%   MD5 checksums are OK. All good.
Uncompressing Airgap K8S Images Setup - Version 3.3.15  100%
Setting up Packs
Setting up Images
  - Pushing image k8s.gcr.io/kube-controller-manager:v1.22.10
  - Pushing image k8s.gcr.io/kube-proxy:v1.22.10
  - Pushing image k8s.gcr.io/kube-apiserver:v1.22.10
  - Pushing image k8s.gcr.io/kube-scheduler:v1.22.10
  …
Setup Completed
Download the binary by using the URL provided by the Palette support team. Change the version number as needed.
curl --user XXXX:YYYYY https://<provided-by-support>/airgap/packs/3.3/airgap-edge-kubeadm.bin \
 --output airgap-edge-kubeadm.bin
If you receive a certificate error, use the -k or --insecure flag.
Assign the proper permissions and start the download script.
sudo chmod 755 ./airgap-edge-kubeadm.bin && sudo ./airgap-edge-kubeadm.bin
Example Output:
sudo ./airgap-edge-kubeadm.bin
Verifying archive integrity...  100%   MD5 checksums are OK. All good.
Uncompressing Airgap Edge Packs - Kubeadm Images   100%
Setting up Images
  - Skipping image k8s.gcr.io/coredns/coredns:v1.8.6
  - Pushing image k8s.gcr.io/etcd:3.5.1-0
  - Pushing image k8s.gcr.io/kube-apiserver:v1.23.12
  - Pushing image k8s.gcr.io/kube-controller-manager:v1.23.12
  - Pushing image k8s.gcr.io/kube-proxy:v1.23.12
  …
Setup Completed
- If you will be using Edge deployments, go ahead and download the packages your Edge deployments will need. If you
are not planning to use Edge, skip to end. You can come back to this step in the future and add the packages if
needed. Click on the
...tab for additional options.
- Ubuntu 22.04 - K3s
- Ubuntu 22.04 - RKE
- Ubuntu 22.04 - Kubeadm
- Ubuntu 20.04 - K3s
- Ubuntu 20.04 - RKE
- Ubuntu 20.04 - Kubeadm
- OpenSuse - K3s
- OpenSuse - RKE
- OpenSuse - Kubeadm
Download the binary by using the URL provided by the Palette support team. Change the version number as needed.
curl --user XXXX:YYYYY https://<provided-by-support>/airgap/packs/3.3/airgap-edge-ubuntu22-k3s.bin \
 --output airgap-edge-ubuntu22-k3s.bin
If you receive a certificate error, use the -k or --insecure flag.
Assign the proper permissions and start the download script.
sudo chmod 755 ./airgap-edge-ubuntu22-k3s.bin && sudo ./airgap-edge-ubuntu22-k3s.bin
Download the binary by using the URL provided by the Palette support team. Change the version number as needed.
curl --user XXXX:YYYYY https://<provided-by-support>/airgap/packs/3.3/airgap-edge-ubuntu22-rke.bin \
 --output airgap-edge-ubuntu22-rke.bin
If you receive a certificate error, use the -k or --insecure flag.
Assign the proper permissions and start the download script.
sudo chmod 755 ./airgap-edge-ubuntu22-rke.bin && sudo ./airgap-edge-ubuntu22-rke.bin
Download the binary by using the URL provided by the Palette support team. Change the version number as needed.
curl --user XXXX:YYYYY https://<provided-by-support>/airgap/packs/3.3/airgap-edge-ubuntu22-kubeadm.bin \
 --output airgap-edge-ubuntu22-kubeadm.bin
If you receive a certificate error, use the -k or --insecure flag.
Assign the proper permissions and start the download script.
sudo chmod 755 ./airgap-edge-ubuntu22-kubeadm.bin && sudo ./airgap-edge-ubuntu22-kubeadm.bin
Download the binary by using the URL provided by the Palette support team. Change the version number as needed.
curl --user XXXX:YYYYY https://<provided-by-support>/airgap/packs/3.3/airgap-edge-ubuntu20-k3s.bin \
 --output airgap-edge-ubuntu20-k3s.bin
If you receive a certificate error, use the -k or --insecure flag.
Assign the proper permissions and start the download script.
sudo chmod 755 ./airgap-edge-ubuntu20-k3s.bin && sudo ./airgap-edge-ubuntu20-k3s.bin
Download the binary by using the URL provided by the Palette support team. Change the version number as needed.
curl --user XXXX:YYYYY https://<provided-by-support>/airgap/packs/3.3/airgap-edge-ubuntu20-rke.bin \
 --output airgap-edge-ubuntu20-rke.bin
If you receive a certificate error, use the -k or --insecure flag.
Assign the proper permissions and start the download script.
sudo chmod 755 ./airgap-edge-ubuntu20-rke.bin && sudo ./airgap-edge-ubuntu20-rke.bin
Download the binary by using the URL provided by the Palette support team. Change the version number as needed.
curl --user XXXX:YYYYY https://<provided-by-support>/airgap/packs/3.3/airgap-edge-ubuntu20-kubeadm.bin \
 --output airgap-edge-ubuntu20-kubeadm.bin
If you receive a certificate error, use the -k or --insecure flag.
Assign the proper permissions and start the download script.
sudo chmod 755 ./airgap-edge-ubuntu20-kubeadm.bin && sudo ./airgap-edge-ubuntu20-kubeadm.bin
Download the binary by using the URL provided by the Palette support team. Change the version number as needed.
curl --user XXXX:YYYYY https://<provided-by-support>/airgap/packs/3.3/airgap-edge-opensuse-k3s.bin \
 --output airgap-edge-opensuse-k3s.bin
If you receive a certificate error, use the -k or --insecure flag.
Assign the proper permissions and start the download script.
sudo chmod 755 ./airgap-edge-opensuse-k3s.bin && sudo ./airgap-edge-opensuse-k3s.bin
Download the binary by using the URL provided by the Palette support team. Change the version number as needed.
curl --user XXXX:YYYYY https://<provided-by-support>/airgap/packs/3.3/airgap-edge-opensuse-rke.bin \
 --output airgap-edge-opensuse-rke.bin
If you receive a certificate error, use the -k or --insecure flag.
Assign the proper permissions and start the download script.
sudo chmod 755 ./airgap-edge-opensuse-rke.bin && sudo ./airgap-edge-opensuse-rke.bin
Download the binary by using the URL provided by the Palette support team. Change the version number as needed.
curl --user XXXX:YYYYY https://<provided-by-support>/airgap/packs/3.3/airgap-edge-opensuse-kubeadm.bin \
 --output airgap-edge-opensuse-kubeadm.bin
If you receive a certificate error, use the -k or --insecure flag.
Assign the proper permissions and start the download script.
sudo chmod 755 ./airgap-edge-opensuse-kubeadm.bin && sudo ./airgap-edge-opensuse-kubeadm.bin
The next step of the installation process is to begin the deployment of an appliance using the instructions in the Instructions guide. If you need to review the Spectro Cloud Repository details, issue the following command for detailed output.
sudo /bin/airgap-setup.sh
You can review all the logs related to the setup of the private Spectro repository in /tmp/airgap-setup.log.
Validate
You can validate that the Spectro Repository you deployed is available and ready for the next steps of the installation process. If you provided the appliance with an SSH key then you can skip to step five.
-
Log in to vCenter Server by using the vSphere Client.
-
Navigate to your Datacenter and locate your VM. Click on the VM to access its details page.
-
Power on the VM.
-
Click on Launch Web Console to access the terminal.
-
Log in with the user
ubuntuand the user password you specified during the installation. If you are using SSH, use the following command, and ensure you specify the path to your SSH private key and replace the IP address with your appliance's static IP.
ssh --identity_file ~/path/to/your/file ubuntu@10.1.1.1
- Verify the registry server is up and available. Replace the
10.1.1.1value with your appliance's IP address.
curl --insecure https://10.1.1.1:5000/health
Example Output:
{"status":"UP"}
- Ensure you can log into your registry server. Use the credentials provided to you by the
airgap-setup.shscript. Replace the10.1.1.1value with your appliance's IP address.
curl --insecure --user admin:admin@airgap https://10.1.1.1:5000/v1/_catalog
Example Output:
{"metadata":{"lastUpdatedTime":"2023-04-11T21:12:09.647295105Z"},"repositories":[{"name":"amazon-linux-eks","tags":[]},{"name":"aws-efs","tags":[]},{"name":"centos-aws","tags":[]},{"name":"centos-azure","tags":[]},{"name":"centos-gcp","tags":[]},{"name":"centos-libvirt","tags":[]},{"name":"centos-vsphere","tags":[]},{"name":"cni-aws-vpc-eks","tags":[]},{"name":"cni-aws-vpc-eks-helm","tags":[]},{"name":"cni-azure","tags":[]},{"name":"cni-calico","tags":[]},{"name":"cni-calico-azure","tags":[]},{"name":"cni-cilium-oss","tags":[]},{"name":"cni-custom","tags":[]},{"name":"cni-kubenet","tags":[]},{"name":"cni-tke-global-router","tags":[]},{"name":"csi-aws","tags":[]},{"name":"csi-aws-ebs","tags":[]},{"name":"csi-aws-efs","tags":[]},{"name":"csi-azure","tags":[]},{"name":"csi-gcp","tags":[]},{"name":"csi-gcp-driver","tags":[]},{"name":"csi-longhorn","tags":[]},{"name":"csi-longhorn-addon","tags":[]},{"name":"csi-maas-volume","tags":[]},{"name":"csi-nfs-subdir-external","tags":[]},{"name":"csi-openstack-cinder","tags":[]},{"name":"csi-portworx-aws","tags":[]},{"name":"csi-portworx-gcp","tags":[]},{"name":"csi-portworx-generic","tags":[]},{"name":"csi-portworx-vsphere","tags":[]},{"name":"csi-rook-ceph","tags":[]},{"name":"csi-rook-ceph-addon","tags":[]},{"name":"csi-tke","tags":[]},{"name":"csi-topolvm-addon","tags":[]},{"name":"csi-vsphere-csi","tags":[]},{"name":"csi-vsphere-volume","tags":[]},{"name":"edge-k3s","tags":[]},{"name":"edge-k8s","tags":[]},{"name":"edge-microk8s","tags":[]},{"name":"edge-native-byoi","tags":[]},{"name":"edge-native-opensuse","tags":[]},{"name":"edge-native-ubuntu","tags":[]},{"name":"edge-rke2","tags":[]},{"name":"external-snapshotter","tags":[]},{"name":"generic-byoi","tags":[]},{"name":"kubernetes","tags":[]},{"name":"kubernetes-aks","tags":[]},{"name":"kubernetes-coxedge","tags":[]},{"name":"kubernetes-eks","tags":[]},{"name":"kubernetes-eksd","tags":[]},{"name":"kubernetes-konvoy","tags":[]},{"name":"kubernetes-microk8s","tags":[]},{"name":"kubernetes-rke2","tags":[]},{"name":"kubernetes-tke","tags":[]},{"name":"portworx-add-on","tags":[]},{"name":"spectro-mgmt","tags":[]},{"name":"tke-managed-os","tags":[]},{"name":"ubuntu-aks","tags":[]},{"name":"ubuntu-aws","tags":[]},{"name":"ubuntu-azure","tags":[]},{"name":"ubuntu-coxedge","tags":[]},{"name":"ubuntu-edge","tags":[]},{"name":"ubuntu-gcp","tags":[]},{"name":"ubuntu-libvirt","tags":[]},{"name":"ubuntu-maas","tags":[]},{"name":"ubuntu-openstack","tags":[]},{"name":"ubuntu-vsphere","tags":[]},{"name":"volume-snapshot-controller","tags":[]}],"listMeta":{"continue":""}}
- Next, validate the Spectro repository is available. Replace the IP with your appliance's IP address.
curl --insecure --user spectro:admin@airgap https://10.1.1.1
Output:
<!doctype html>
<html>
  <head>
    <title>Welcome to nginx!</title>
    <style>
      body {
        width: 35em;
        margin: 0 auto;
        font-family: Tahoma, Verdana, Arial, sans-serif;
      }
    </style>
  </head>
  <body>
    <h1>Welcome to nginx!</h1>
    <p>
      If you see this page, the nginx web server is successfully installed and working. Further configuration is
      required.
    </p>

    <p>
      For online documentation and support please refer to <a href="http://nginx.org/">nginx.org</a>.<br />
      Commercial support is available at
      <a href="http://nginx.com/">nginx.com</a>.
    </p>

    <p><em>Thank you for using nginx.</em></p>
  </body>
</html>