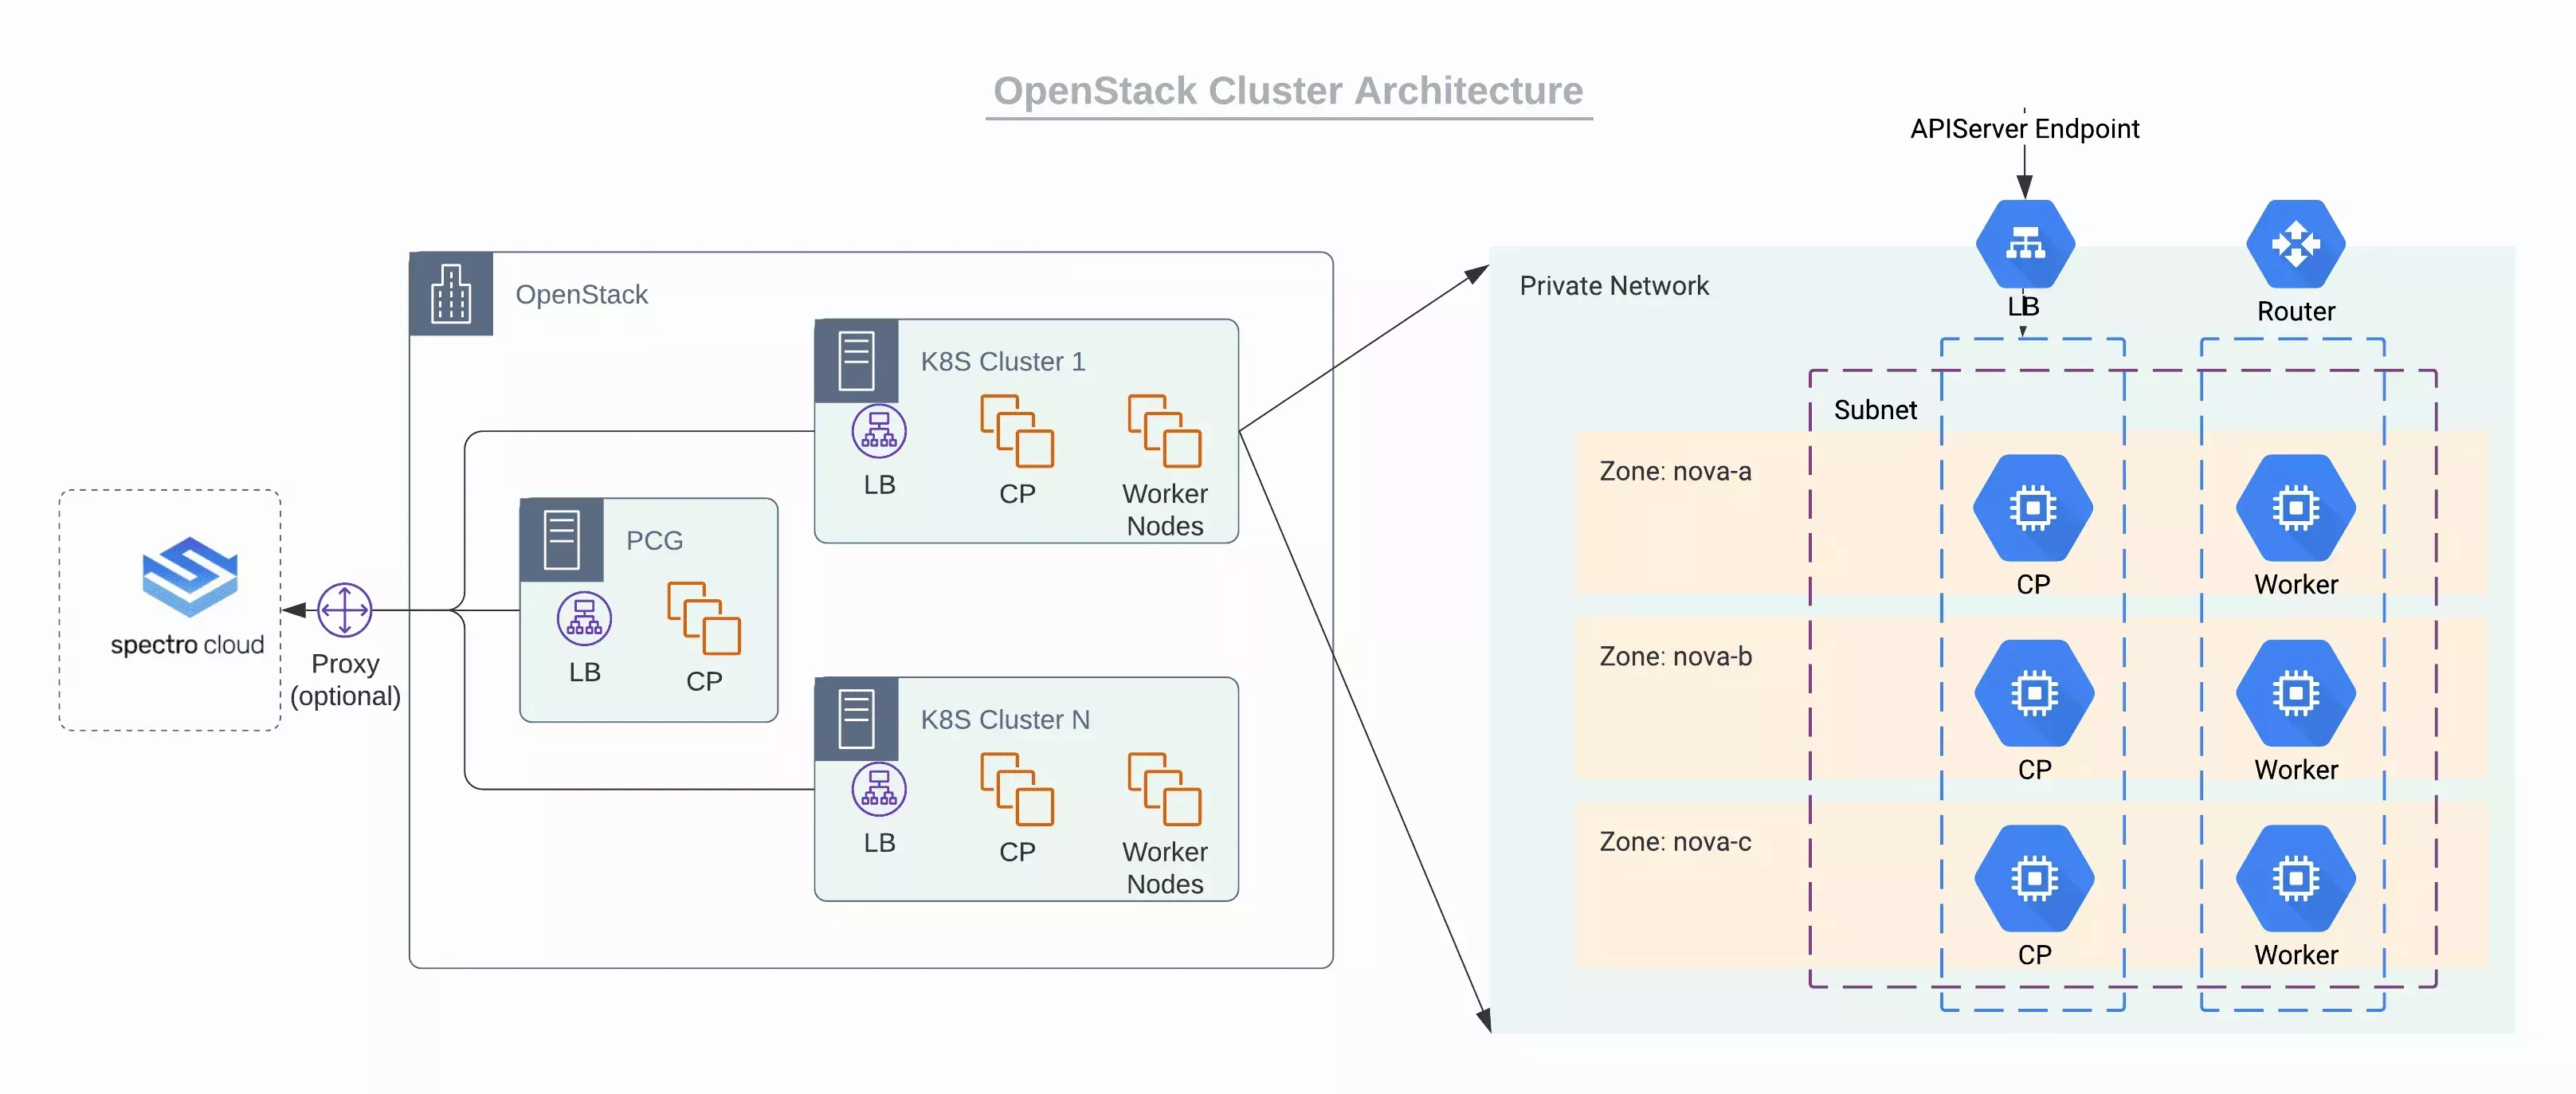
OpenStack
The following are some highlights of OpenStack clusters provisioned by Palette:
-
Palette provides public cloud like experience to deploying clusters on OpenStack.
-
In order to facilitate communication between the Palette management platform and the OpenStack controllers installed in the private data center, a Private Cloud Gateway needs to be set up within the environment.
-
Private Cloud Gateway(PCG) is Palette's on-premesis component to enable support for isolated private cloud or data center environments. Palette Gateway, once installed on-premesis registers itself with Palette's SaaS portal and enables secure communication between the SaaS portal and private cloud environment. The gateway enables installation and end-to-end lifecycle management of Kubernetes clusters in private cloud environments from Palette's SaaS portal.
Prerequisites
The following prerequisites must be met before deploying a Kubernetes clusters in OpenStack:
-
OpenStack Victoria (recommended).
-
NTP configured on all Hosts.
-
Shared Storage between OpenStack hosts.
-
You must have an active OpenStack account with access to all the projects that you would like to provision clusters into. The account should have all the permissions listed below in the "OpenStack Cloud Account Permissions" section.
-
You should have an Infrastructure cluster profile created in Palette for OpenStack.
-
You should install a Private Cloud Gateway for OpenStack as described in the "Installing Private Cloud Gateway - OpenStack" section below. Installing the Private Cloud Gateway will automatically register a cloud account for OpenStack in Palette. You can register your additional OpenStack cloud accounts in Palette as described in the "Creating a OpenStack Cloud account" section below.
-
Egress access to the internet (direct or via proxy):
- For proxy: HTTP_PROXY, HTTPS_PROXY (both required)
- Outgoing internet connection on port 443 to api.spectrocloud.com
-
DNS to resolve public internet names (e.g.: api.spectrocloud.com).
-
Sufficient IPs for application workload services (e.g.: Load Balancer services).
-
Per workload cluster IP requirements:
- One (1) per cluster node
- One (1) Kubernetes control-plane VIP
OpenStack Cloud Account Permissions
- Cinder Service
- Neutron Service
- Glance Service
- Nova Compute Service
Cinder Service
Last Update: June 28, 2021
"volume:attachment_update": "rule:admin_or_owner"
"volume:attachment_delete": "rule:admin_or_owner"
"volume:attachment_complete": "rule:admin_or_owner"
"volume:multiattach_bootable_volume": "rule:admin_or_owner"
"message:get_all": "rule:admin_or_owner"
"message:get": "rule:admin_or_owner"
"message:delete": "rule:admin_or_owner"
"volume:get_snapshot_metadata": "rule:admin_or_owner"
"volume:update_snapshot_metadata": "rule:admin_or_owner"
"volume:delete_snapshot_metadata": "rule:admin_or_owner"
"volume:get_all_snapshots": "rule:admin_or_owner"
"volume_extension:extended_snapshot_attributes": "rule:admin_or_owner"
"volume:create_snapshot": "rule:admin_or_owner"
"volume:get_snapshot": "rule:admin_or_owner"
"volume:update_snapshot": "rule:admin_or_owner"
"volume:delete_snapshot": "rule:admin_or_owner"
"backup:get_all": "rule:admin_or_owner"
"backup:get": "rule:admin_or_owner"
"backup:update": "rule:admin_or_owner"
"backup:delete": "rule:admin_or_owner"
"backup:restore": "rule:admin_or_owner"
"group:get_all": "rule:admin_or_owner"
"group:get": "rule:admin_or_owner"
"group:update": "rule:admin_or_owner"
"group:get_all_group_snapshots": "rule:admin_or_owner"
"group:get_group_snapshot": "rule:admin_or_owner"
"group:delete_group_snapshot": "rule:admin_or_owner"
"group:update_group_snapshot": "rule:admin_or_owner"
"group:reset_group_snapshot_status": "rule:admin_or_owner"
"group:delete": "rule:admin_or_owner"
"group:enable_replication": "rule:admin_or_owner"
"group:disable_replication": "rule:admin_or_owner"
"group:failover_replication": "rule:admin_or_owner"
"group:list_replication_targets": "rule:admin_or_owner"
"volume_extension:quotas:show": "rule:admin_or_owner"
"limits_extension:used_limits": "rule:admin_or_owner"
"volume_extension:volume_type_access": "rule:admin_or_owner"
"volume:extend": "rule:admin_or_owner"
"volume:extend_attached_volume": "rule:admin_or_owner"
"volume:revert_to_snapshot": "rule:admin_or_owner"
"volume:retype": "rule:admin_or_owner"
"volume:update_readonly_flag": "rule:admin_or_owner"
"volume_extension:volume_actions:upload_image": "rule:admin_or_owner"
"volume_extension:volume_actions:initialize_connection": "rule:admin_or_owner"
"volume_extension:volume_actions:terminate_connection": "rule:admin_or_owner"
"volume_extension:volume_actions:roll_detaching": "rule:admin_or_owner"
"volume_extension:volume_actions:reserve": "rule:admin_or_owner"
"volume_extension:volume_actions:unreserve": "rule:admin_or_owner"
"volume_extension:volume_actions:begin_detaching": "rule:admin_or_owner"
"volume_extension:volume_actions:attach": "rule:admin_or_owner"
"volume_extension:volume_actions:detach": "rule:admin_or_owner"
"volume:get_all_transfers": "rule:admin_or_owner"
"volume:create_transfer": "rule:admin_or_owner"
"volume:get_transfer": "rule:admin_or_owner"
"volume:delete_transfer": "rule:admin_or_owner"
"volume:get_volume_metadata": "rule:admin_or_owner"
"volume:create_volume_metadata": "rule:admin_or_owner"
"volume:update_volume_metadata": "rule:admin_or_owner"
"volume:delete_volume_metadata": "rule:admin_or_owner"
"volume_extension:volume_image_metadata": "rule:admin_or_owner"
"volume:get": "rule:admin_or_owner"
"volume:get_all": "rule:admin_or_owner"
"volume:update": "rule:admin_or_owner"
"volume:delete": "rule:admin_or_owner"
"volume_extension:volume_tenant_attribute": "rule:admin_or_owner"
"volume_extension:volume_encryption_metadata": "rule:admin_or_owner"
"volume:multiattach": "rule:admin_or_owner"
Neutron Service
Last Update: June 28, 2021
    "create_subnet": "rule:admin_or_network_owner",
    "get_subnet": "rule:admin_or_owner or rule:shared",
    "update_subnet": "rule:admin_or_network_owner",
    "delete_subnet": "rule:admin_or_network_owner",
    "get_subnetpool": "rule:admin_or_owner or rule:shared_subnetpools",
    "update_subnetpool": "rule:admin_or_owner",
    "delete_subnetpool": "rule:admin_or_owner",
    "get_address_scope": "rule:admin_or_owner or rule:shared_address_scopes",
    "update_address_scope": "rule:admin_or_owner",
    "delete_address_scope": "rule:admin_or_owner",
    "get_network": "rule:admin_or_owner or rule:shared or rule:external or rule:context_is_advsvc",
    "update_network": "rule:admin_or_owner",
    "delete_network": "rule:admin_or_owner",
    "network_device": "field:port:device_owner=~^network:",
    "create_port:device_owner": "not rule:network_device or rule:context_is_advsvc or rule:admin_or_network_owner",
    "create_port:mac_address": "rule:context_is_advsvc or rule:admin_or_network_owner",
    "create_port:fixed_ips": "rule:context_is_advsvc or rule:admin_or_network_owner or rule:shared",
    "create_port:fixed_ips:ip_address": "rule:context_is_advsvc or rule:admin_or_network_owner",
    "create_port:fixed_ips:subnet_id": "rule:context_is_advsvc or rule:admin_or_network_owner or rule:shared",
    "create_port:port_security_enabled": "rule:context_is_advsvc or rule:admin_or_network_owner",
    "create_port:mac_learning_enabled": "rule:context_is_advsvc or rule:admin_or_network_owner",
    "create_port:allowed_address_pairs": "rule:admin_or_network_owner",
    "create_port:allowed_address_pairs:mac_address": "rule:admin_or_network_owner",
    "create_port:allowed_address_pairs:ip_address": "rule:admin_or_network_owner",
    "get_port": "rule:context_is_advsvc or rule:admin_owner_or_network_owner",
    "update_port": "rule:admin_or_owner or rule:context_is_advsvc",
    "update_port:device_owner": "not rule:network_device or rule:context_is_advsvc or rule:admin_or_network_owner",
    "update_port:fixed_ips": "rule:context_is_advsvc or rule:admin_or_network_owner or rule:shared",
    "update_port:fixed_ips:ip_address": "rule:context_is_advsvc or rule:admin_or_network_owner",
    "update_port:fixed_ips:subnet_id": "rule:context_is_advsvc or rule:admin_or_network_owner or rule:shared",
    "update_port:port_security_enabled": "rule:context_is_advsvc or rule:admin_or_network_owner",
    "update_port:mac_learning_enabled": "rule:context_is_advsvc or rule:admin_or_network_owner",
    "update_port:allowed_address_pairs": "rule:admin_or_network_owner",
    "update_port:allowed_address_pairs:mac_address": "rule:admin_or_network_owner",
    "update_port:allowed_address_pairs:ip_address": "rule:admin_or_network_owner",
    "delete_port": "rule:context_is_advsvc or rule:admin_owner_or_network_owner",
    "create_router:external_gateway_info": "rule:admin_or_owner",
    "create_router:external_gateway_info:network_id": "rule:admin_or_owner",
    "get_router": "rule:admin_or_owner",
    "update_router": "rule:admin_or_owner",
    "update_router:external_gateway_info": "rule:admin_or_owner",
    "update_router:external_gateway_info:network_id": "rule:admin_or_owner",
    "delete_router": "rule:admin_or_owner",
    "add_router_interface": "rule:admin_or_owner",
    "remove_router_interface": "rule:admin_or_owner",
    "update_floatingip": "rule:admin_or_owner",
    "delete_floatingip": "rule:admin_or_owner",
    "get_floatingip": "rule:admin_or_owner",
    "update_rbac_policy": "rule:admin_or_owner",
    "update_rbac_policy:target_tenant": "rule:restrict_wildcard and rule:admin_or_owner",
    "get_rbac_policy": "rule:admin_or_owner",
    "delete_rbac_policy": "rule:admin_or_owner",
    "get_auto_allocated_topology": "rule:admin_or_owner",
    "get_trunk": "rule:admin_or_owner",
    "delete_trunk": "rule:admin_or_owner",
    "add_subports": "rule:admin_or_owner",
    "remove_subports": "rule:admin_or_owner",
    "get_security_groups": "rule:admin_or_owner",
    "get_security_group": "rule:admin_or_owner",
    "create_security_group": "rule:admin_or_owner",
    "update_security_group": "rule:admin_or_owner",
    "delete_security_group": "rule:admin_or_owner",
    "get_security_group_rules": "rule:admin_or_owner",
    "get_security_group_rule": "rule:admin_owner_or_sg_owner",
    "create_security_group_rule": "rule:admin_or_owner",
    "delete_security_group_rule": "rule:admin_or_owner",
Glance Service
Last Update: June 28, 2021
    "add_image": "role:admin or role:member",
    "delete_image": "role:admin or role:member",
    "get_image": "role:admin or role:member",
    "get_images": "role:admin or role:member",
    "publicize_image": "role:admin or role:member",
    "download_image": "role:admin or role:member",
    "upload_image": "role:admin or role:member",
    "get_image_location": "role:admin or role:member",
    "set_image_location": "role:admin or role:member",
Nova Compute Service
Last Update: June 28, 2021
 "os_compute_api:os-admin-password": "rule:admin_or_owner",
    "os_compute_api:os-attach-interfaces": "rule:admin_or_owner",
    "os_compute_api:os-attach-interfaces:create": "rule:admin_or_owner",
    "os_compute_api:os-attach-interfaces:delete": "rule:admin_or_owner",
    "os_compute_api:os-availability-zone:list": "rule:admin_or_owner",
    "os_compute_api:os-config-drive": "rule:admin_or_owner",
    "os_compute_api:os-console-output": "rule:admin_or_owner",
    "os_compute_api:os-consoles:create": "rule:admin_or_owner",
    "os_compute_api:os-consoles:show": "rule:admin_or_owner",
    "os_compute_api:os-consoles:delete": "rule:admin_or_owner",
    "os_compute_api:os-consoles:index": "rule:admin_or_owner",
    "os_compute_api:os-create-backup": "rule:admin_or_owner",
    "os_compute_api:os-deferred-delete": "rule:admin_or_owner",
    "os_compute_api:os-extended-availability-zone": "rule:admin_or_owner",
    "os_compute_api:os-extended-status": "rule:admin_or_owner",
    "os_compute_api:os-extended-volumes": "rule:admin_or_owner",
    "os_compute_api:extensions": "rule:admin_or_owner",
    "os_compute_api:os-flavor-access": "rule:admin_or_owner",
    "os_compute_api:os-flavor-extra-specs:show": "rule:admin_or_owner",
    "os_compute_api:os-flavor-extra-specs:index": "rule:admin_or_owner",
    "os_compute_api:os-flavor-rxtx": "rule:admin_or_owner",
    "os_compute_api:flavors": "rule:admin_or_owner",
    "os_compute_api:os-floating-ip-dns": "rule:admin_or_owner",
    "os_compute_api:os-floating-ip-pools": "rule:admin_or_owner",
    "os_compute_api:os-floating-ips": "rule:admin_or_owner",
    "os_compute_api:os-fping": "rule:admin_or_owner",
    "os_compute_api:image-size": "rule:admin_or_owner",
    "os_compute_api:os-instance-actions": "rule:admin_or_owner",
    "os_compute_api:ips:show": "rule:admin_or_owner",
    "os_compute_api:ips:index": "rule:admin_or_owner",
    "os_compute_api:os-keypairs": "rule:admin_or_owner",
    "os_compute_api:limits": "rule:admin_or_owner",
    "os_compute_api:os-lock-server:lock": "rule:admin_or_owner",
    "os_compute_api:os-lock-server:unlock": "rule:admin_or_owner",
    "os_compute_api:os-multinic": "rule:admin_or_owner",
    "os_compute_api:os-networks:view": "rule:admin_or_owner",
    "os_compute_api:os-pause-server:pause": "rule:admin_or_owner",
    "os_compute_api:os-pause-server:unpause": "rule:admin_or_owner",
    "os_compute_api:os-quota-sets:show": "rule:admin_or_owner",
    "os_compute_api:os-quota-sets:detail": "rule:admin_or_owner",
    "os_compute_api:os-remote-consoles": "rule:admin_or_owner",
    "os_compute_api:os-rescue": "rule:admin_or_owner",
    "os_compute_api:os-security-groups": "rule:admin_or_owner",
    "os_compute_api:os-server-groups": "rule:admin_or_owner",
    "os_compute_api:server-metadata:index": "rule:admin_or_owner",
    "os_compute_api:server-metadata:show": "rule:admin_or_owner",
    "os_compute_api:server-metadata:create": "rule:admin_or_owner",
    "os_compute_api:server-metadata:update_all": "rule:admin_or_owner",
    "os_compute_api:server-metadata:update": "rule:admin_or_owner",
    "os_compute_api:server-metadata:delete": "rule:admin_or_owner",
    "os_compute_api:os-server-password": "rule:admin_or_owner",
    "os_compute_api:os-server-tags:delete_all": "rule:admin_or_owner",
    "os_compute_api:os-server-tags:index": "rule:admin_or_owner",
    "os_compute_api:os-server-tags:update_all": "rule:admin_or_owner",
    "os_compute_api:os-server-tags:delete": "rule:admin_or_owner",
    "os_compute_api:os-server-tags:update": "rule:admin_or_owner",
    "os_compute_api:os-server-tags:show": "rule:admin_or_owner",
    "os_compute_api:os-server-usage": "rule:admin_or_owner",
    "os_compute_api:servers:index": "rule:admin_or_owner",
    "os_compute_api:servers:detail": "rule:admin_or_owner",
    "os_compute_api:servers:show": "rule:admin_or_owner",
    "os_compute_api:servers:create": "rule:admin_or_owner",
    "os_compute_api:servers:create:attach_volume": "rule:admin_or_owner",
    "os_compute_api:servers:create:attach_network": "rule:admin_or_owner",
    "os_compute_api:servers:delete": "rule:admin_or_owner",
    "os_compute_api:servers:update": "rule:admin_or_owner",
    "os_compute_api:servers:confirm_resize": "rule:admin_or_owner",
    "os_compute_api:servers:revert_resize": "rule:admin_or_owner",
    "os_compute_api:servers:reboot": "rule:admin_or_owner",
    "os_compute_api:servers:resize": "rule:admin_or_owner",
    "os_compute_api:servers:rebuild": "rule:admin_or_owner",
    "os_compute_api:servers:create_image": "rule:admin_or_owner",
    "os_compute_api:servers:create_image:allow_volume_backed": "rule:admin_or_owner",
    "os_compute_api:servers:start": "rule:admin_or_owner",
    "os_compute_api:servers:stop": "rule:admin_or_owner",
    "os_compute_api:servers:trigger_crash_dump": "rule:admin_or_owner",
    "os_compute_api:os-shelve:shelve": "rule:admin_or_owner",
    "os_compute_api:os-shelve:unshelve": "rule:admin_or_owner",
    "os_compute_api:os-simple-tenant-usage:show": "rule:admin_or_owner",
    "os_compute_api:os-suspend-server:resume": "rule:admin_or_owner",
    "os_compute_api:os-suspend-server:suspend": "rule:admin_or_owner",
    "os_compute_api:os-tenant-networks": "rule:admin_or_owner",
    "os_compute_api:os-virtual-interfaces": "rule:admin_or_owner",
    "os_compute_api:os-volumes": "rule:admin_or_owner",
    "os_compute_api:os-volumes-attachments:index": "rule:admin_or_owner",
    "os_compute_api:os-volumes-attachments:create": "rule:admin_or_owner",
    "os_compute_api:os-volumes-attachments:show": "rule:admin_or_owner",
    "os_compute_api:os-volumes-attachments:delete": "rule:admin_or_owner"
Installing Private Cloud Gateway - OpenStack
video: title: "openstack-pcg-creation": /pcg-creation-video/openstack.mp4
The following system requirements should be met in order to install a private cloud gateway for OpenStack:
- Private cloud gateway IP requirements:
- 1 IP for a 1 node PCG or 3 IPs for a 3 node PCG
- 1 IP for Kubernetes control-plane
Palette provides an installer in the form of a docker container. This installer can be run on any system that has docker daemon installed and has connectivity to the Palette Management console as well as OpenStack controller.
Generate pairing code
Navigate to the Private Cloud Gateway page under Administration and Create a new OpenStack gateway. Copy the pairing code displayed on the page. This will be used in subsequent steps.
Generate gateway config
Invoke gateway installer in interactive mode to generate the gateway configuration file. Follow the prompts to provide the Palette Management, OpenStack cloud account, Environment and Placement information as requested.
docker run -it --rm \
 --net=host \
 -v /var/run/docker.sock:/var/run/docker.sock \
 -v /tmp:/opt/spectrocloud \
 gcr.io/spectro-images-public/release/spectro-installer:1.0.9 \
 -o true
Enter Palette Management Information:
| Parameter | Description |
|---|---|
| Palette Console | Management Console endpoint e.g. https://console.spectrocloud.com |
| Palette Username | Login email address e.g. user1@company.com |
| Palette Password | Login password |
| Private Cloud Gateway pairing code | The unique authentication code generated in the previous step. |
Enter Environment Configuration:
| Parameter | Description |
|---|---|
| HTTPS Proxy(--https_proxy) | The endpoint for the HTTPS proxy server. This setting will be propagated to all the nodes launched in the proxy network. e.g., http://USERNAME:PASSWORD@PROXYIP:PROXYPORT |
| HTTP Proxy(--http_proxy) | The endpoint for the HTTP proxy server. This setting will be propagated to all the nodes launched in the proxy network. e.g., http://USERNAME:PASSWORD@PROXYIP:PROXYPORT |
| No Proxy(--no_proxy) | A comma-separated list of local network CIDRs, hostnames, domain names that should be excluded from proxying. This setting will be propagated to all the nodes to bypass the proxy server. e.g., maas.company.com,10.10.0.0/16 |
| Pod CIDR (--pod_cidr) | The CIDR pool is used to assign IP addresses to pods in the cluster. This setting will be used to assign IP addresses to pods in Kubernetes clusters. The pod IP addresses should be unique and should notoverlap with any Virtual Machine IPs in the environment. |
| Service IP Range (--svc_ip_range) | The IP address that will be assigned to services created on Kubernetes. This setting will be used to assign IP addresses to services in Kubernetes clusters. The service IP addresses should be unique and not overlap with any virtual machine IPs in the environment. |
Enter OpenStack Account Information:
| Parameter | Description |
|---|---|
| OpenStack Identity Endpoint | OpenStack Identity endpoint. Domain or IP address. e.g. https://openstack.mycompany.com/identity |
| OpenStack Account Username | OpenStack account username |
| OpenStack Account Password | OpenStack account password |
| Default Domain | Default OpenStack domain. e.g. Default |
| Default Region | Default OpenStack region. e.g. RegionOne |
| Default Project | Default OpenStack project. e.g. dev |
Enter OpenStack cluster configuration for the Private Cloud Gateway:
-
Verify the following parameters:
- Default Domain
- Default Region
- Default Project
-
Enter the values for:
| Parameter | Description |
|---|---|
| SSH Key | Select a key. |
| Placement option as Static or Dynamic | For static placement, VMs are placed into existing networks whereas, for dynamic placement, new network is created. |
| Network | Select an existing network. |
| Sub Network | Select a sub network. |
Enter OpenStack Machine configuration for the Private Cloud Gateway:
- Select the availability zone
- Choose flavor
- Number of nodes: Choose between 1 and 3
After this step, a new gateway configuration file is generated and its location is displayed on the console. e.g.: Config created:/opt/spectrocloud//install-pcg-ar-dev-os-gw-02-aug-01-20210802062349/pcg.yaml
Copy Configuration File
Copy the pcg.yaml file to a known location for easy access and updates.
cp /tmp/install-pcg-xxx/pcg.yaml /tmp
Deploy Private Cloud Gateway
Invoke the gateway installer in silent mode, providing the gateway config file as input to deploy the gateway. New VM(s) will be launched in your OpenStack environment and a gateway will be installed on those VM(s). If deployment fails due to misconfiguration, update the gateway configuration file and rerun the command.
docker run -it --rm \
 --net=host \
 -v /var/run/docker.sock:/var/run/docker.sock \
 -v /tmp:/opt/spectrocloud \
 gcr.io/spectro-images-public/release/spectro-installer:1.0.9 \
 -s true \
 -c //opt/spectrocloud/pcg.yaml
Upgrading an OpenStack cloud gateway
Palette maintains the OS image and all configurations for the cloud gateway. Periodically, the OS images, configurations, or other components need to be upgraded to resolve security or functionality issues. Palette releases such upgrades when required and communication about the same is presented in the form of an upgrade notification on the gateway.
Administrators should review the changes and apply them at a suitable time. Upgrading a cloud gateway does not result in any downtime for the tenant clusters. During the upgrade process, the provisioning of new clusters might be temporarily unavailable. New cluster requests are queued while the gateway is being upgraded, and are processed as soon as the gateway upgrade is complete.
Deleting an OpenStack cloud gateway
The following steps need to be performed to delete a cloud gateway:
-
As a Tenant administrator, navigate to the Private Cloud Gateway page under settings.
-
Invoke the Delete action on the cloud gateway instance that needs to be deleted.
-
The system performs a validation to ensure that there are no running tenant clusters associated with the gateway instance being deleted. If such instances are found, the system presents an error. Delete relevant running tenant clusters and retry the deletion of the cloud gateway.
-
Delete the gateway.
The delete gateway operation deletes the gateway instance registered in the management console, however the gateway infrastructure such as Load Balancers, VMs, Networks (if dynamic provision was chosen), etc. need to be deleted on the OpenStack console.
Resizing an OpenStack gateway
A cloud gateway can be set up as a 1-node or a 3-node cluster. For production environments, it is recommended that 3 nodes are set up. A cloud gateway can be initially set up with 1 node and resized to 3 nodes at a later time. The following steps need to be performed to resize a 1-node cloud gateway cluster to a 3-node gateway cluster:
-
As a tenant administrator, navigate to the Private Cloud Gateway page under settings.
-
Invoke the resize action for the relevant cloud gateway instance.
-
Update the size from 1 to 3.
-
The gateway upgrade begins shortly after the update. Two new nodes are created, and the gateway is upgraded to a 3-node cluster.
Creating an OpenStack Cloud Account
A default cloud account is automatically created when the private cloud gateway is configured. This cloud account can be used to create tenant clusters. Additional cloud accounts may be created if desired within the same gateway.
-
To create an OpenStack cloud account, proceed to project settings and select 'create cloud account' under OpenStack.
-
Fill the following values to the cloud account creation wizard.
Property Description Account Name Custom name for the cloud account Private cloud gateway Reference to a running cloud gateway Username OpenStack Username Password OpenStack Password Identity Endpoint Identity Endpoint of the gateway CA Certificate Digital certificate of authority Parent Region OpenStack Region to be used Default Domain Default OpenStack domain Default Project Default OpenStack project
Deploying an OpenStack Cluster
The following steps need to be performed to provision a new OpenStack cluster:
-
Provide basic cluster information like Name, Description, and Tags. Tags are currently not propagated to the VMs deployed on the cloud/data center environments.
-
Select a Cluster Profile created for the OpenStack environment. The profile definition will be used as the cluster construction template.
-
Review and override Pack Parameters as desired. By default, Parameters for all packs are set with values defined in the Cluster Profile.
-
Provide an OpenStack Cloud account and placement information.
- Cloud Account - Select the desired cloud account. OpenStack cloud accounts with credentials need to be
preconfigured in project settings. An account is auto-created as part of the cloud gateway setup and is available
for provisioning of tenant clusters if permitted by the administrator.
- Domain
- Region
- Project
- SSH Key
- Placement
- If the user choice of placement is Static then:
- Network
- Subnet
- If the user choice of placement is NOT Static then:
- Subnet CIDR
- DNS Name Server
- If the user choice of placement is Static then:
- Cloud Account - Select the desired cloud account. OpenStack cloud accounts with credentials need to be
preconfigured in project settings. An account is auto-created as part of the cloud gateway setup and is available
for provisioning of tenant clusters if permitted by the administrator.
-
Configure the control plane and worker node pools. Fill out the input fields in the Add node pool page. The following table contains an explanation of the available input parameters.
Control Plane Pool
| Parameter | Description |
|---|---|
| Name | A descriptive name for the node pool. |
| Size | Number of VMs to be provisioned for the node pool. For the control plane pool, this number can be 1, 3, or 5. |
| Allow worker capability | Select this option for allowing workloads to be provisioned on control plane nodes. |
| Labels | Add a label to apply placement constraints on a pod, such as a node eligible for receiving the workload. |
| Taints | To set toleration to pods and allow (but do not require) the pods to schedule onto nodes with matching taints. |
| Instance type | Select the compute instance type to be used for all nodes in the node pool. |
| Availability Zones | Choose one or more availability zones. Palette provides fault tolerance to guard against hardware failures, network failures, etc., by provisioning nodes across availability zones if multiple zones are selected. |
| Disk Size | Give the required storage size |
Worker Pool
| Parameter | Description |
|---|---|
| Name | A descriptive name for the node pool. |
| Enable Autoscaler | You can enable the autoscaler, by toggling the Enable Autoscaler button. Autoscaler scales up and down resources between the defined minimum and the maximum number of nodes to optimize resource utilization. |
| Set the scaling limit by setting the Minimum Size and Maximum Size, as per the workload the number of nods will scale up from minimum set value to maximum set value and the scale down from maximum set value to minimum set value | |
| Size | Number of VMs to be provisioned for the node pool. |
| Rolling Update | Rolling update has two available options. The expand option launches a new node first, then shuts down old one. The contract option shuts down a old one first, then launches new one. |
| Labels | Add a label to apply placement constraints on a pod, such as a node eligible for receiving the workload. |
| Taints | To set toleration to pods and allow (but do not require) the pods to schedule onto nodes with matching taints. |
| Instance type | Select the compute instance type to be used for all nodes in the node pool. |
| Availability Zones | Choose one or more availability zones. Palette provides fault tolerance to guard against hardware failures, network failures, etc., by provisioning nodes across availability zones if multiple zones are selected. |
| Disk Size | Provide the required storage size |
-
Configure the cluster policies/features.
- Manage Machines
- Scan Policies
- Backup Policies
-
Click to get details on cluster management feature.
-
Review settings and deploy the cluster. Provisioning status with details of ongoing provisioning tasks is available to track progress.
Deleting an OpenStack Cluster
The deletion of an OpenStack cluster results in the removal of all Virtual machines and associated storage disks created for the cluster. The following tasks need to be performed to delete an OpenStack cluster:
-
Select the cluster to be deleted from the Cluster View page and navigate to the Cluster Overview page.
-
Invoke a delete action available on the page: Cluster > Settings > Cluster Settings > Delete Cluster.
-
Click Confirm to delete.
The Cluster Status is updated to Deleting while cluster resources are being deleted. Provisioning status is updated with the ongoing progress of the delete operation. Once all resources are successfully deleted, the cluster status changes to Deleted and is removed from the list of clusters.
Delete action is only available for clusters that are fully provisioned. For clusters that are still in the process of being provisioned, the 'Abort' action is available to stop provisioning and delete all resources.
Force Delete a Cluster
A cluster stuck in the Deletion state can be force deleted by the user through the User Interface. The user can go for a force deletion of the cluster, only if it is stuck in a deletion state for a minimum of 15 minutes. Palette enables cluster force delete from the Tenant Admin and Project Admin scope.
-
Log in to the Palette Management Console.
-
Navigate to the Cluster Details page of the cluster stuck in deletion.
-
If the deletion is stuck for more than 15 minutes, click the Force Delete Cluster button from the Settings dropdown.
-
If the Force Delete Cluster button is not enabled, wait for 15 minutes. The Settings dropdown will give the estimated time for the auto-enabling of the Force Delete button.
-
If there are any cloud resources still on the cloud, the user should cleanup those resources before going for the force deletion.