VMware
The following are some architectural highlights of Kubernetes clusters provisioned by Palette on VMware:
- Kubernetes nodes can be distributed across multiple-compute clusters, which serve as distinct fault domains.
-
Support for static IP as well as DHCP.
- If using DHCP, Dynamic DNS is required.
-
IP pool management for assigning blocks of IPs dedicated to clusters or projects.
-
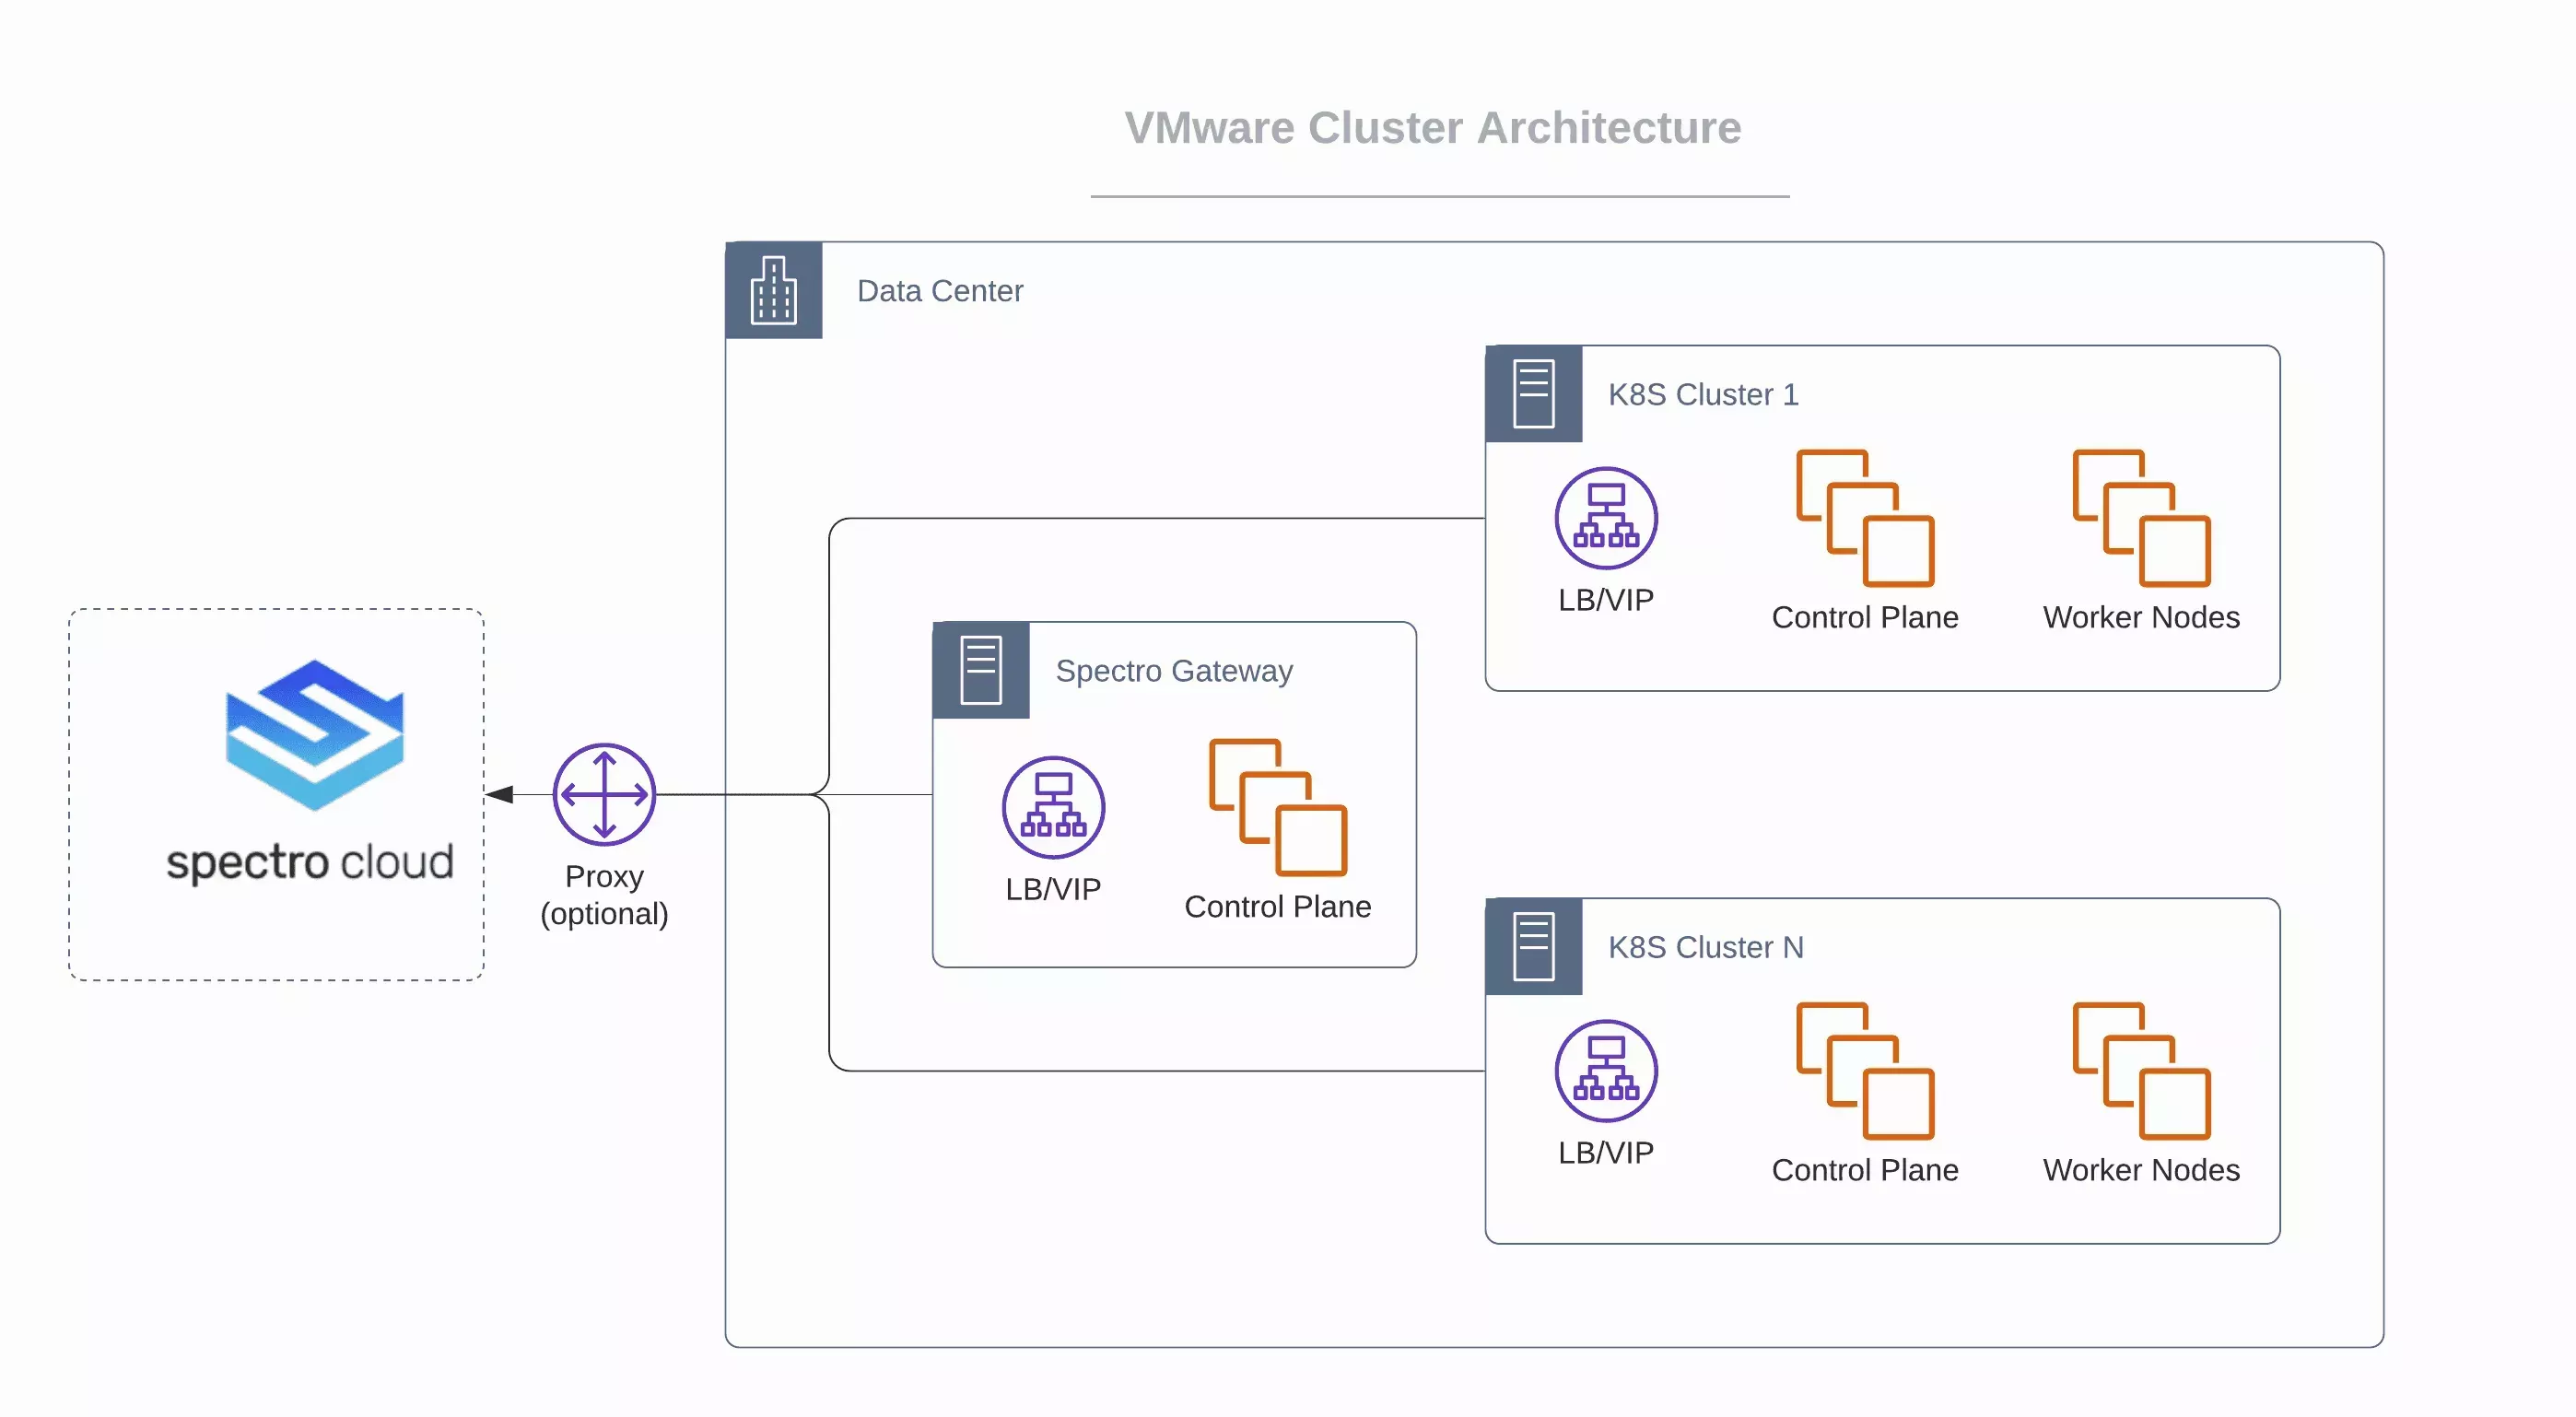
A Private Cloud Gateway (PCG) that you set up within the environment facilitates communications between the Palette management platform and vCenter installed in the private data center.
The PCG is Palette's on-prem component to enable support for isolated, private cloud, or data center environments. When the PCG is installed on-prem, it registers itself with Palette's SaaS portal and enables secure communications between the SaaS portal and private cloud environment.
Prerequisites
The following prerequisites must be met before deploying a Kubernetes clusters in VMware:
-
vSphere 6.7U3 or later (recommended).
-
Configuration Requirements - A Resource Pool needs to be configured across the hosts, onto which the workload clusters will be provisioned. Every host in the Resource Pool will need access to shared storage, such as vSAN, to be able to make use of high-availability control planes. Network Time Protocol (NTP) must be configured on each of the ESXi hosts.
-
You need an active vCenter account with all the permissions listed below in the VMware Cloud Account Permissions section.
-
An active vCenter account with all the permissions listed in VMware Privileges.
-
Installed PCG for VMware. Installing the PCG will automatically register a cloud account for VMware in Palette. You can register your additional VMware cloud accounts in Palette as described in the Create VMware Cloud Account section.
-
The Private cloud gateway IP requirements are:
- One (1) node - one (1) IP or three (3) nodes - three (3) IPs.
- One (1) Kubernetes control-plane VIP.
- One (1) Kubernetes control-plane extra.
-
IPs for application workload services (e.g.: LoadBalancer services).
-
A DNS to resolve public internet names (e.g.: api.spectrocloud.com).
-
Shared Storage between vSphere hosts.
-
A cluster profile created in Palette for VMWare.
-
Zone Tagging: A dynamic storage allocation for persistent storage.
Naming conventions for vSphere Region and Zone Tags
The following points needs to be taken care while creating the Tags:
- A valid tag must consist of alphanumeric characters
- The tag must start and end with an alphanumeric characters
- The regex used for validation is '(([A-Za-z0-9][-A-Za-z0-9_.]*)?[A-Za-z0-9])?')
Example Tags:
- MyValue
- my_value
- 12345
Zone Tagging
Zone tagging is required for dynamic storage allocation across fault domains when provisioning workloads that require persistent storage. This is required for installation of Palette Platform itself and also useful for workloads deployed in the tenant clusters if they have persistent storage needs. Use vSphere tags on Datacenters (k8s-region) and compute clusters (k8s-zone) to create distinct zones in your environment.
As an example, assume your vCenter environment includes three compute clusters, cluster-1, cluster-2, and cluster-3, that are part of Datacenter dc-1. You can tag them as follows:
| vSphere Object | Tag Category | Tag Value |
|---|---|---|
| dc-1 | k8s-region | region1 |
| cluster-1 | k8s-zone | az1 |
| cluster-2 | k8s-zone | az2 |
| cluster-3 | k8s-zone | az3 |
Note:
The exact values for the k8s-region and k8s-zone tags can be different from the ones described in the above example, as long as they are unique.
VMware Privileges
Last Update: August 18, 2022
The vSphere user account used in the various Palette tasks must have the minimum vSphere privileges required to perform the task. The Administrator role provides super-user access to all vSphere objects. For users without the Administrator role, one or more custom roles can be created based on the tasks being performed by the user.
If the network is a Distributed Port Group under a vSphere Distributed Switch (VDS), ReadOnly access to the VDS without “Propagate to children” needs to be provided.
Privileges Under Root-Level Role
If the network is a Distributed Port Group under a vSphere Distributed Switch (VDS), ReadOnly access to the VDS without “Propagate to children” is required.
- 8.0
- 7.0
- 6.7
Root-Level Role Privileges
Root-level role privileges listed in the table are applied only to root objects and data center objects.
| vSphere Object | Privileges |
|---|---|
| Cns | Searchable |
| Datastore | Browse datastore |
| Host | Configuration |
| * Storage partition configuration | |
| vSphere Tagging | Create vSphere Tag |
| Edit vSphere Tag | |
| Network | Assign network |
| Sessions | Validate session |
| VM Storage Policies | View VM storage policies |
| Storage views | View |
Spectro Role Privileges
The Spectro role privileges listed in the table must be applied to the spectro-template folder, hosts, clusters, virtual machines, templates, datastore, and network objects.
Palette downloads images and Open Virtual Appliance (OVA) files to the spectro-templates folder and clones images from it to create nodes.
| vSphere Object | Privileges |
|---|---|
| spectro-templates | Read only |
| Cns | Searchable |
| Datastore | Allocate space |
| Browse datastore | |
| Low-level file operations | |
| Remove file | |
| Update virtual machine files | |
| Update virtual machine metadata | |
| Folder | Create folder |
| Delete folder | |
| Move folder | |
| Rename folder | |
| Host | Local operations |
| Reconfigure virtual machine | |
| vSphere Tagging | Assign or Unassign vSphere Tag |
| Create vSphere Tag | |
| Delete vSphere Tag | |
| Edit vSphere Tag | |
| Network | Assign network |
| Resource | Apply recommendation |
| Assign virtual machine to resource pool | |
| Migrate powered off virtual machine | |
| Migrate powered on virtual machine | |
| Query vMotion | |
| Sessions | Validate session |
| VM Storage Policies | View VM storage policies |
| Storage views | Configure service |
| View | |
| Tasks | Create task |
| Update task | |
| vApp | Export |
| Import | |
| View OVF environment | |
| vApp application configuration | |
| vApp instance configuration | |
| Virtual machines | Change Configuration |
| * Acquire disk lease | |
| * Add existing disk | |
| * Add new disk | |
| * Add or remove device | |
| * Advanced configuration | |
| * Change CPU count | |
| * Change Memory | |
| * Change Settings | |
| * Change Swapfile placement | |
| * Change resource | |
| * Configure Host USB device | |
| * Configure Raw device | |
| * Configure managedBy | |
| * Display connection settings | |
| * Extend virtual disk | |
| * Modify device settings | |
| * Query Fault Tolerance compatibility | |
| * Query unowned files | |
| * Reload from path | |
| * Remove disk | |
| * Rename | |
| * Reset guest information | |
| * Set annotation | |
| * Toggle disk change tracking | |
| * Toggle fork parent | |
| * Upgrade virtual machine compatibility | |
| Edit Inventory | |
| * Create from existing | |
| * Create new | |
| * Move | |
| * Register | |
| * Remove | |
| * Unregister | |
| Guest operations | |
| * Guest operation alias modification | |
| * Guest operation alias query | |
| * Guest operation modifications | |
| * Guest operation program execution | |
| * Guest operation queries | |
| Interaction | |
| * Console interaction | |
| * Power off | |
| * Power on | |
| Provisioning | |
| * Allow disk access | |
| * Allow file access | |
| * Allow read-only disk access | |
| * Allow virtual machine download | |
| * Allow virtual machine files upload | |
| * Clone template | |
| * Clone virtual machine | |
| * Create template from virtual machine | |
| * Customize guest | |
| * Deploy template | |
| * Mark as template | |
| * Mark as virtual machine | |
| * Modify customization specification | |
| * Promote disks | |
| * Read customization specifications | |
| Service configuration | |
| * Allow notifications | |
| * Allow polling of global event notifications | |
| * Manage service configurations | |
| * Modify service configuration | |
| * Query service configurations | |
| * Read service configuration | |
| Snapshot management | |
| * Create snapshot | |
| * Remove snapshot | |
| * Rename snapshot | |
| * Revert to snapshot | |
| vSphere Replication | |
| * Configure replication | |
| * Manage replication | |
| * Monitor replication | |
| vSAN | Cluster |
| ShallowRekey |
Root-Level Role Privileges
Root-level role privileges listed in the table are applied only to root object and data center objects.
| vSphere Object | Privileges |
|---|---|
| Cns | Searchable |
| Datastore | Browse datastore |
| Host | Configuration |
| * Storage partition configuration | |
| vSphere Tagging | Create vSphere Tag |
| Edit vSphere Tag | |
| Network | Assign network |
| Sessions | Validate session |
| Profile-driven storage | Profile-driven storage view |
| Storage views | View |
Privileges Under the Spectro Role
Palette downloads images and Open Virtual Appliance (OVA) files to the spectro-templates folder and clones images from it to create nodes.
| vSphere Object | Privileges |
|---|---|
| Cns | Searchable |
| Datastore | Allocate space |
| Browse datastore | |
| Low level file operations | |
| Remove file | |
| Update virtual machine files | |
| Update virtual machine metadata | |
| Folder | Create folder |
| Delete folder | |
| Move folder | |
| Rename folder | |
| Host | Local operations |
| Reconfigure virtual machine | |
| vSphere Tagging | Assign or Unassign vSphere Tag |
| Create vSphere Tag | |
| Delete vSphere Tag | |
| Edit vSphere Tag | |
| Network | Assign network |
| Resource | Apply recommendation |
| Assign virtual machine to resource pool | |
| Migrate powered off virtual machine | |
| Migrate powered on virtual machine | |
| Query vMotion | |
| Sessions | Validate session |
| Profile-driven storage | Profile-driven storage view |
| Storage views | Configure service |
| View | |
| Tasks | Create task |
| Update task | |
| vApp | Export |
| Import | |
| View OVF environment | |
| vApp application configuration | |
| vApp instance configuration | |
| Virtual machines | Change Configuration |
| * Acquire disk lease | |
| * Add existing disk | |
| * Add new disk | |
| * Add or remove device | |
| * Advanced configuration | |
| * Change CPU count | |
| * Change Memory | |
| * Change Settings | |
| * Change Swapfile placement | |
| * Change resource | |
| * Configure Host USB device | |
| * Configure Raw device | |
| * Configure managedBy | |
| * Display connection settings | |
| * Extend virtual disk | |
| * Modify device settings | |
| * Query Fault Tolerance compatibility | |
| * Query unowned files | |
| * Reload from path | |
| * Remove disk | |
| * Rename | |
| * Reset guest information | |
| * Set annotation | |
| * Toggle disk change tracking | |
| * Toggle fork parent | |
| * Upgrade virtual machine compatibility | |
| Edit Inventory | |
| * Create from existing | |
| * Create new | |
| * Move | |
| * Register | |
| * Remove | |
| * Unregister | |
| Guest operations | |
| * Guest operation alias modification | |
| * Guest operation alias query | |
| * Guest operation modifications | |
| * Guest operation program execution | |
| * Guest operation queries | |
| Interaction | |
| * Console interaction | |
| * Power off | |
| * Power on | |
| Provisioning | |
| * Allow disk access | |
| * Allow file access | |
| * Allow read-only disk access | |
| * Allow virtual machine download | |
| * Allow virtual machine files upload | |
| * Clone template | |
| * Clone virtual machine | |
| * Create template from virtual machine | |
| * Customize guest | |
| * Deploy template | |
| * Mark as template | |
| * Mark as virtual machine | |
| * Modify customization specification | |
| * Promote disks | |
| * Read customization specifications | |
| Service configuration | |
| * Allow notifications | |
| * Allow polling of global event notifications | |
| * Manage service configurations | |
| * Modify service configuration | |
| * Query service configurations | |
| * Read service configuration | |
| Snapshot management | |
| * Create snapshot | |
| * Remove snapshot | |
| * Rename snapshot | |
| * Revert to snapshot | |
| vSphere Replication | |
| * Configure replication | |
| * Manage replication | |
| * Monitor replication | |
| vSAN | Cluster |
| ShallowRekey |
Root-Level Role Privileges
Root-level role privileges listed in the table are applied only to root object and data center objects.
| vSphere Object | Privileges |
|---|---|
| Cns | Searchable |
| Datastore | Browse datastore |
| Host | Configuration |
| * Storage partition configuration | |
| vSphere Tagging | Create vSphere Tag |
| Edit vSphere Tag | |
| Network | Assign network |
| Sessions | Validate session |
| Profile-driven storage | Profile-driven storage view |
| Storage views | View |
Spectro Role Privileges
The Spectro role privileges listed in the table must be applied to the spectro-template folder, hosts, clusters, virtual machines, templates, datastore, and network objects.
Palette downloads images and Open Virtual Appliance (OVA) files to the spectro-templates folder and clones images from it to create nodes.
| vSphere Object | Privileges |
|---|---|
| spectro-templates | Read only |
| Cns | Searchable |
| Datastore | Allocate space |
| Browse datastore | |
| Low level file operations | |
| Remove file | |
| Update virtual machine files | |
| Update virtual machine metadata | |
| Folder | Create folder |
| Delete folder | |
| Move folder | |
| Rename folder | |
| Host | Local operations |
| Reconfigure virtual machine | |
| vSphere Tagging | Assign or Unassign vSphere Tag |
| Create vSphere Tag | |
| Delete vSphere Tag | |
| Edit vSphere Tag | |
| Network | Assign network |
| Resource | Apply recommendation |
| Assign virtual machine to resource pool | |
| Migrate powered off virtual machine | |
| Migrate powered on virtual machine | |
| Query vMotion | |
| Sessions | Validate session |
| Profile-driven storage | Profile-driven storage view |
| Storage views | Configure service |
| View | |
| Tasks | Create task |
| Update task | |
| vApp | Export |
| Import | |
| View OVF environment | |
| vApp application configuration | |
| vApp instance configuration | |
| Virtual machines | Change Configuration |
| * Acquire disk lease | |
| * Add existing disk | |
| * Add new disk | |
| * Add or remove device | |
| * Advanced configuration | |
| * Change CPU count | |
| * Change Memory | |
| * Change Settings | |
| * Change Swapfile placement | |
| * Change resource | |
| * Configure Host USB device | |
| * Configure Raw device | |
| * Configure managedBy | |
| * Display connection settings | |
| * Extend virtual disk | |
| * Modify device settings | |
| * Query Fault Tolerance compatibility | |
| * Query unowned files | |
| * Reload from path | |
| * Remove disk | |
| * Rename | |
| * Reset guest information | |
| * Set annotation | |
| * Toggle disk change tracking | |
| * Toggle fork parent | |
| * Upgrade virtual machine compatibility | |
| Edit Inventory | |
| * Create from existing | |
| * Create new | |
| * Move | |
| * Register | |
| * Remove | |
| * Unregister | |
| Guest operations | |
| * Guest operation alias modification | |
| * Guest operation alias query | |
| * Guest operation modifications | |
| * Guest operation program execution | |
| * Guest operation queries | |
| Interaction | |
| * Console interaction | |
| * Power off | |
| * Power on | |
| Provisioning | |
| * Allow disk access | |
| * Allow file access | |
| * Allow read-only disk access | |
| * Allow virtual machine download | |
| * Allow virtual machine files upload | |
| * Clone template | |
| * Clone virtual machine | |
| * Create template from virtual machine | |
| * Customize guest | |
| * Deploy template | |
| * Mark as template | |
| * Mark as virtual machine | |
| * Modify customization specification | |
| * Promote disks | |
| * Read customization specifications | |
| Service configuration | |
| * Allow notifications | |
| * Allow polling of global event notifications | |
| * Manage service configurations | |
| * Modify service configuration | |
| * Query service configurations | |
| * Read service configuration | |
| Snapshot management | |
| * Create snapshot | |
| * Remove snapshot | |
| * Rename snapshot | |
| * Revert to snapshot | |
| vSphere Replication | |
| * Configure replication | |
| * Manage replication | |
| * Monitor replication | |
| vSAN | Cluster |
| ShallowRekey |
Create VMware Cloud Gateway
The following points give an overview of what you will do to set up the PCG:
-
Initiate the installation from the tenant portal.
-
Deploy the gateway installer VM in VMware vSphere.
-
Launch the cloud gateway from the tenant portal.
Self-hosted Palette installations provide a system gateway out-of-the-box and typically do not require a PCG. However, you can create additional gateways as needed to support provisioning into remote data centers that do not have a direct incoming connection from the management console.
Prerequisites
-
Setting up a cloud gateway involves:
- Initiating the install from the tenant portal
- Deploying gateway installer VM in vSphere
- Launching the cloud gateway from the tenant portal
Tenant Portal - Initiate Install
-
As a Tenant Administrator, navigate to the Private Cloud Gateway page under settings and click the dialogue to create a new Private Cloud Gateway.
-
Notate the link to the Palette Gateway Installer OVA and PIN displayed on the dialogue.
-
You can set up the PCG as a single- or three-node cluster based on your requirements for high availability (HA). The minimum PCG resource requirements are the following.
-
Single-node cluster: 2 vCPU, 4 GB memory, 60 GB storage.
-
High-Availability (HA) three-node cluster: 6 vCPU, 12 GB memory, 70 GB storage.
-
Install PCG
-
Log in to Palette as a tenant admin.
-
Navigate to the left Main Menu and select Tenant Settings > Private Cloud Gateway.
-
Click the Create Private Cloud Gateway button and select VMware. Private Gateway installation instructions are displayed.
-
Copy the gateway-installer link. Alternatively, you can download the OVA and upload it to an accessible location and import it as a local file.
vSphere - Deploy Gateway Installer
-
Initiate deployment of a new OVF template by providing a link to the installer OVA as the URL.
-
Proceed through the OVF deployment wizard by choosing the desired Name, Placement, Compute, Storage, and Network options.
-
At the Customize Template step, specify Palette properties as follows:
| Parameter | Value | Remarks |
|---|---|---|
| Installer Name | Desired Palette Gateway Name | The name will be used to identify the gateway instance. Typical environments may only require a single gateway to be deployed, however, multiple gateways might be required for managing clusters across multiple vCenters. Choose a name that can easily identify the environment that this gateway instance is being configured for. |
| Console endpoint | URL to Palette management platform portal | https://console.spectrocloud.com by default |
| Pairing Code | PIN displayed on the Palette management platform portal's 'Create a new gateway' dialogue. | |
| SSH Public Key | Optional key, useful for troubleshooting purposes (Recommended) | Enables SSH access to the VM as 'ubuntu' user |
| Pod CIDR | Optional - IP range exclusive to pods | This range should be different to prevent an overlap with your network CIDR. |
| Service cluster IP range | Optional - IP range in the CIDR format exclusive to the service clusters | This range also must not overlap with either the pod CIDR or your network CIDR. |
Additional properties that are required to be set only for a proxy environment. Each of the proxy properties may or may not have the same value but all the three properties are mandatory.
| Parameter | Value | Remarks |
|---|---|---|
| HTTP PROXY | The endpoint for the HTTP proxy server | This setting will be propagated to all the nodes launched in the proxy network. e.g., http://USERNAME:PASSWORD@PROXYIP:PROXYPORT |
| HTTPS PROXY | The endpoint for the HTTPS proxy server | This setting will be propagated to all the nodes launched in the proxy network. e.g., http://USERNAME:PASSWORD@PROXYIP:PROXYPORT |
| NO Proxy | A comma-separated list of vCenter server, local network CIDR, hostnames, domain names that should be excluded from proxying | This setting will be propagated to all the nodes to bypass the proxy server . e.g., vcenter.company.com, .company.org, 10.10.0.0/16 |
| Certificate | The base64 encoded value of the proxy server's cerficate OR the base64 encoded root and issuing certificate authority (CA) certificates used to sign the proxy server's certificate | Depending on how the certificate is decoded, an additonal = character may appear at the tailend of the value. The following command can be used to encode the certificate properly base64 -w0 | sed "s/=$//" |
-
Finish the OVF deployment wizard and wait for the OVA to be imported and virtual machine to be deployed.
-
Power on the virtual machine.
Tenant Portal - Launch Cloud Gateway
-
Close the Create New Gateway dialog box if it is still open or navigate to the Private Cloud Gateway page under settings in case you have navigated away or been logged out.
-
Wait for a gateway widget to display on the page and for the Configure option to become available. The IP address of the installer VM will be displayed on the gateway widget. This may take a few minutes after the VM is powered on. Failure of the installer to register with Palette within 10 minutes of powering on the Virtual Machine on vSphere might indicate an error. Follow steps in Troubleshooting to identify and resolve the issue.
-
Click on the Configure button to invoke the Palette Configuration dialogue. Provide vCenter credentials and proceed to the next configuration step.
-
Choose the desired values for the Datacenter, Compute Cluster, Datastore, Network, Resource pool, and Folder. Optionally, provide one or more SSH Keys and/or NTP server addresses.
-
Choose the IP Allocation Scheme - Static IP or DHCP. If static IP is selected, an option to create an IP pool is enabled. Proceed to create an IP pool by providing an IP range (start and end IP addresses) or a subnet. The IP addresses from this IP Pool will be assigned to the gateway cluster. By default, the IP Pool is available for use by other tenant clusters. This can be prevented by enabling the Restrict to a single cluster button. A detailed description of all the fields involved in the creation of an IP pool can be found here.
-
Click on Confirm, to initiate provisioning of the gateway cluster. The status of the cluster on the UI should change to Provisioning and eventually Running, when the gateway cluster is fully provisioned. This process might take several minutes (typically 8 to 10 mins). You can observe a detailed provisioning sequence on the Cluster Details page, by clicking on the gateway widget on the UI. If provisioning of the gateway cluster runs into errors or gets stuck, relevant details can be found on the Summary tab or the events tab of the cluster details page.
In certain cases where provisioning of the gateway cluster is stuck or failed due to invalid configuration, the process can be reset from the Cloud Gateway Widget on the UI.
-
Once the Gateway transitions to the Running state, it is fully provisioned and ready to bootstrap tenant cluster requests.
A Gateway cluster installation automatically creates a cloud account using the credentials entered at the time the gateway cluster is deployed. You can use this account to provision clusters across all tenant projects.
Upgrade PCG
Palette maintains the OS image and all configurations for the cloud gateway. Periodically, the OS images, configurations, or other components need to be upgraded to resolve security or functionality issues. Palette releases such upgrades when required and communication about the same is presented in the form of an upgrade notification on the gateway.
Administrators should review the changes and apply them at a suitable time. Upgrading a cloud gateway does not result in any downtime for the Tenant Clusters. During the upgrade process, the provisioning of new clusters might be temporarily unavailable. New cluster requests are queued while the gateway is being upgraded and are processed as soon as the gateway upgrade is complete.
Delete a VMware Cloud Gateway
The following steps need to be performed to delete a cloud gateway:
-
As a Tenant Administrator, navigate to the Private Cloud Gateway page under Settings.
-
Invoke the Delete action on the cloud gateway instance that needs to be deleted.
-
The system performs a validation to ensure there are no running tenant clusters associated with the gateway instance being deleted. If such instances are found, the system presents an error. Delete relevant running tenant clusters and retry the deletion of the cloud gateway.
-
Delete the Gateway Virtual Machines from vSphere.
Resizing a VMware Cloud Gateway
A cloud gateway can be set up as a 1-node or a 3-node cluster. For production environments, it is recommended that three (3) nodes are set up. A cloud gateway can be initially set up with one (1) node and resized to three (3) nodes at a later time. The following steps need to be performed to resize a 1-node cloud gateway cluster to a 3-node gateway cluster:
-
As a Tenant Administrator, navigate to the Private Cloud Gateway page under Settings.
-
Invoke the resize action for the relevant cloud gateway instance.
-
Update the size from one (1) to three (3).
-
The gateway upgrade begins shortly after the update. Two new nodes are created on vSphere and the gateway is upgraded to a 3-node cluster.
Scaling a 3-node cluster down to a 1-node cluster is not permitted.
A load balancer instance is launched even for a 1-node gateway to support future expansion.IP Address Management
Palette supports DHCP as well as Static IP based allocation strategies for the VMs that are launched during cluster creation. IP Pools can be defined, using a range or a subnet. Administrators can define one or more IP pools linked to a private cloud gateway.
Clusters created using a private cloud gateway can select from the IP pools linked to the corresponding private cloud gateway. By default, IP Pools are shared across multiple clusters, but can optionally be restricted to a cluster.
The following is a description of various IP Pool properties:
| Property | Description |
|---|---|
| Name | Descriptive name for the IP Pool. This name will be displayed for IP Pool selection when static IP is chosen as the IP allocation strategy |
| Network Type | Select Range to provide a start and an end IP address. IPs within this range will become part of this pool. Alternately select 'Subnet' to provide the IP range in CIDR format. |
| Start | First IP address for a range based IP Pool E.g. 10.10.183.1 |
| End | Last IP address for a range based IP Pool. E.g. 10.10.183.100 |
| Subnet | CIDR to allocate a set of IP addresses for a subnet based IP Pool. E.g. 10.10.183.64/26 |
| Subnet Prefix | Network subnet prefix. e.g. /18 |
| Gateway | Network Gateway E.g. 10.128.1.1 |
| Name server addresses | A comma-separated list of name servers. e.g., 8.8.8.8 |
| Restrict to a Single Cluster | Select this option to reserve the pool for the first cluster that uses this pool. By default, IP pools can be shared across clusters. |
Create a VMware Cloud Account
Use the following steps to create a VMware cloud account.
Prerequisites
-
A VMware cloud gateway must be configured. Refer to the Create VMware Cloud Gateway section for guidance.
infoEnterprise version users should choose the Use System Gateway option.
In addition to the default cloud account already associated with the private cloud gateway, new user cloud accounts can be created for the different vSphere users.
| Property | Description |
|---|---|
| Account Name | Custom name for the cloud account |
| Private cloud gateway | Reference to a running cloud gateway |
| vCenter Server | IP or FQDN of the vCenter server |
| Username | vCenter username |
| Password | vCenter password |
If you change the password for a user account in vCenter, you must also change it in Palette for the same VMware cloud account. We recommend updating the passwords immediately to avoid potentially locking Palette out of vCenter. For guidance, refer to Change VMware Cloud Account Password in Palette.
Change VMware Cloud Account Password
The user account password in vCenter must match the password for the corresponding VMware cloud account in Palette. This section provides steps to change the password in Palette in the event the vCenter password changes.
Prerequisites
- Access to the vCenter credentials.
Change the Password in Palette
-
Log in to Palette.
-
From the Menu Menu navigate to Tenant Settings > Cloud Accounts.
-
Click the three-dot Menu for the VMware account you want to update, and select Edit.
-
In the window that opens, update the password in the Password field and click the Validate button.
-
Confirm your changes.
Validation
Palette validates the password. Incorrect credentials will result in an error. As an extra precaution, try scaling a cluster up or down.
In addition to changing the password for a VMware account, Palette provides a way for you to also change the user associated with an account by entering a new username in the Username field. Ensure the new user account has the same permissions as the previous user account in vCenter.
Deploy a VMware Cluster
The following steps need to be performed to provision a new VMware cluster:
-
Provide the basic cluster information like Name, Description, and Tags. Tags are currently not propagated to the Virtual Machines (VMs) deployed on the cloud/Datacenter environments.
-
Select a Cluster Profile created for the VMware environment. The profile definition will be used as the cluster construction template.
-
Review and override Pack Parameters as desired. By default, parameters for all Packs are set with values defined in the Cluster Profile.
-
Provide a vSphere Cloud account and placement information.
Parameter Description Cloud Account Select the desired cloud account.
VMware cloud accounts with credentials need to be preconfigured
in the Project Settings section. An account is auto-created as
part of the cloud gateway setup and is available for
provisioning of Tenant Clusters if permitted by the administrator.Datacenter The vSphere data center where the cluster nodes will be launched. Deployment Folder The vSphere VM Folder where the cluster nodes will be launched. Image Template Folder The vSphere folder to which the Spectro templates are imported. SSH Keys (Optional) Public key to configure remote SSH access to the nodes (User: spectro). NTP Server (Optional) Setup time synchronization for all the running nodes. IP Allocation strategy DHCP or Static IP -
Configure the control plane and worker node pools. Fill out the input fields in the Add node pool page. The following table contains an explanation of the available input parameters.
Control Plane Pool
| Parameter | Description |
|---|---|
| Name | A descriptive name for the node pool. |
| Size | Number of VMs to be provisioned for the node pool. For the control plane pool, this number can be 1, 3, or 5. |
| Allow worker capability | Select this option for allowing workloads to be provisioned on control plane nodes. |
| Labels | Add a label to apply placement constraints on a pod, such as a node eligible for receiving the workload. |
| Taints | To set toleration to pods and allow (but do not require) the pods to schedule onto nodes with matching taints. |
| Instance type | Select the compute instance type to be used for all nodes in the node pool. |
| Availability Zones | Choose one or more availability zones. Palette provides fault tolerance to guard against hardware failures, network failures, etc., by provisioning nodes across availability zones if multiple zones are selected. |
| Disk Size | Give the required storage size |
Worker Pool
| Parameter | Description |
|---|---|
| Name | A descriptive name for the node pool. |
| Enable Autoscaler | You can enable the autoscaler, by toggling the Enable Autoscaler button. Autoscaler scales up and down resources between the defined minimum and the maximum number of nodes to optimize resource utilization. |
| Set the scaling limit by setting the Minimum Size and Maximum Size, as per the workload the number of nods will scale up from minimum set value to maximum set value and the scale down from maximum set value to minimum set value | |
| Size | Number of VMs to be provisioned for the node pool. |
| Rolling Update | Rolling update has two available options. The expand option launches a new node first, then shuts down old one. The contract option shuts down a old one first, then launches new one.details. |
| Labels | Add a label to apply placement constraints on a pod, such as a node eligible for receiving the workload. |
| Taints | To set toleration to pods and allow (but do not require) the pods to schedule onto nodes with matching taints. |
| Instance type | Select the compute instance type to be used for all nodes in the node pool. |
| Availability Zones | Choose one or more availability zones. Palette provides fault tolerance to guard against hardware failures, network failures, etc., by provisioning nodes across availability zones if multiple zones are selected. |
| Disk Size | Provide the required storage size |
- Review settings and deploy the cluster. Provisioning status with details of ongoing provisioning tasks is available to track progress.
New worker pools may be added if it is desired to customize certain worker nodes to run specialized workloads. As an example, the default worker pool may be configured with 4 CPUs, 8 GB of memory for general-purpose workloads, and another worker pool with 8 CPUs, 16 GB of memory for advanced workloads that demand larger resources.
Deleting a VMware Cluster
The deletion of a VMware cluster results in the removal of all Virtual machines and associated storage disks created for the cluster. The following tasks need to be performed to delete a VMware cluster:
-
Select the cluster to be deleted from the Cluster View page and navigate to the Cluster Overview page.
-
Invoke the delete action available on the page: Cluster > Settings > Cluster Settings > Delete Cluster.
-
Click Confirm to delete.
The Cluster Status is updated to Deleting while the Cluster Resources are being deleted. Provisioning status is updated with the ongoing progress of the delete operation. Once all resources are successfully deleted, the Cluster Status changes to Deleted and is removed from the list of Clusters.
The Delete action is only available for Clusters that are fully provisioned. For Clusters that are still in the process of being provisioned, Abort action is available to stop provisioning and delete all resources.
Force Delete a Cluster
A cluster stuck in the Deletion state can be force deleted by the user through the User Interface. The user can go for a force deletion of the cluster, only if it is stuck in a deletion state for a minimum of 15 minutes. Palette enables cluster force delete from the Tenant Admin and Project Admin scope.
To force delete a cluster:
-
Log in to the Palette Management Console.
-
Navigate to the Cluster Details page of the cluster stuck in deletion mode.
-
If the deletion status is stuck for more than 15 minutes, click the Force Delete Cluster button from the Settings dropdown.
-
If the Force Delete Cluster button is not enabled, wait for 15 minutes. The Settings dropdown will give the estimated time for the auto-enabling of the Force Delete button.
-
If there are any cloud resources still on the cloud, the user should cleanup those resources before going for the force deletion.