Private Cloud Gateway
When you deploy a Kubernetes cluster in a private data center environment, you must already have a Private Cloud Gateway (PCG) cluster deployed in the data center environment. A PCG enables secure communication between Palette and the private data center environment.
The following are the high-level steps of deploying a PCG in a private data center environment:
- Initiate the installation in Palette. In this step, you get a pairing code and an installer image.
- Deploy the PCG installer in the data center environment.
- Configure the cloud gateway in Palette, and launch the PCG cluster.
While deploying a PCG, you may encounter one of the following scenarios during the above-mentioned steps. Some scenarios below apply to all data center environments, whereas others apply to a specific data center environment, such as VMware. Each scenario covers a specific problem, including an overview, possible causes, and debugging steps.
Scenario - Jet CrashLoopBackOff
After you finish configuring the PCG in Palette, Palette starts provisioning the PCG cluster. During the provisioning, one of the internal Palette components may undergo a CrashLoopBackOff state.
The internal component, Jet, will transition to a healthy state once the PCG cluster is successfully registered with Palette.
Debug Steps
Wait 10-15 minutes for the PCG installation to finish so that the internal component receives the required authorization token from Palette. Once the internal component is authorized, the PCG cluster will complete the initialization successfully.
Scenario - PCG Installer VM Unable to Register With Palette
When deploying the PCG installer in VMware vSphere, you use an OVF template and then power on the PCG installer Virtual Machine (VM). After powering it on, the PCG installer goes through a bootstrap process and attempts to register with Palette. This process typically takes between five to ten minutes.
If the installer fails to register with Palette within the expected timeframe, it could indicate a bootstrapping error. The error can occur due to network connectivity issues, incorrect pairing code, or an incorrect endpoint configuration for Palette in the PCG installer template settings.
Debug Steps
-
SSH into the PCG installer VM using the username
ubuntuand the SSH key you provided during the OVA import. -
Inspect the log file located at /var/log/cloud-init-output.log.
cat /var/log/cloud-init-output.log
The cloud-init-output.log file will contain error messages if there are failures with connecting to Palette, authenticating, or downloading installation artifacts. A common cause for these errors is incorrect values provided to the OVF template deployment wizard, such as the Palette endpoint or a mistyped pairing code.
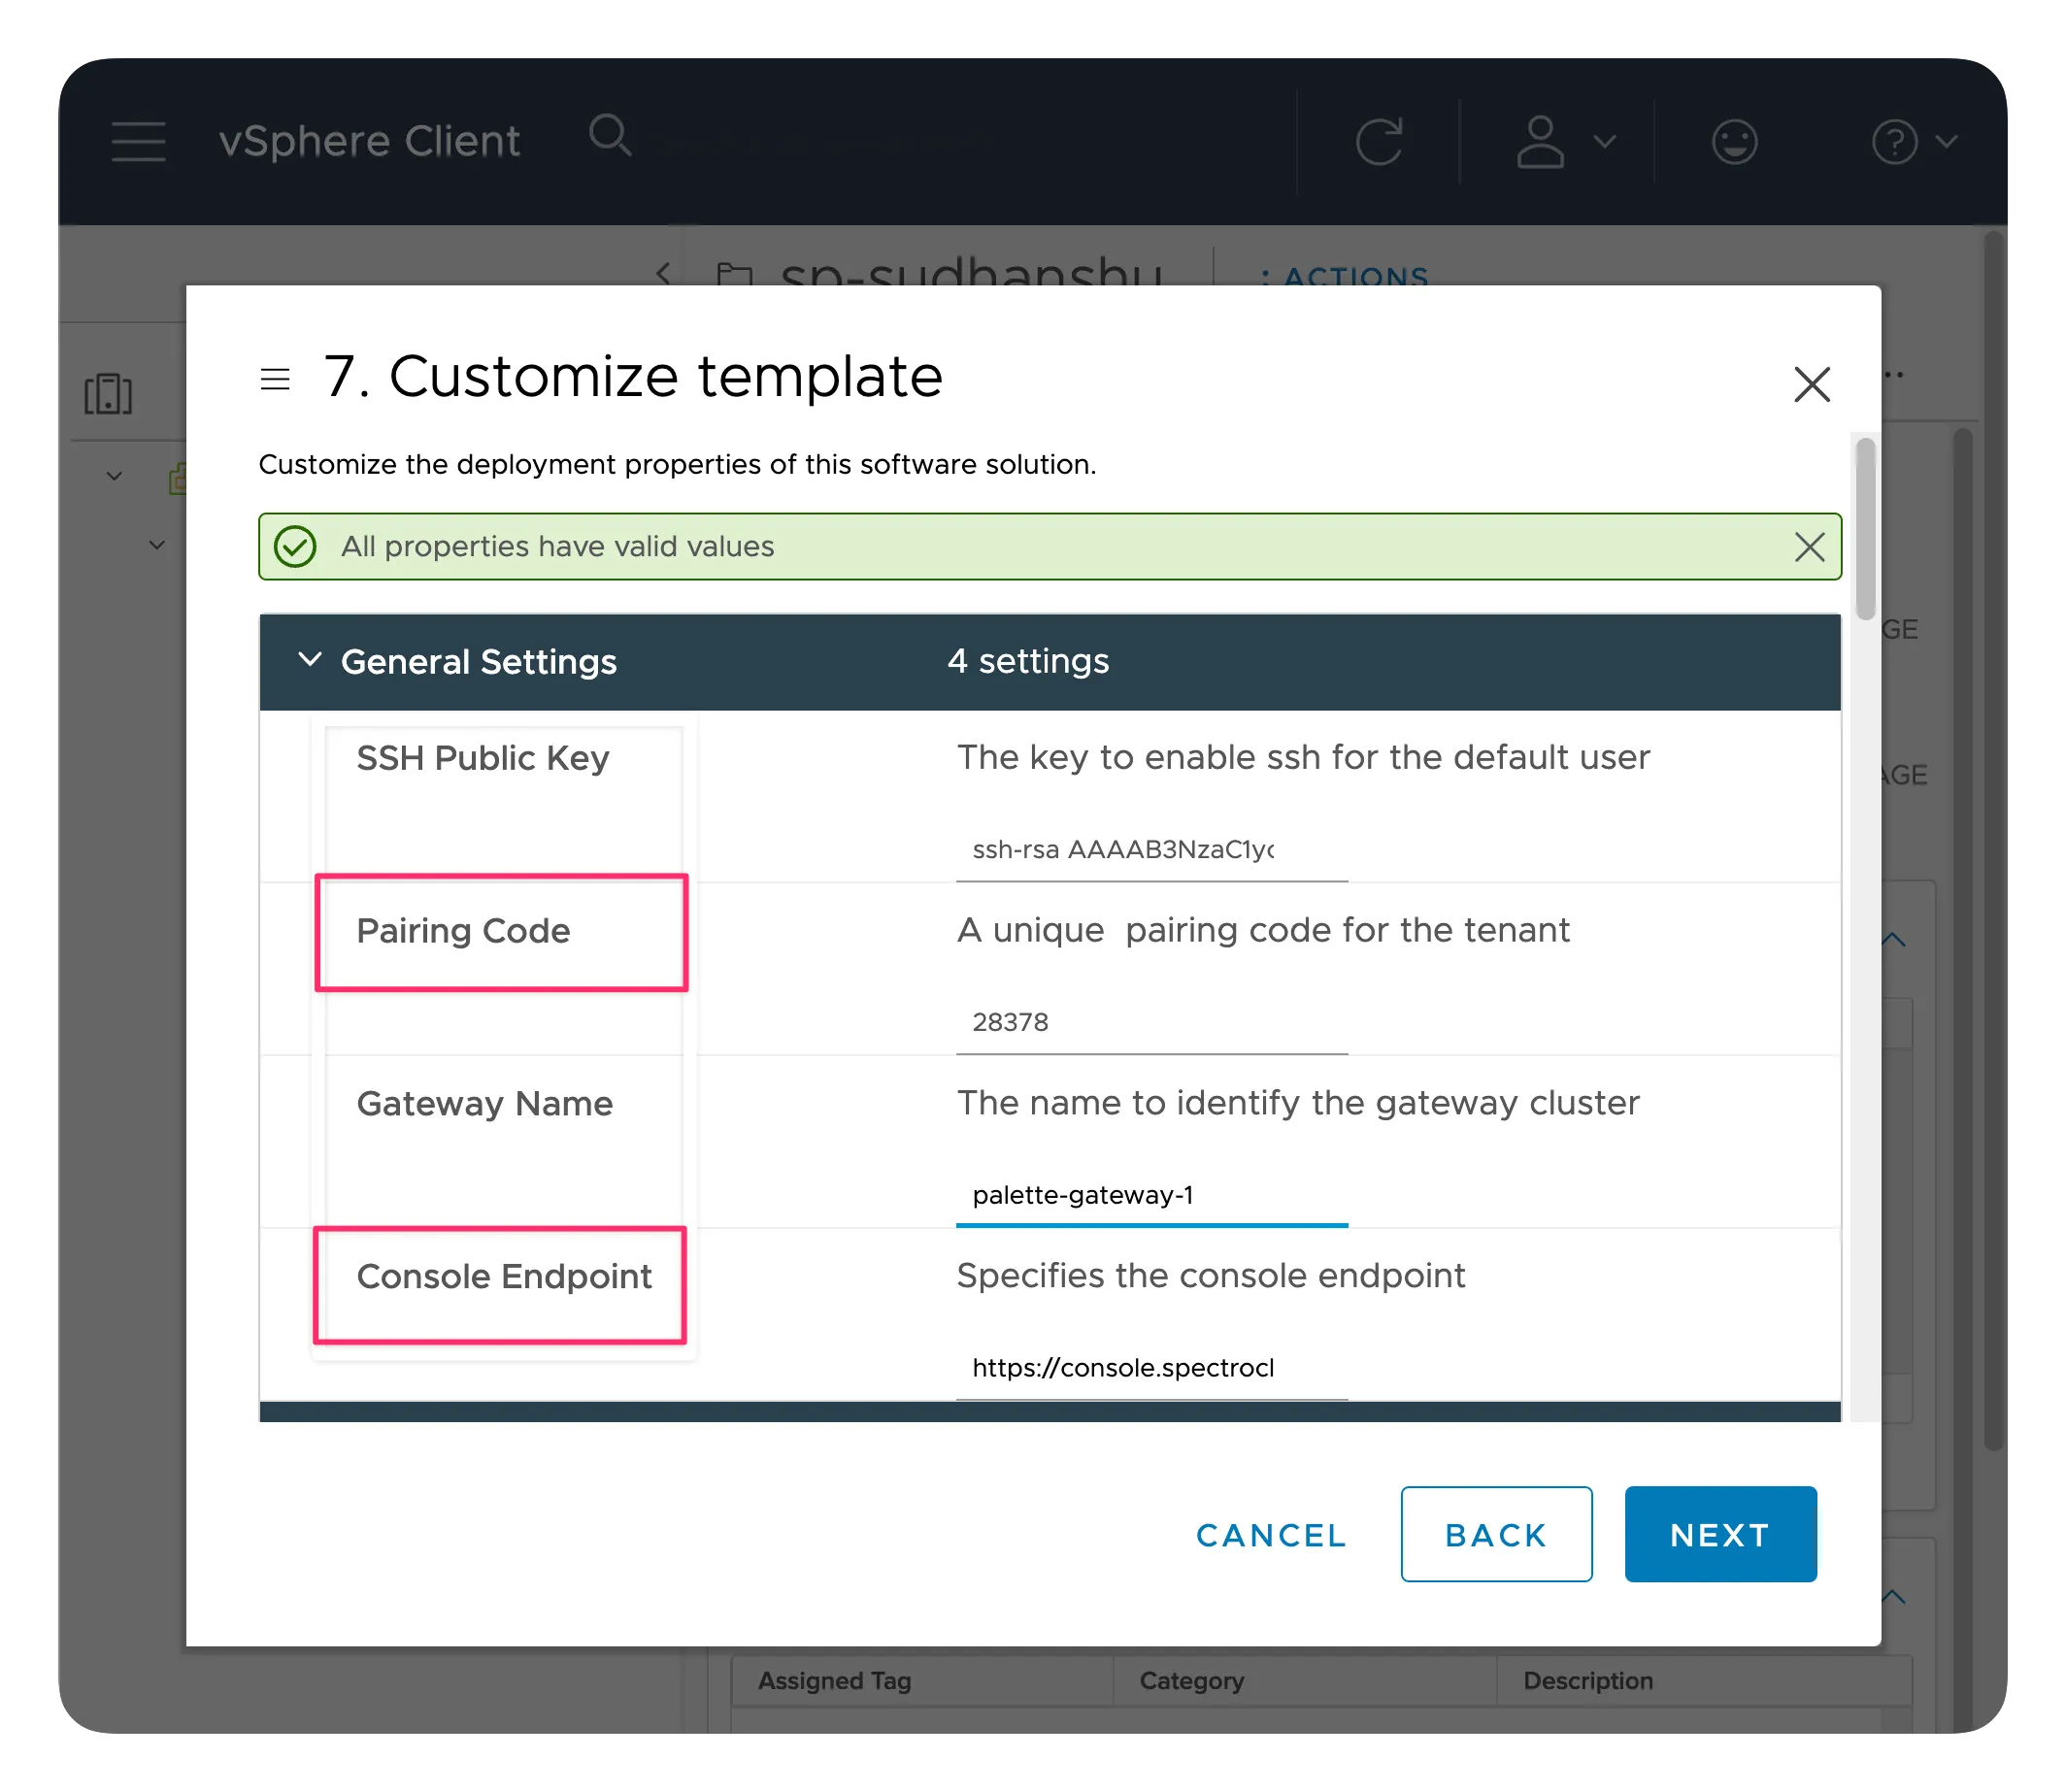
The screenshot below highlights the OVF template properties you must carefully configure and verify before deploying a PCG installer VM.
-
Double-check the accuracy of the pairing code used for the PCG installer VM. A pairing code is a unique authentication code Palette generates for each PCG installer instance. Confirm that it matches the value you copied from Palette.
-
Ensure the Palette endpoint is correct and has no trailing slash
/. If you use Palette SaaS, the default endpoint ishttps://console.spectrocloud.com. If you are using a self-hosted Palette instance, use the domain name as applicable to you. If the Palette endpoint is incorrectly specified, relaunch a new PCG installer VM with the correct values. -
Another potential issue may be a lack of outbound connectivity from the PCG installer VM to Palette. The installer VM needs to have outbound connectivity directly or via a proxy to download the installation artifacts from Spectro Cloud. Check for any network restrictions or firewall rules in the network settings that may block communication. Adjust the proxy settings, if applicable, to fix the connectivity. Alternatively, you can relaunch a new PCG installer VM in a network that supports outbound connections to Palette.
-
If the problem persists, issue the following command in the PCG installer VM to create a script to generate a log bundle.
cat > pcg-debug.sh << 'EOF'
#!/bin/bash
DESTDIR="/tmp/"
CONTAINER_LOGS_DIR="/var/log/containers/"
CLOUD_INIT_OUTPUT_LOG="/var/log/cloud-init-output.log"
CLOUD_INIT_LOG="/var/log/cloud-init.log"
KERN_LOG="/var/log/kern.log"
KUBELET_LOG="/tmp/kubelet.log"
SYSLOGS="/var/log/syslog*"
FILENAME=spectro-logs-$(date +%-Y%-m%-d)-$(date +%-HH%-MM%-SS).tgz
journalctl -u kubelet > $KUBELET_LOG
tar --create --gzip -h --file=$DESTDIR$FILENAME $CONTAINER_LOGS_DIR $CLOUD_INIT_LOG $CLOUD_INIT_OUTPUT_LOG $KERN_LOG $KUBELET_LOG $SYSLOGS
retVal=$?
if [ $retVal -eq 1 ]; then
    echo "Error creating spectro logs package"
else
    echo "Successfully extracted spectro cloud logs: $DESTDIR$FILENAME"
fi
EOF
- Start the script to generate a log archive. By default, the script places the log archive in the /tmp/ folder.
The log archive file name starts with the prefix spectro-logs- followed by a timestamp value.
chmod +x pcg-debug.sh && ./pcg-debug.sh
- Contact our support team by emailing support@spectrocloud.com and attach the logs archive to the ticket so the support team can troubleshoot the issue and provide you with further guidance.
Scenario - PCG Installer VM IP Address Assignment Error
When deploying the PCG installer in VMware vSphere, you use an OVF template and then power on the PCG installer VM. After powering it on, the PCG installer VM may fail to get an IP address.
If the PCG installer VM fails to get an IP address assigned, it implies a networking error or an incomplete cloud-init. The selected IP allocation scheme specified in the network settings of the PCG installer OVF template assigns an IP address to the PCG installer VM. The IP allocation scheme offers two options - static IP or DHCP. You must check the selected IP allocation scheme for troubleshooting.
Debug Steps
-
If you chose the static IP allocation scheme, ensure you have correctly provided the values for the gateway IP address, DNS addresses, and static IP subnet prefix. Check that the subnet prefix you provided allows the creation of an IP pool with sufficient IP addresses to allocate to the new PCG installer VM.
-
If you chose the DHCP allocation scheme, check that the DHCP service is available on the DHCP server. Restart the service if it's not in an active state.
-
If the DHCP server is active, recheck the DHCP scope and the DHCP reservations. The DHCP scope defines the range of IP addresses that the DHCP server allocates on the selected network. You must have sufficient IP addresses from the DHCP scope for dynamic allocation.
-
If you chose the DHCP allocation scheme, ensure Dynamic DNS is enabled in the DHCP server. A Dynamic DNS is only required if you are using DHCP. Dynamic DNS is not required for a static IP allocation scheme.
-
If there are no network-related issues, SSH into the PCG installer VM using the username
ubuntuand the SSH public key you provided during the OVA import step. Alternatively, you can open the web console of the PCG installer VM. -
Inspect the log files in the /var/log directory.
-
Examine the cloud-init logs for potential errors or warnings related to the IP address assignment.
-
If the problem persists, email the log files to our support team at support@spectrocloud.com.
Scenario - PCG Installer Deployment Failed
When deploying the PCG installer in VMware, you deploy the OVF template and power on the PCG installer VM. If the VM instance is supposed to receive a public IP address and the deployment fails, you cannot configure the cloud gateway in Palette.
The PCG installer deployment can fail due to internet connectivity or internal misconfigurations, such as an incorrect pairing code.
Debug Steps
If the PCG installer VM has a public IP address assigned, you can access the PCG installer's deployment status and system logs from the monitoring console. Follow the steps below to review the deployment status and logs.
-
Open a web browser on your local machine and visit the
https://[IP-ADDRESS]:5080URL. Replace the[IP-ADDRESS]placeholder with your PCG installer VM's public IP address. -
Provide the username and password when prompted. You can use the default installation credentials:
- username: admin
- password: admin
-
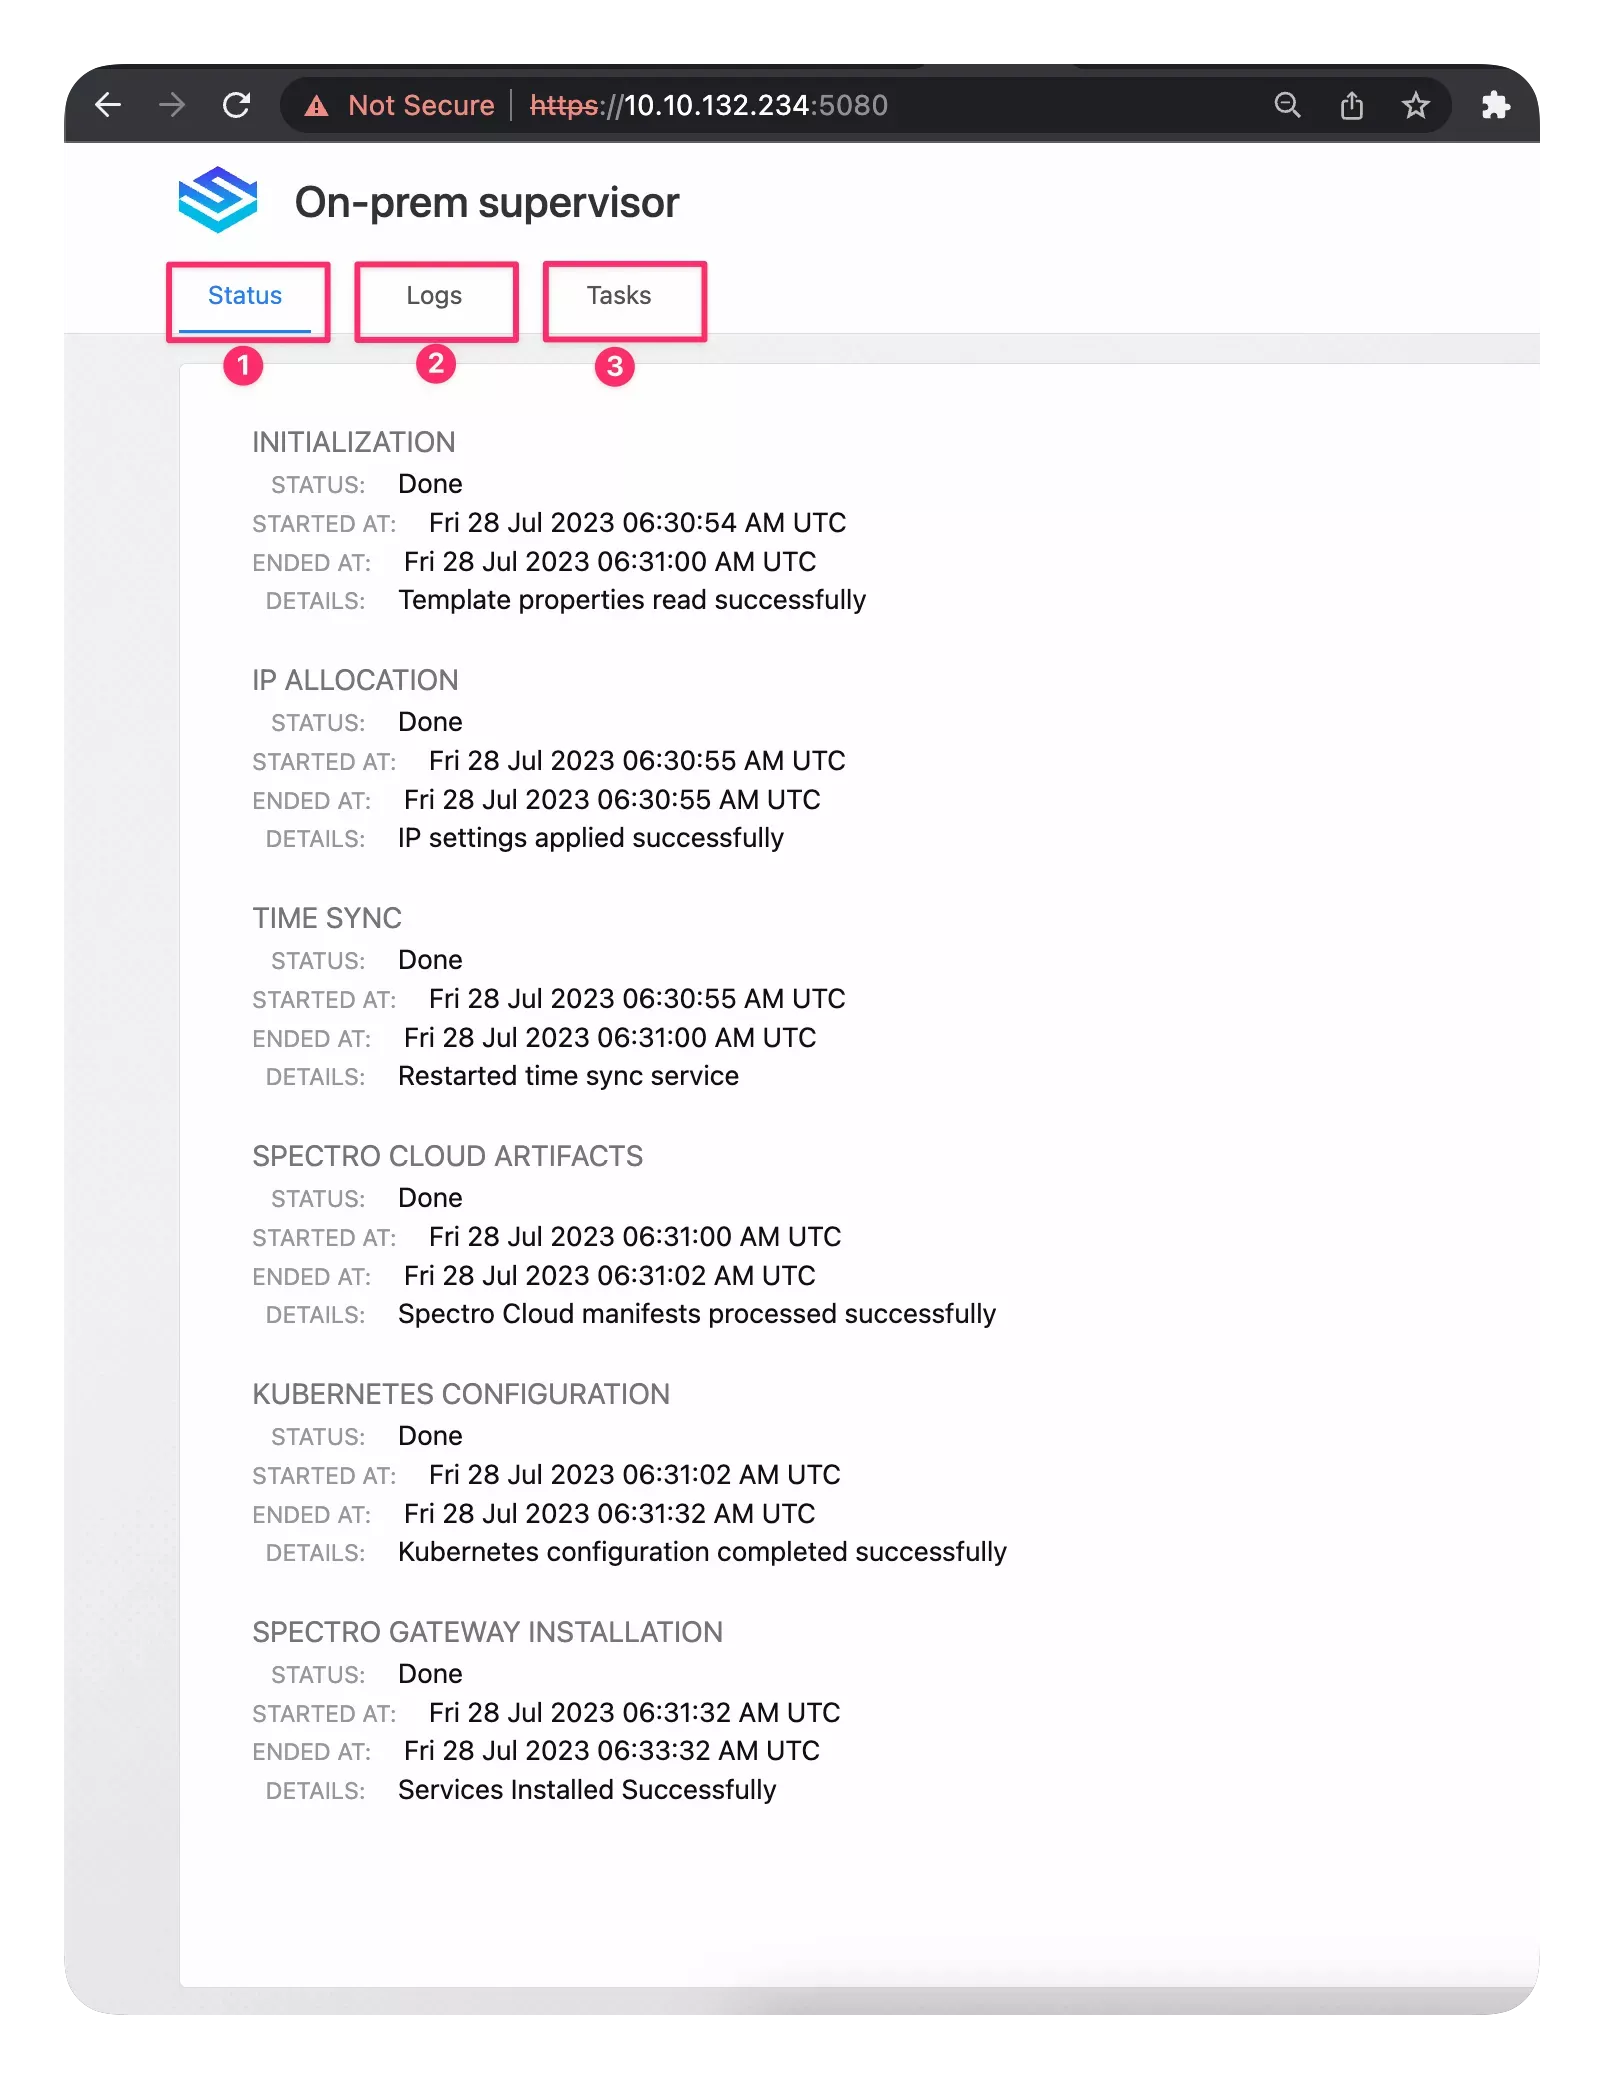
Once you are logged in, review the PCG installer's deployment status, system logs, and diagnostic tasks, as highlighted in the screenshot below. The monitoring console allows you to check the high-level status and download the individual log files.
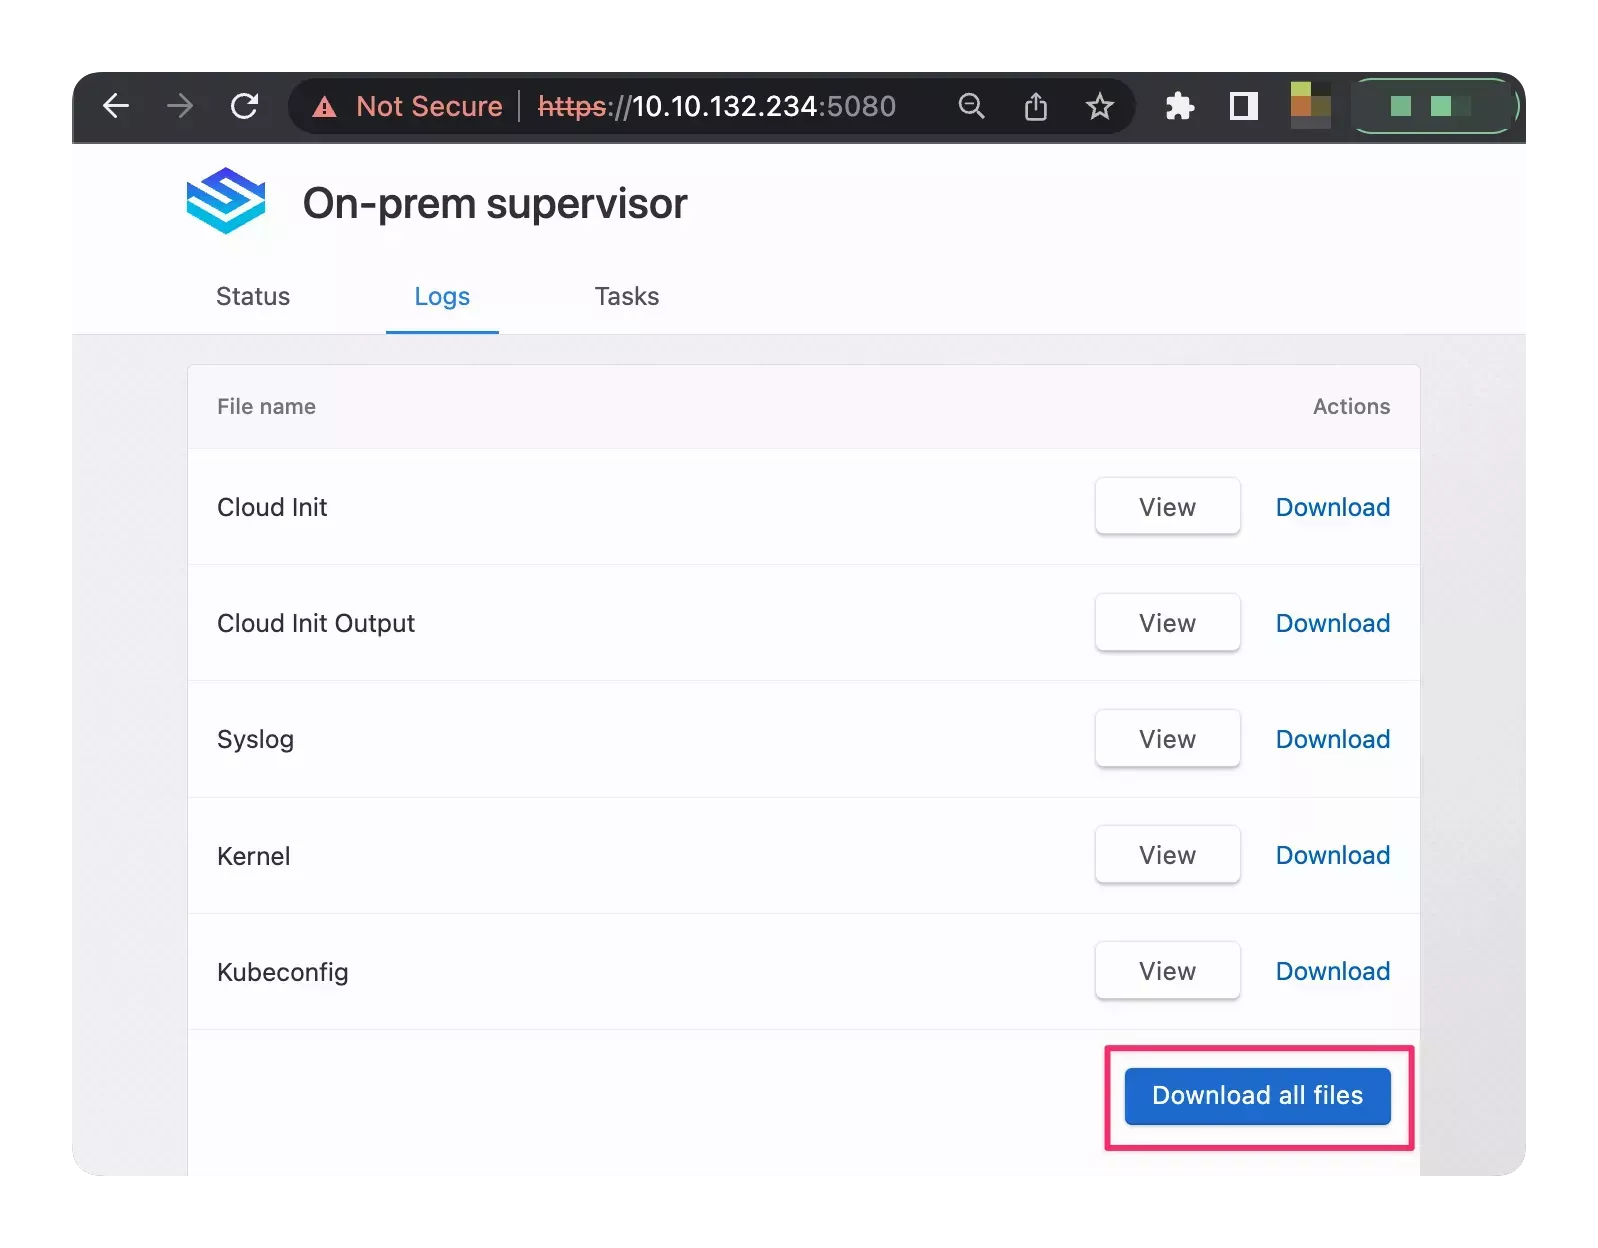
- If any of the statuses is not Done after waiting for a while, download the concerned logs. The screenshot below displays the Logs tab in the monitoring console.
-
Examine the log files for potential errors and root causes.
-
Check if the deployment failed due to a lack of outbound internet connectivity from the PCG installer VM. Use the following steps to check outbound internet connectivity:
-
SSH into the PCG installer VM using the username
ubuntuand the public SSH key you provided during the OVA import. -
Use the ping command to check if the VM can reach a public IP address. For example, ping well-known public IPs like Google's public DNS server (8.8.8.8) or any other public IP address.
ping 8.8.8.8 -
If you receive responses from the ping requests, it indicates that the VM has outbound internet connectivity.
-
Suppose you do not receive a response from the ping requests. In that case, go to the next step for further troubleshooting steps.
-
-
Check for any network restrictions or firewall rules in the data center's network settings that may block communication. Adjust the proxy settings, if applicable, to fix the connectivity. Alternatively, you can power down and delete the PCG installer VM and relaunch a new one in a network that supports outbound internet connections.
-
If the problem persists, email the log files to our support team at support@spectrocloud.com.
Scenario - PCG Cluster Provisioning Stalled or Failed
After you finish configuring the cloud gateway in Palette, the PCG cluster provisioning process may take up to 15 minutes to finish the PCG cluster deployment.
However, if the PCG cluster provisioning gets stuck, it could hint at incorrect cloud gateway configurations, unavailable IP addresses for the worker nodes, or the inability to perform a Network Time Protocol (NTP) sync.
Debug Steps
-
Log in to Palette.
-
Navigate to the left Main Menu and select Tenant Settings. From the Tenant settings menu, select Private Cloud Gateways.
-
Click on the newly provisioned PCG cluster to review its details.
-
Click on the Events tab.
-
Examine all events in the Events tab to identify specific errors or issues. Each event will have a status, timestamp, associated service name, and orchestration details.
-
If you encounter one of the following error events -
Failed to deploy image: Failed to create govomiClientorNo route to host, refer to the remediation steps outlined in the Scenario - Failed to Deploy Image or the Scenario - No Route to the Kubernetes API Server section, respectively. -
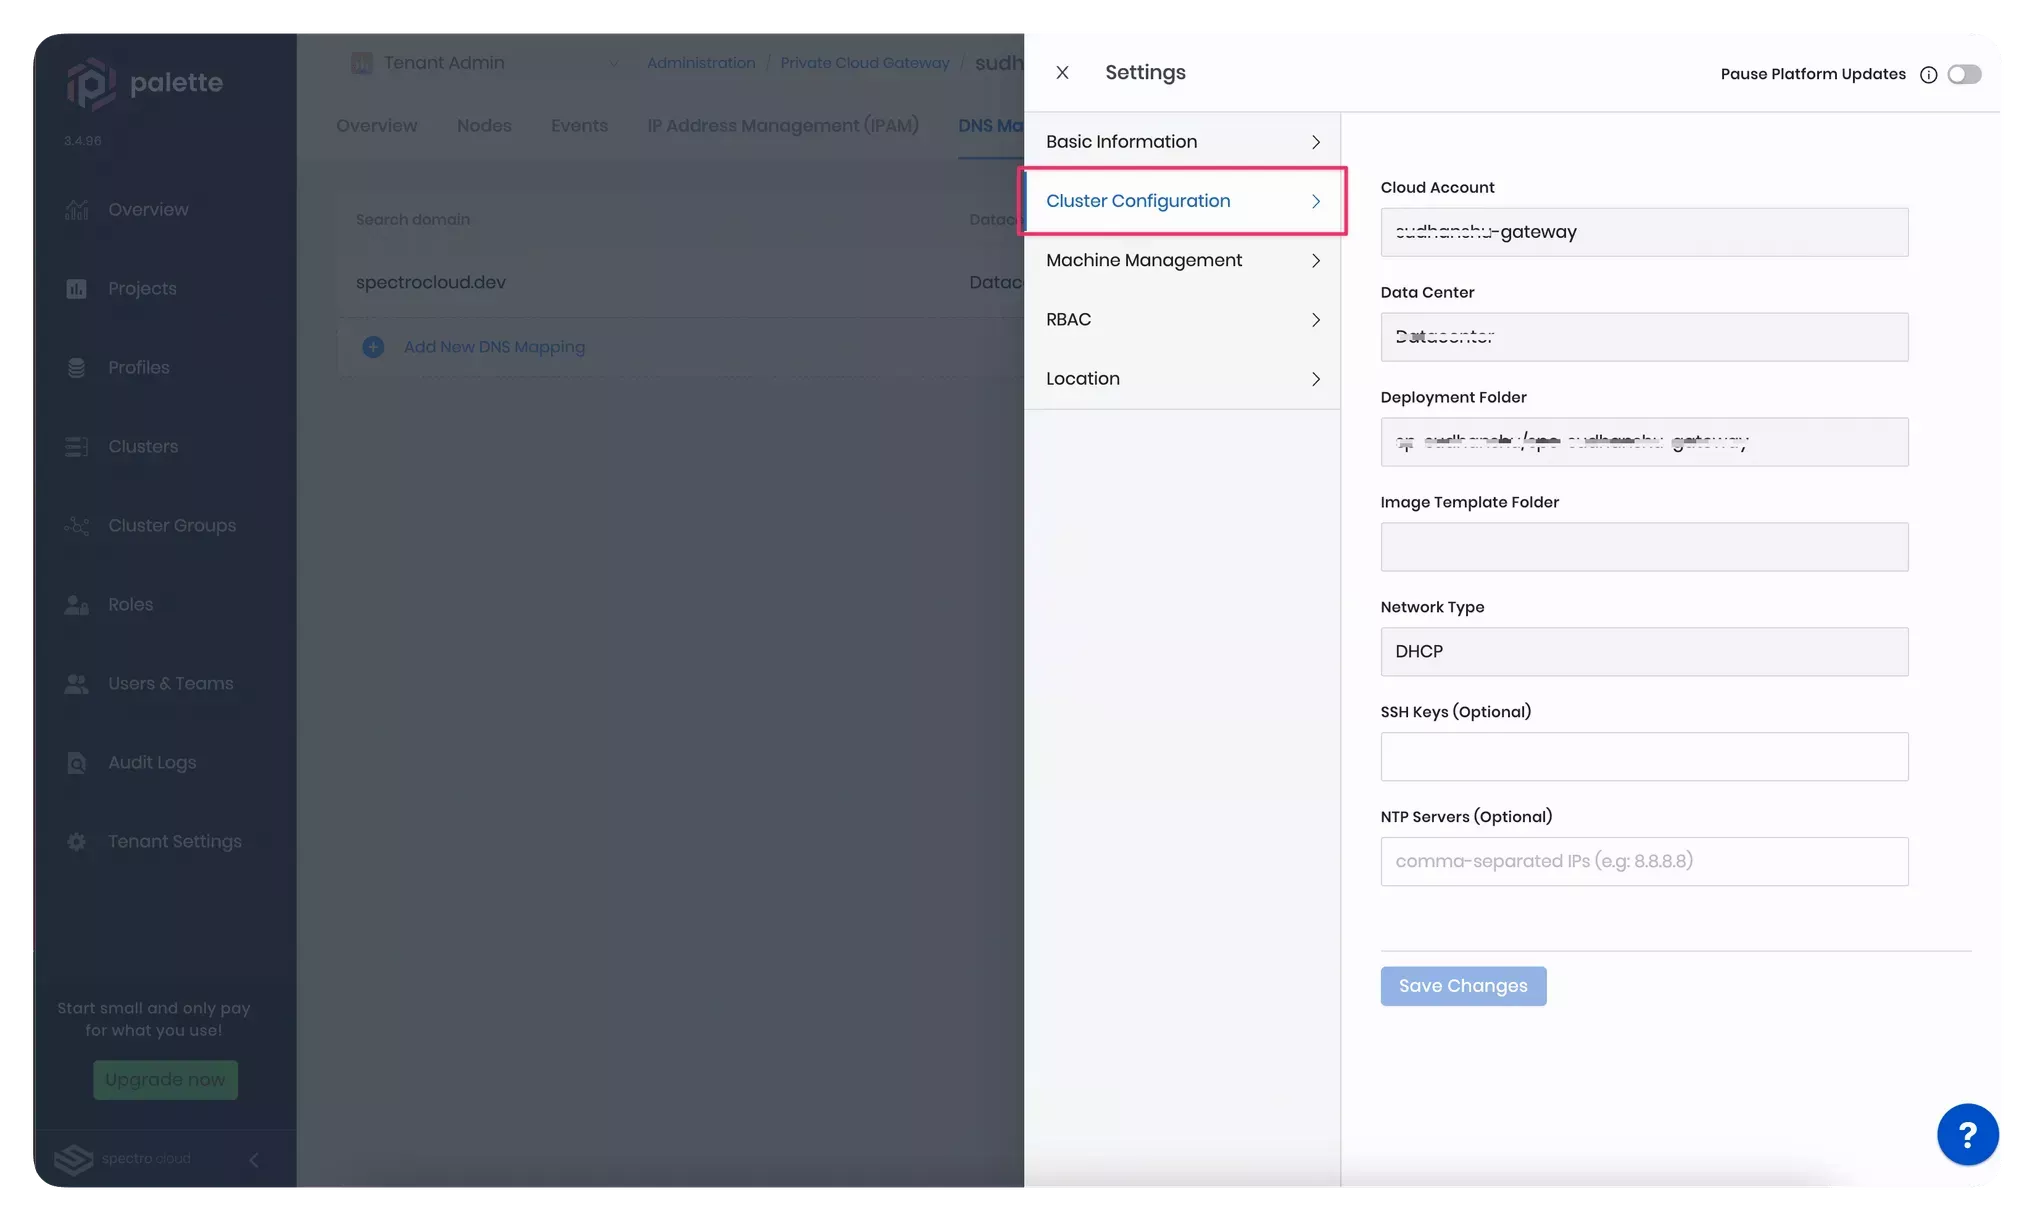
If you encounter errors other than the ones mentioned in the previous step, it is possible that the cluster configuration or the DNS settings are not set correctly. You can review and edit the cluster configuration in the cluster settings. The screenshot below highlights the cluster configuration section in the cluster settings blade.
-
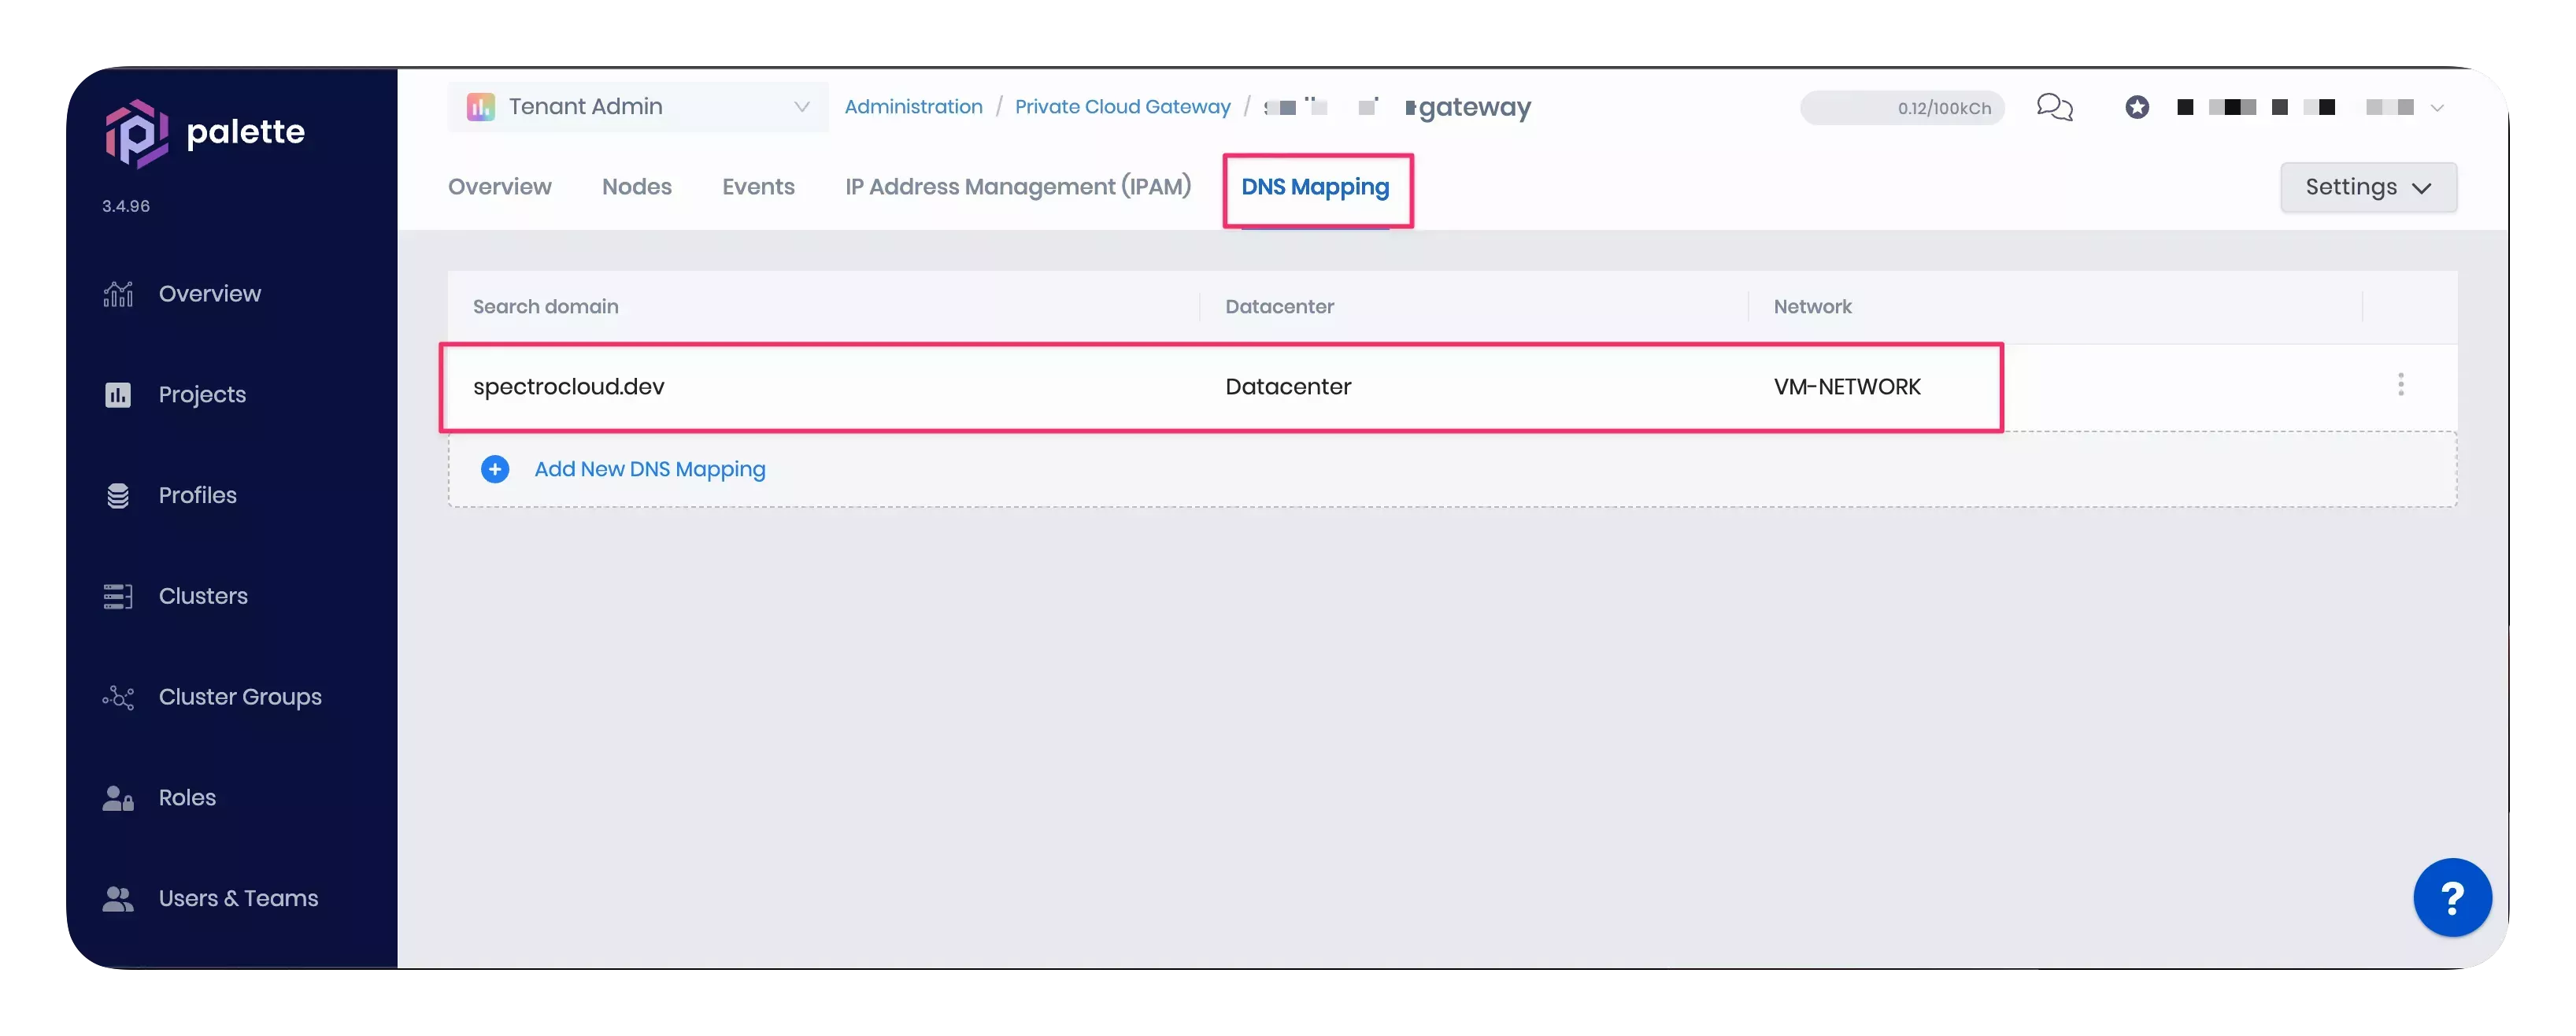
If the cluster settings look correct, ensure the search domain is correctly defined in the fault domain's DNS settings. The screenshot below highlights how you can review and edit the DNS mapping of an existing PCG cluster.
-
If the problem persists, download the cluster logs from Palette. The screenshot below will help you locate the button to download logs from the cluster details page.
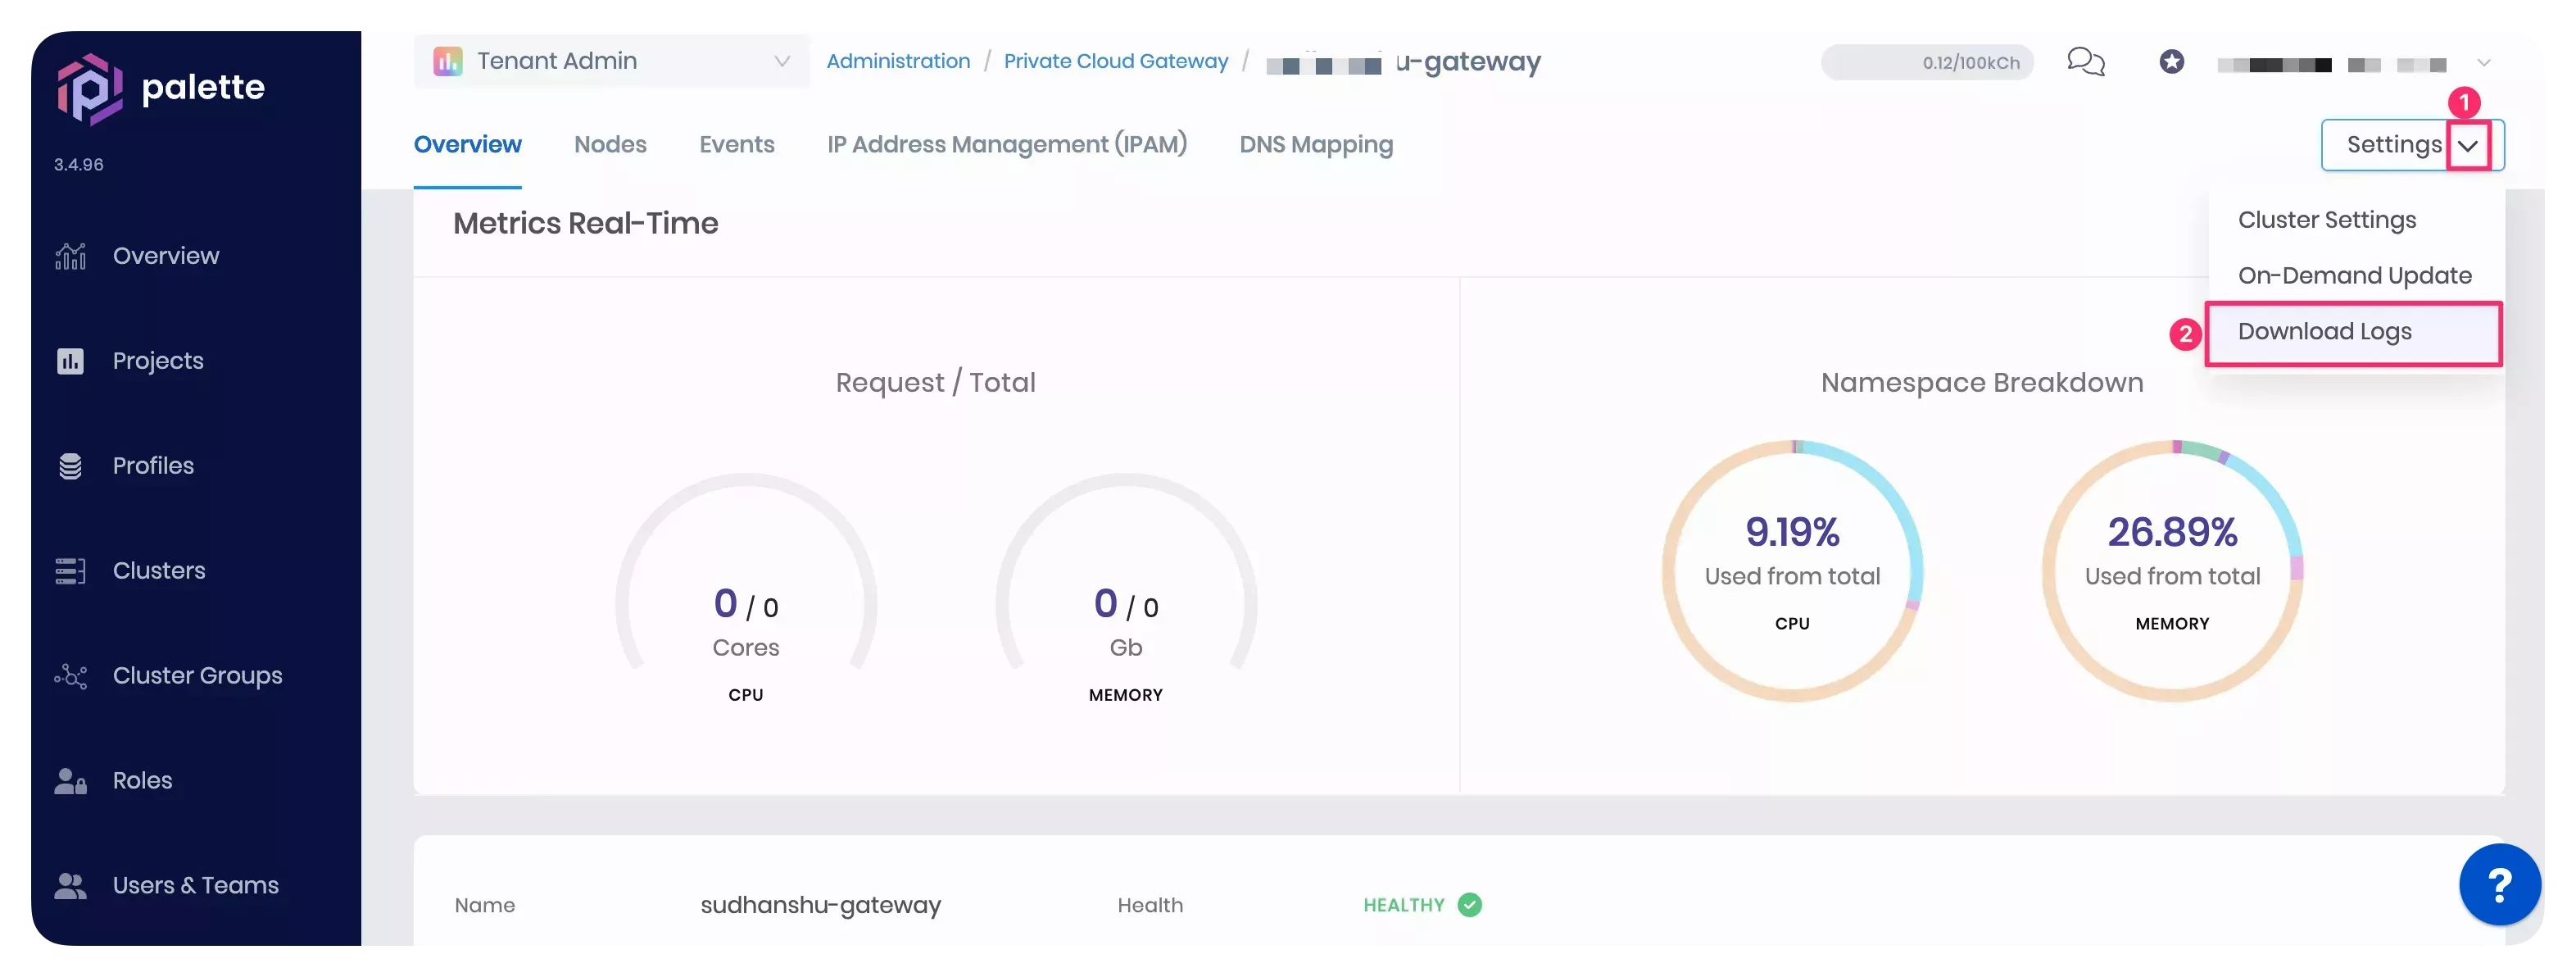
- Share the logs with our support team at support@spectrocloud.com.
Scenario - No Progress After Creating the Container Manager
After you finish configuring the cloud gateway in Palette, Palette starts provisioning the PCG cluster. The PCG cluster
provisioning process may take up to 15 minutes to finish the PCG cluster deployment. You can navigate to the cluster
details page and review the progressive events in the Events tab while the cluster is provisioning. Suppose the PCG
events display no progress after the specific event, Created container manager.
This issue can occur when the PCG installer VM fails to connect to the Palette API endpoint and download the installation artifacts. Another potential reason is that the PCG installer may not have the required permissions to store the installation artifacts in the spectro-templates folder. The installer downloads the images for the worker nodes and stores them in the spectro-templates folder during the cluster provisioning.
Debug Steps
-
Check the outbound internet connectivity from the PCG installer VM. Internet connectivity is needed to communicate with the Palette API endpoint,
https://api.spectrocloud.com, or your self-hosted Palette's API endpoint. Use the following steps to check the outbound internet connectivity:-
SSH into the PCG installer VM using the username
ubuntuand the public SSH key you provided during the OVA import. -
Use the ping command to check if the VM can reach a public IP address. For example, ping well-known public IPs like Google's public DNS server (8.8.8.8) or any other public IP address.
ping 8.8.8.8 -
If you receive responses from the ping requests, it indicates that the VM has outbound internet connectivity.
-
Suppose you do not receive a response from the ping requests. In that case, it indicates the machine does not have outbound internet connectivity. Go to the next step for further troubleshooting steps.
-
-
Check for any network restrictions or firewall rules in the data center's network settings that may block communication. Adjust the proxy settings, if applicable, to fix the connectivity. Alternatively, you can power down and delete the PCG installer VM and relaunch a new one in a network that supports outbound internet connections.
-
Ensure you have the necessary write permissions for the spectro-templates folder in the data center environment.
Scenario - Failed to Deploy Image
After you finish configuring the cloud gateway in Palette, Palette starts provisioning the PCG cluster. The PCG cluster
provisioning process may take up to 15 minutes to finish the PCG cluster deployment. You can navigate to the cluster
details page and review the progressive events in the Events tab while the cluster is provisioning. Suppose one of
the events displays the Failed to deploy image: Failed to create govomiClient error.
The error can occur if there is a preceding "https://" or "http://" string in the vCenter server URL or if the PCG installer VM lacks outbound internet connectivity.
Debug Steps
-
Log in to Palette.
-
Navigate to the Tenant Settings > Private Cloud Gateways page.
-
Click on the newly provisioned PCG cluster to review its details.
-
Click on the Events tab.
-
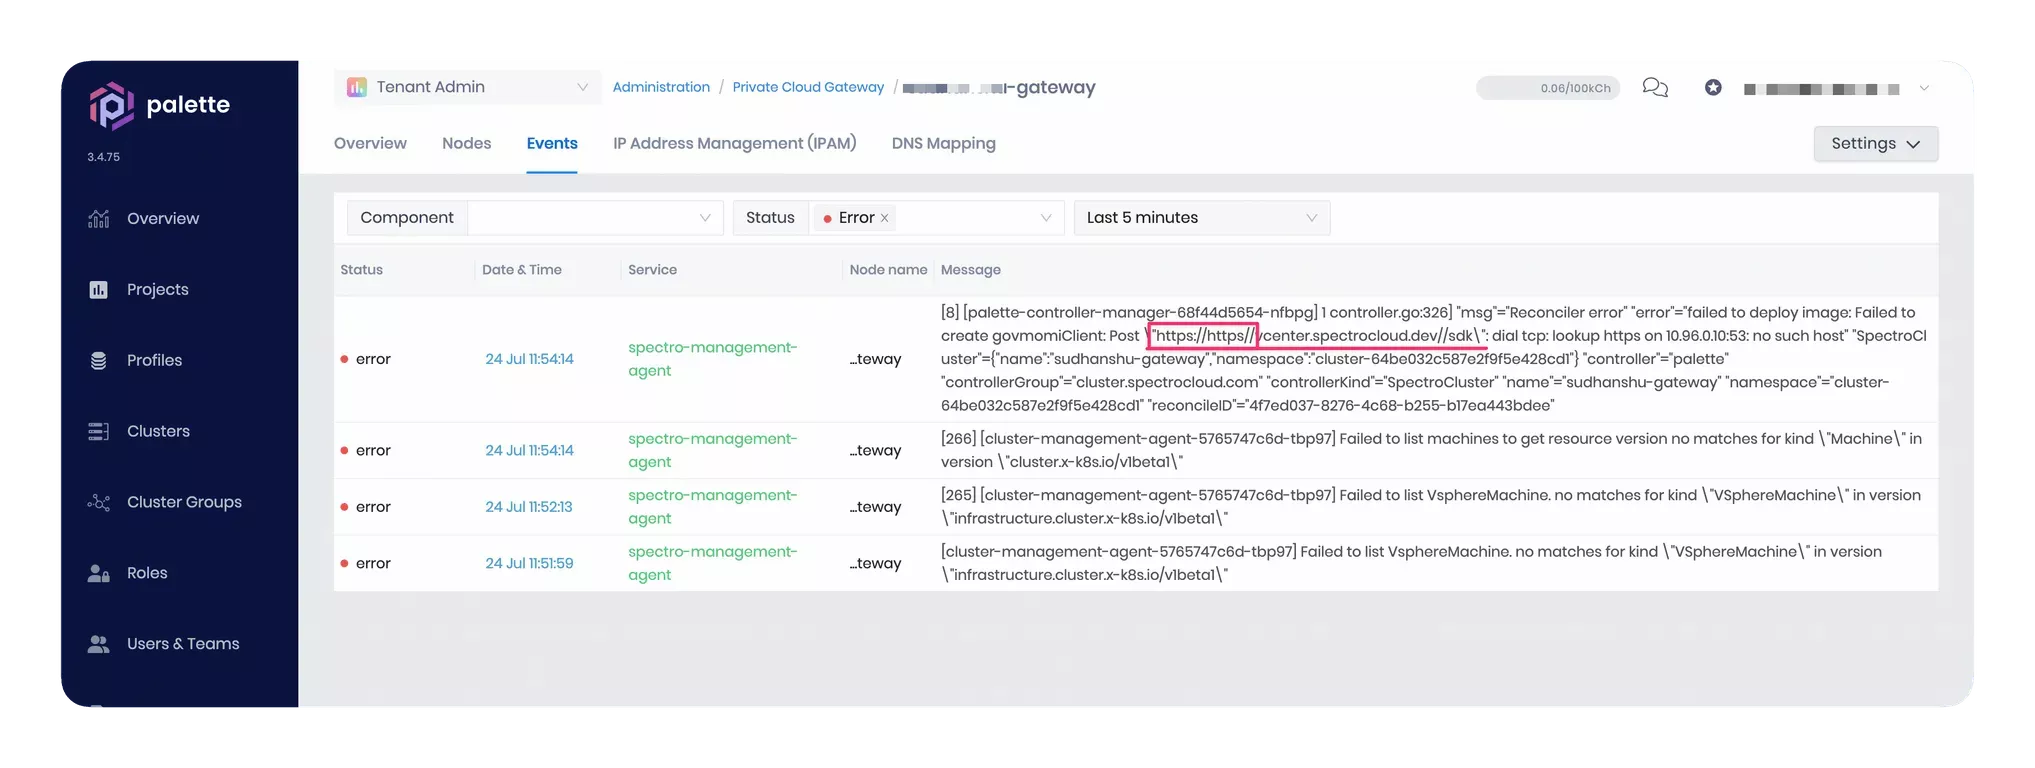
In the Events tab, search the
Failed to deploy image: Failed to create govomiClienterror. If the error has occurred due to a preceding "https://" or "http://" string in the vCenter server URL, the error details will mention "https://" twice, as highlighted in the screenshot below.
-
Palette does not allow you to edit the vCenter server URL you used for authentication. Therefore, you must redeploy the PCG cluster with the following considerations:
-
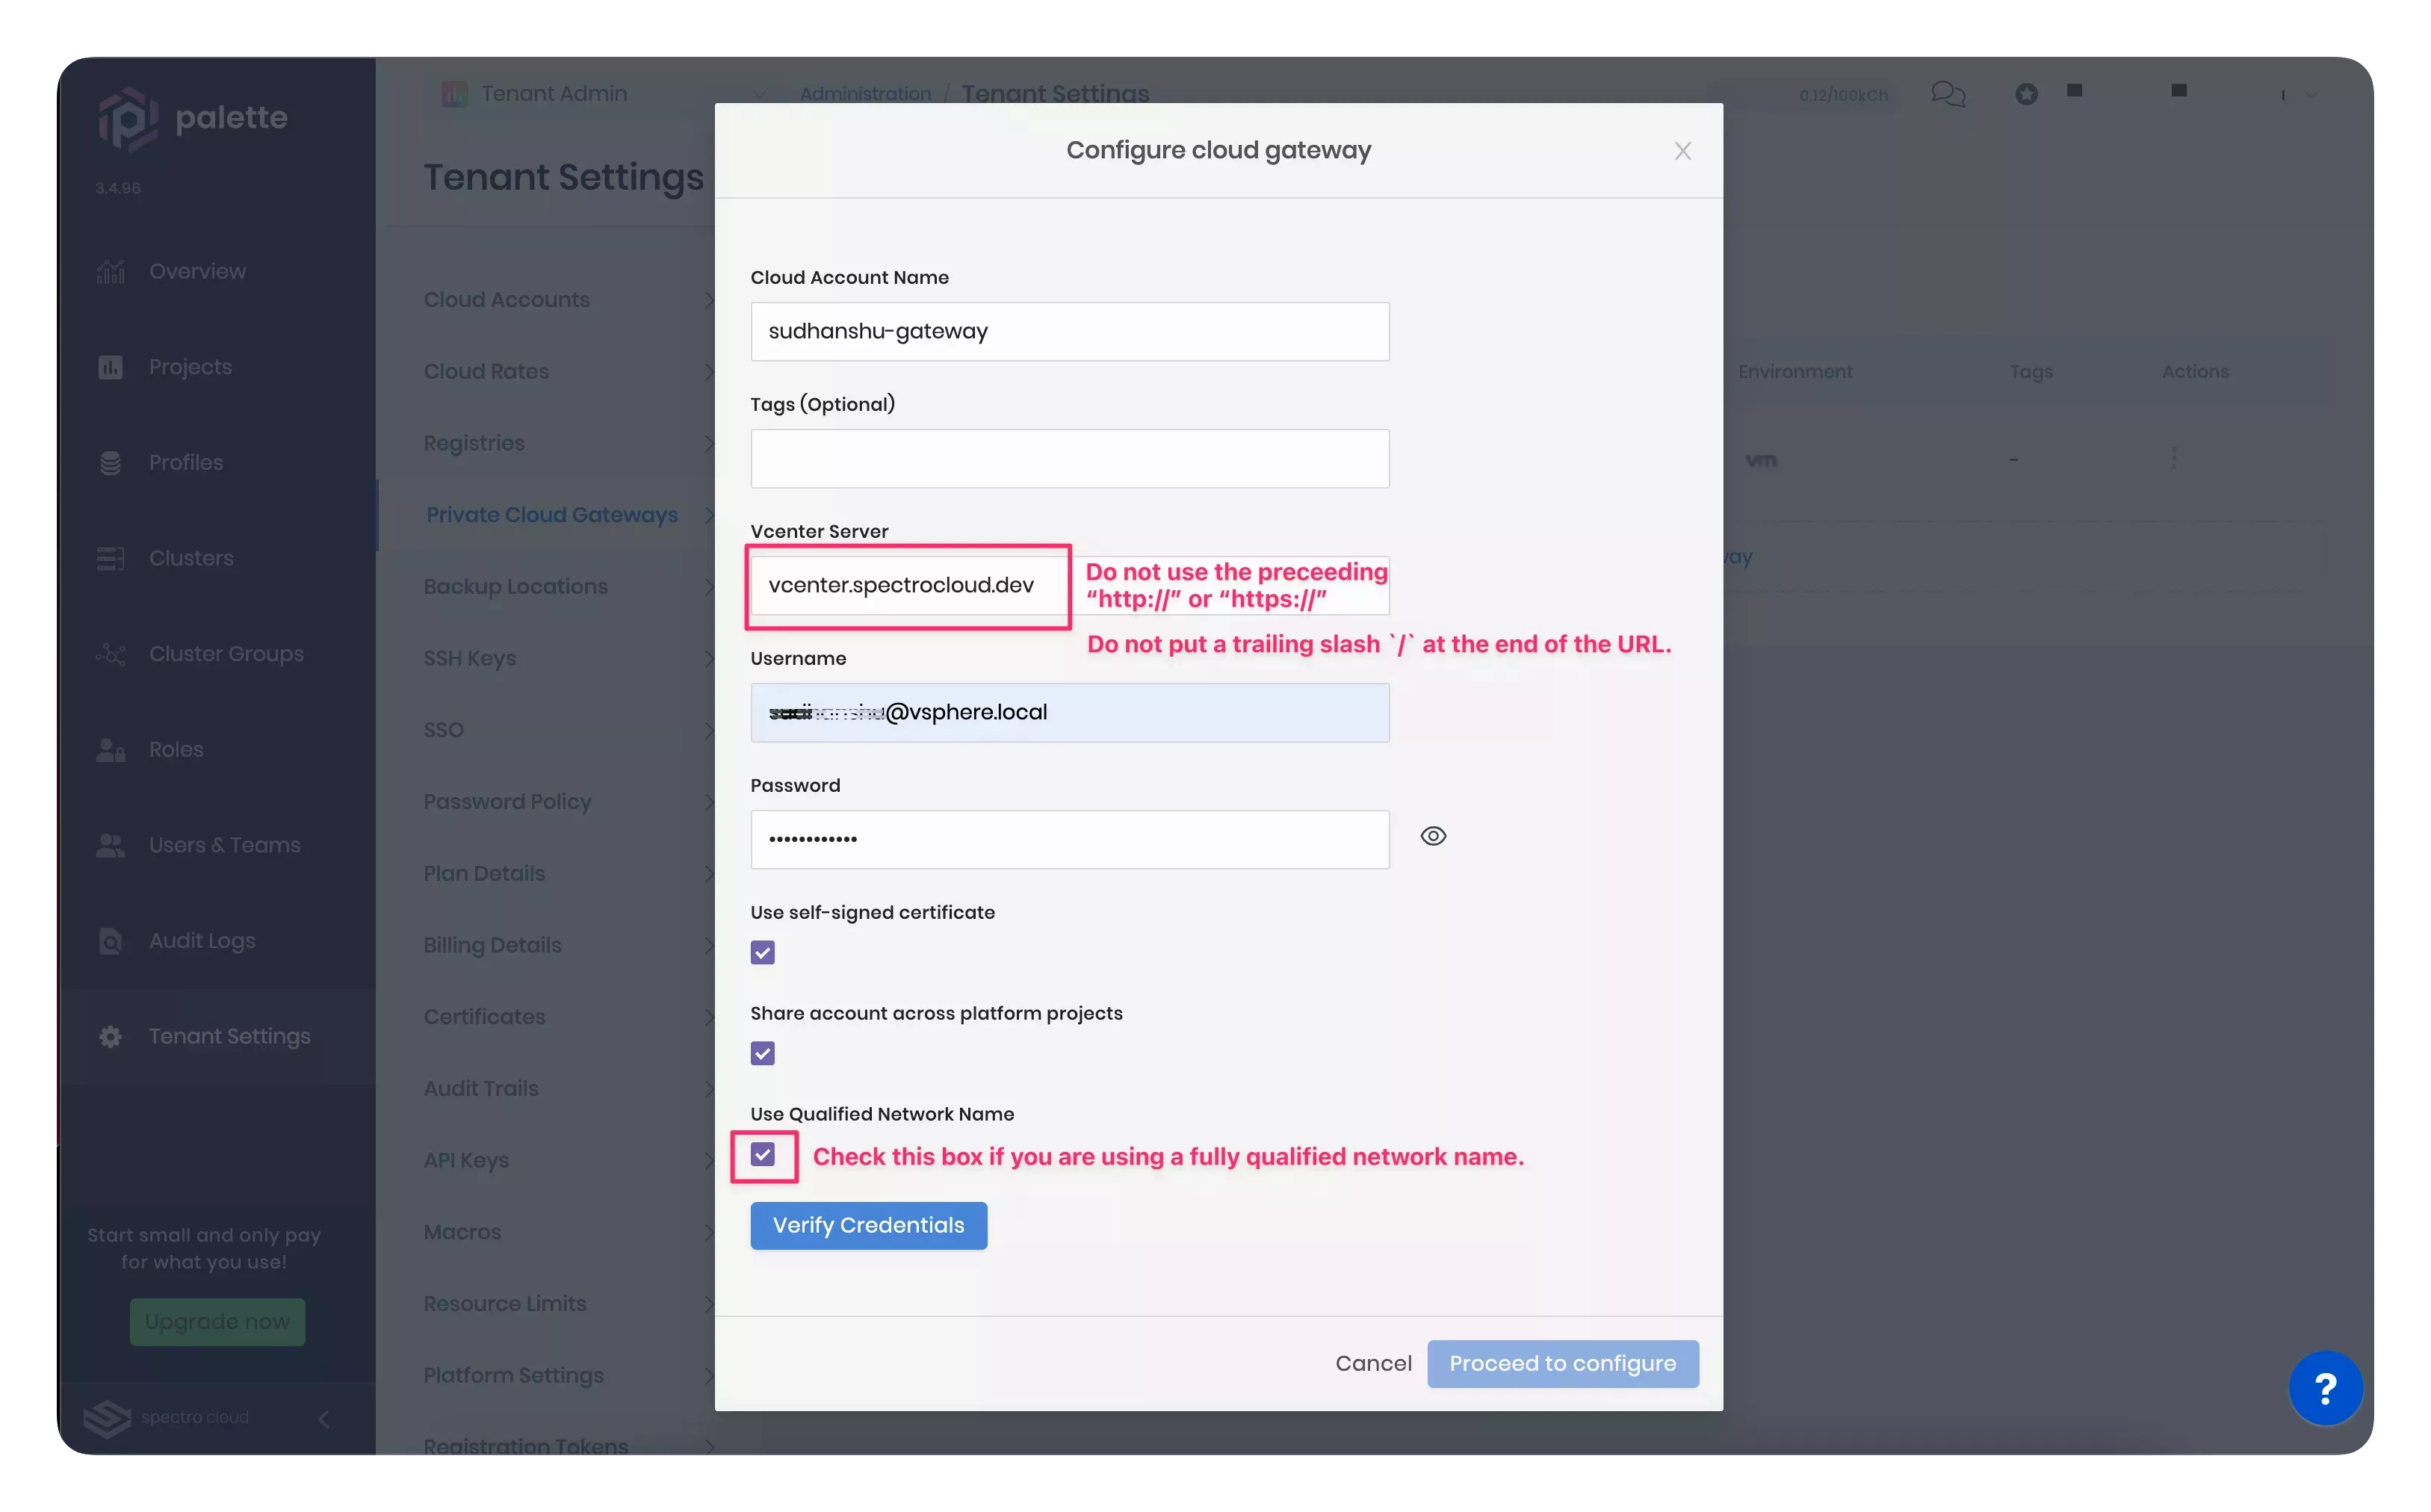
Check the VMware vCenter server field. The field expects a URL or an IP address for authentication. If you use a URL, ensure the URL does not include the preceding "http://" or "https://" string. Also, select the Use Qualified Network Name checkbox if you use a URL. The screenshot below displays the vCenter server field you configure in Palette.
-
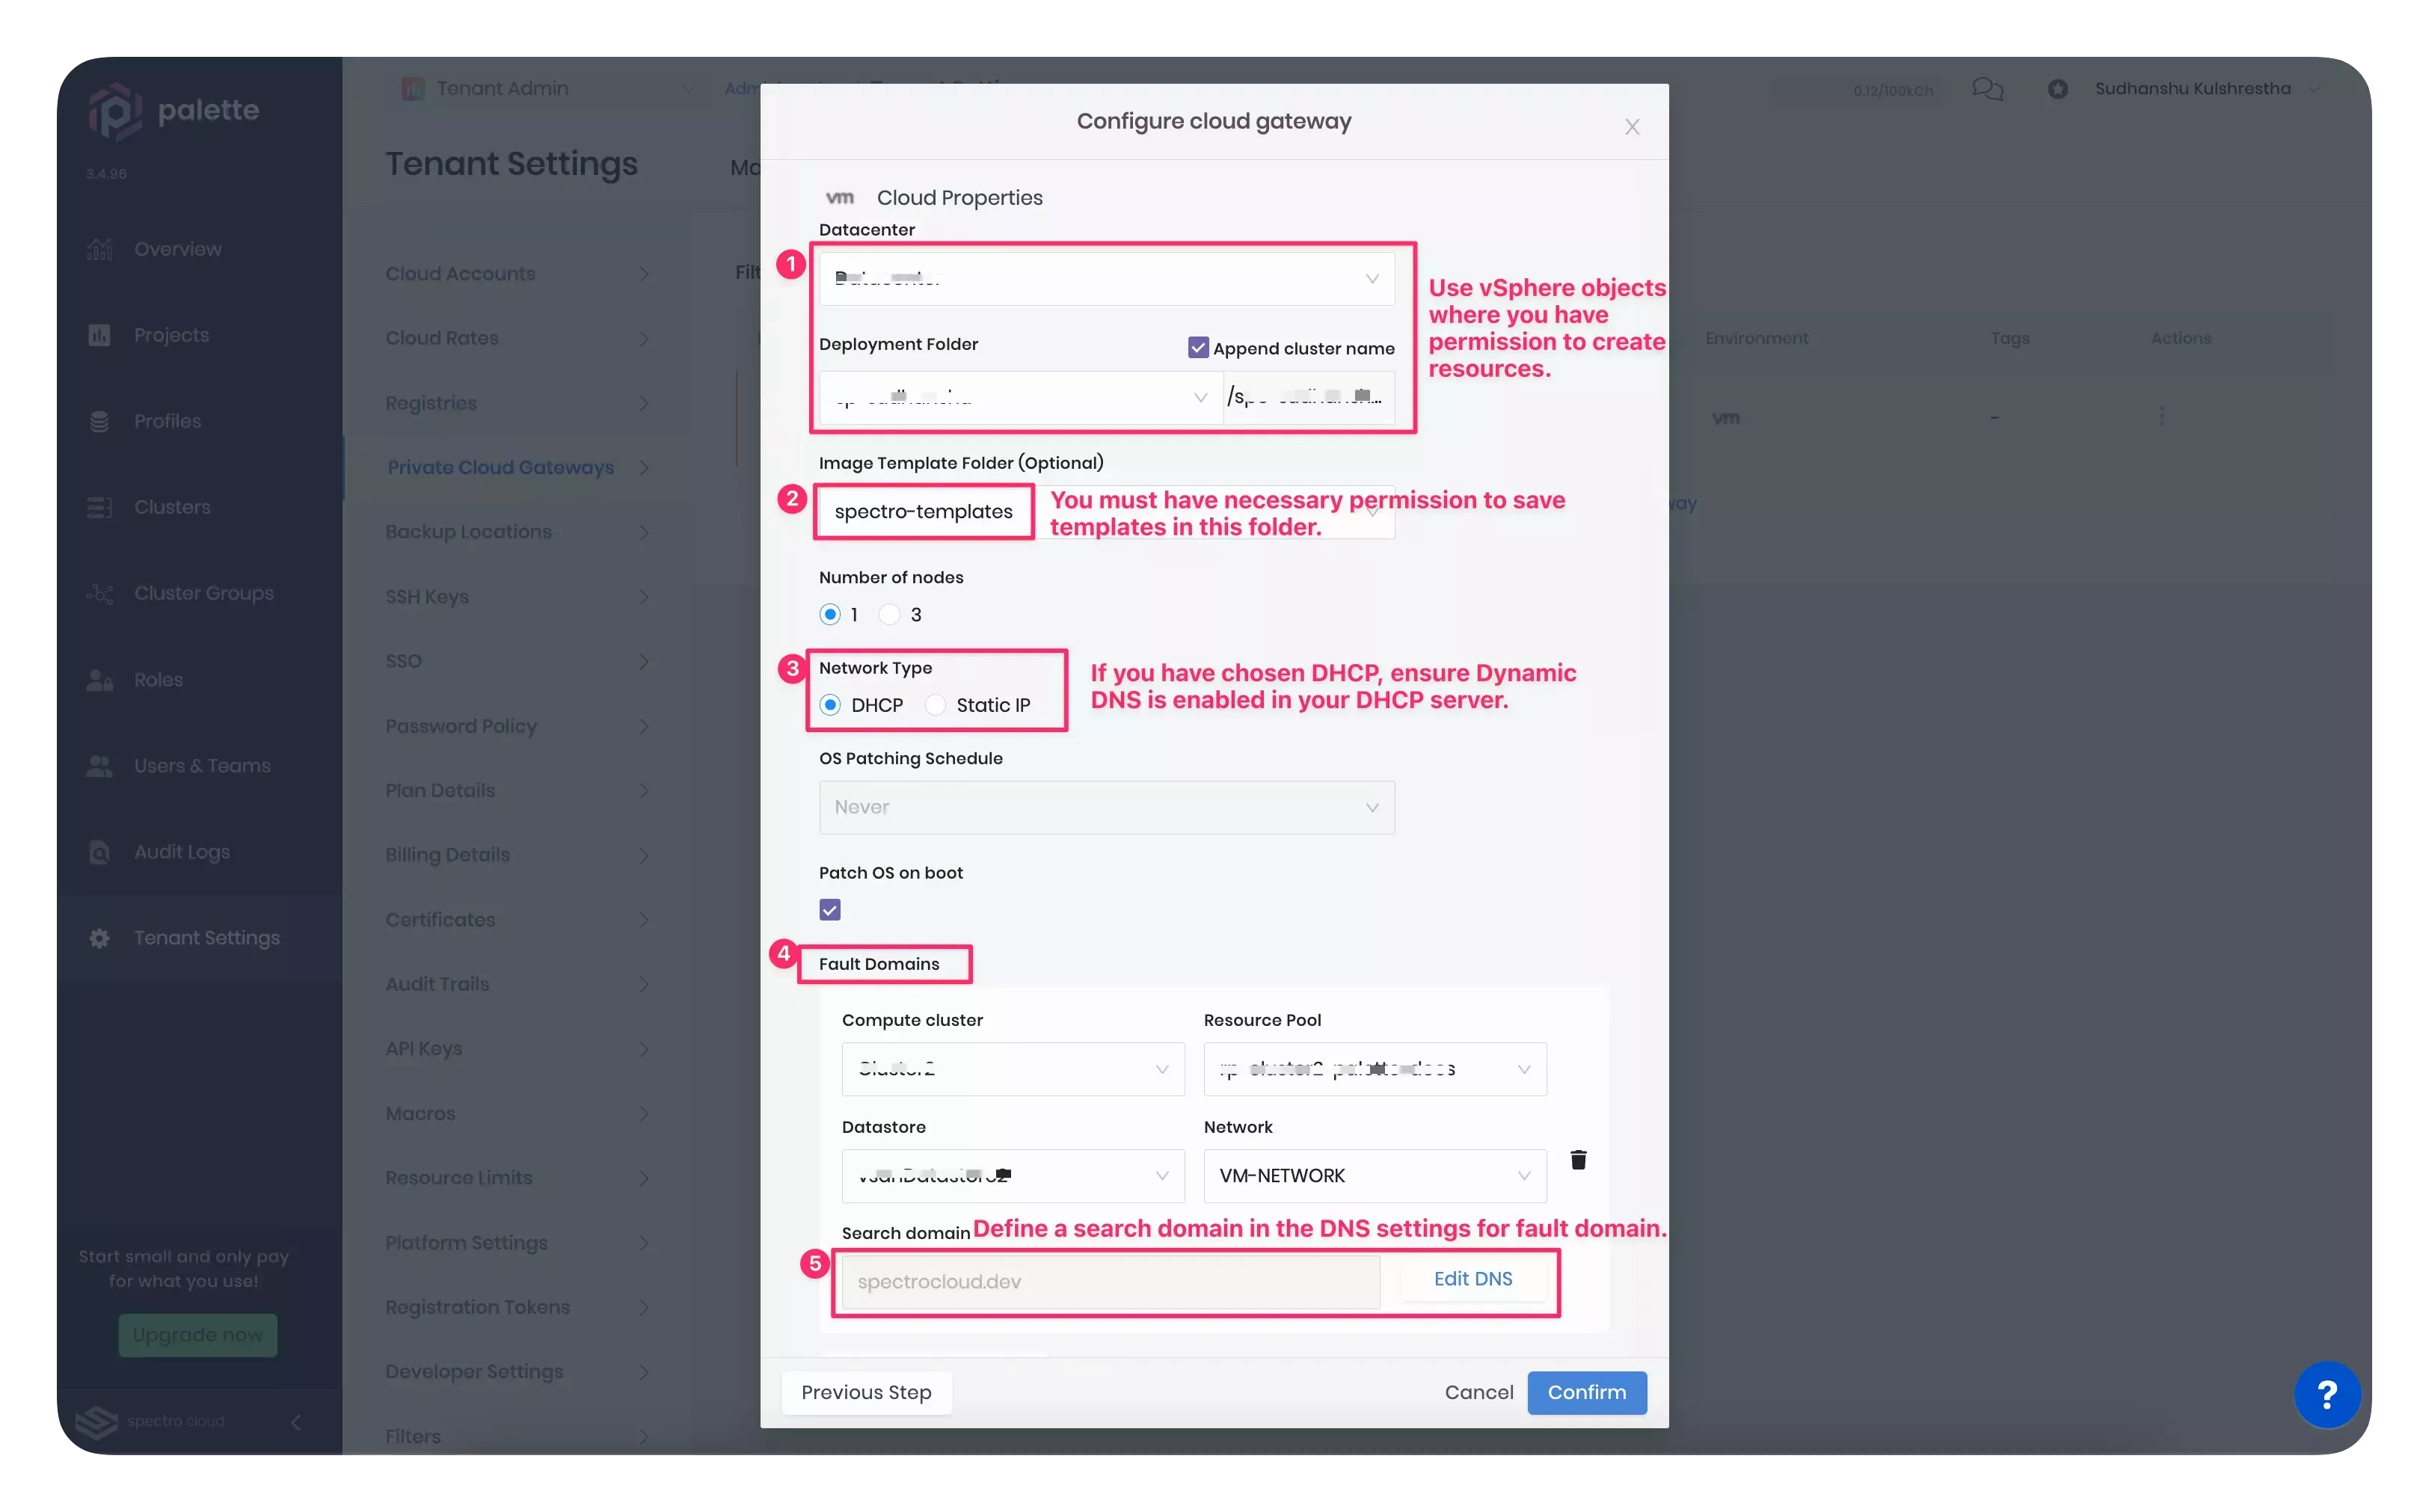
Ensure the VMware cloud properties are specified correctly in the cloud gateway configuration. You must use the vSphere data center and the folder where you have permission to create resources.
-
If you choose the DHCP option, enable the Dynamic DNS in your DNS server. The screenshot below displays the VMware cloud properties you configure in Palette.
-
-
If the steps above do not resolve the issue, check if the deployment failed due to a lack of outbound internet connectivity from the PCG installer VM. Use the following steps to check outbound internet connectivity:
-
SSH into the PCG installer VM using the username
ubuntuand the public SSH key you provided during the OVA import. -
Use the ping command to check if the VM can reach a public IP address. For example, ping well-known public IPs like Google's public DNS server (8.8.8.8) or any other public IP address.
ping 8.8.8.8 -
If you receive responses from the ping requests, it indicates that the VM has outbound internet connectivity.
-
Suppose you do not receive a response from the ping requests. In that case, it indicates the machine does not have outbound internet connectivity. Go to the next step for further troubleshooting steps.
-
-
Check for any network restrictions or firewall rules in the data center's network settings that may block communication. Adjust the proxy settings, if applicable, to fix the connectivity. Alternatively, you can power down and delete the PCG installer VM and relaunch a new one in a network that supports outbound internet connections.
Scenario - No Route to the Kubernetes API Server
After you finish configuring the cloud gateway in Palette, Palette starts provisioning the PCG cluster. The PCG cluster
provisioning process may take up to 15 minutes to finish the PCG cluster deployment. You can navigate to the cluster
details page and review the progressive events in the Events tab while the cluster is provisioning. Suppose one of
the events displays the No route to host. error.
The error indicates an issue with the PCG cluster nodes attempting to connect to the cluster's Kubernetes API server. This issue can occur due to improper networking configuration or an error in the cloud-init process.
Debug Steps
-
Check the data center network settings. Ensure no network restrictions, firewalls, or security groups block communication between the nodes and the API server.
-
If you use the DHCP allocation scheme, check that the DHCP service is available on the DHCP server. Restart the service if it's not in an active state.
-
If you use the DHCP allocation scheme, ensure Dynamic DNS is enabled in the DHCP server. A Dynamic DNS is only required if you are using DHCP. Dynamic DNS is not required for a static IP allocation scheme.
-
Check the Kubernetes API server status. The Kubernetes API server must be active and healthy on the control plane node. Use the following steps to check the status.
-
Switch to Palette.
-
Navigate to the Tenant Settings > Private Cloud Gateways page.
-
Click on the newly provisioned PCG cluster to review its details.
-
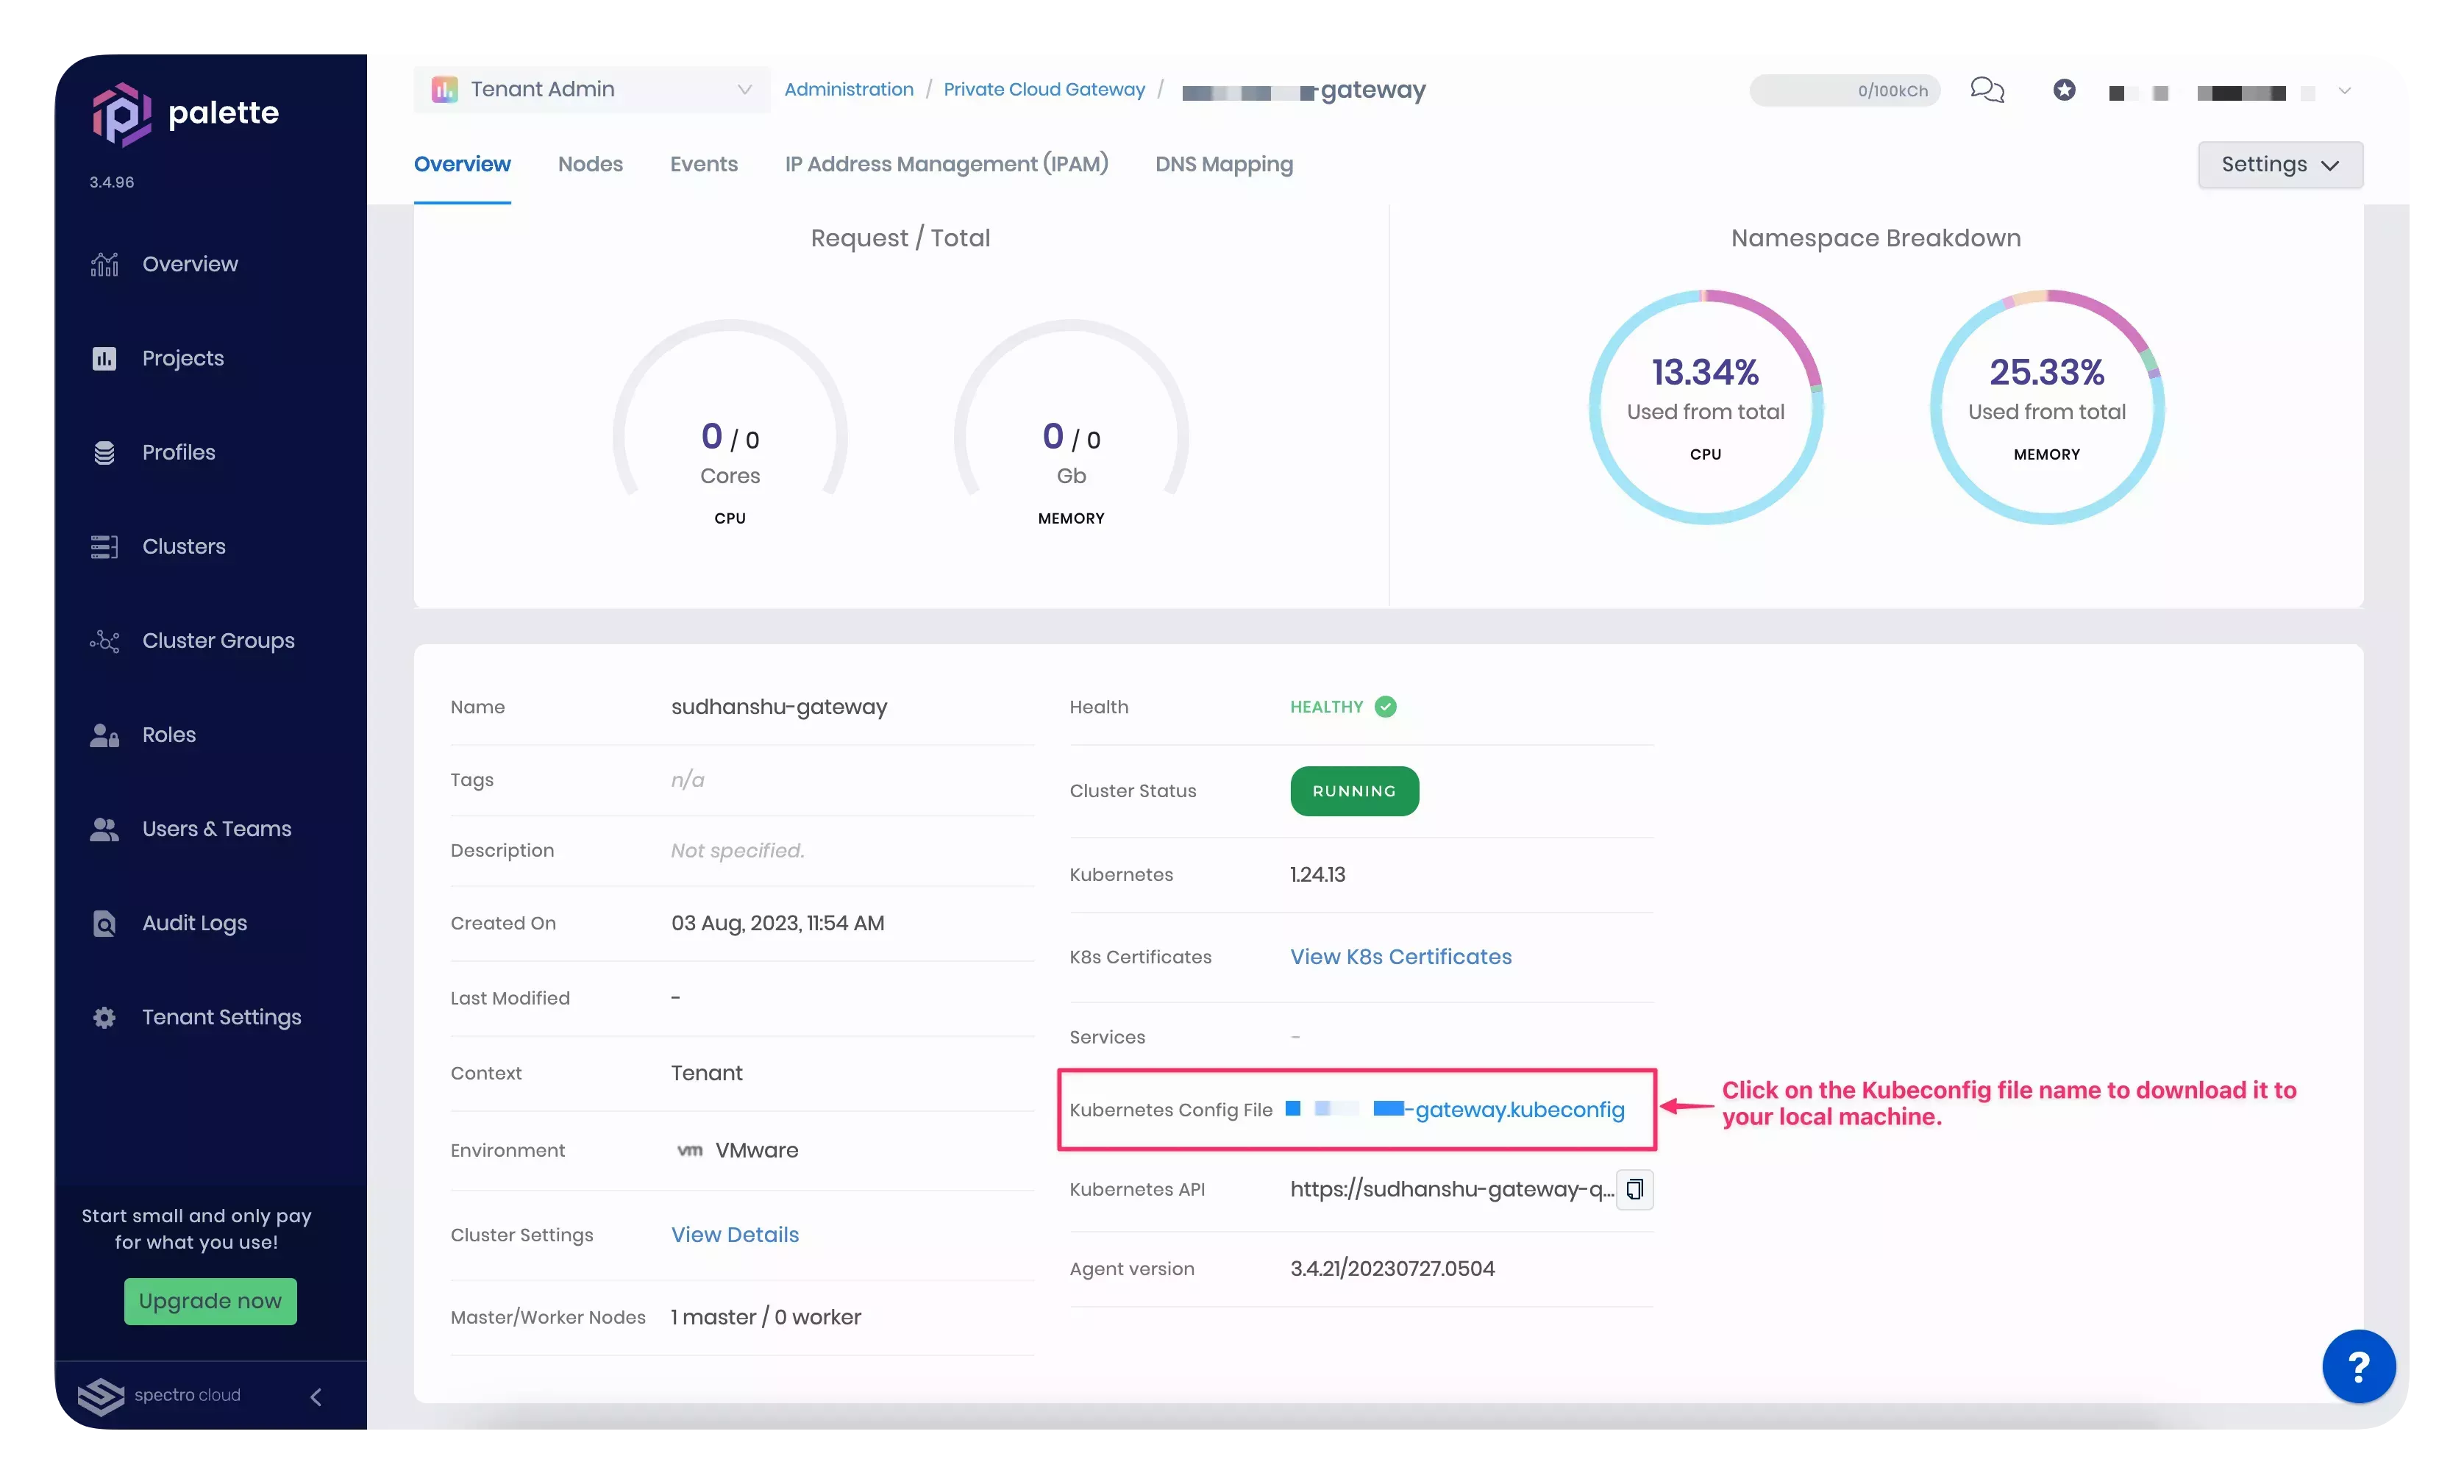
Download the PCG cluster's kubeconfig file from the Overview tab. Click on the kubeconfig file name to download it to your local machine, as highlighted in the screenshot below.
-
After you download the PCG cluster's kubeconfig file, use the following commands to make a GET request to one of the Kubernetes API server endpoints,
/readyzor'/livez'. Replace[path_to_kubeconfig]placeholder with the path to the kubeconfig file you downloaded in the previous step. A status codeokor200indicates the Kubernetes API server is healthy.
kubectl --kubeconfig [path_to_kubeconfig] get --raw='/readyz' -
If the previous command does not return an
ok, use the command below to make a verbose GET request by specifying theverboseparameter. The output will display the individual health checks so you can decide on further debugging steps based on the failed checks.
kubectl --kubeconfig [path_to_kubeconfig] get --raw='/readyz?verbose'
-
-
If the PCG installer VM has a public IP address assigned, SSH into the VM using the username
ubuntuand the public SSH key you provided during the OVA import. -
Navigate to the /var/log directory containing the log files.
-
Examine the cloud-init and system logs for potential errors or warnings.
Scenario - Permission Denied to Provision
After you finish configuring the cloud gateway in Palette, Palette starts provisioning the PCG cluster. The PCG cluster
provisioning process may take up to 15 minutes to finish the PCG cluster deployment. You can navigate to the cluster
details page and review the progressive events in the Events tab while the cluster is provisioning. Suppose one of
the events displays the Permission to perform this operation denied error.
You must have the necessary permissions to provision a PCG cluster in the VMware environment. If you do not have adequate permissions, the PCG cluster provisioning will fail, and you will get the above-mentioned error in the events log.
Debug Steps
-
Ensure you have all the permissions listed in the VMware Privileges section before proceeding to provision a PCG cluster.
-
Contact your VMware administrator if you are missing any of the required permissions.
-
Delete the existing PCG cluster and redeploy a new one so that the new permissions take effect.