Deploy a Custom Pack
Custom add-on packs allow you to deploy Kubernetes applications in clusters and reuse them in multiple deployments. This ensures uniformity across your clusters. The primary use cases for creating custom packs are:
-
Aggregated configuration and application dependencies simplify deployment and consumption.
-
Open-source contributors can add new Kubernetes applications to a custom add-on pack for the community.
-
Enterprises can add proprietary Kubernetes applications to a custom add-on pack.
In this tutorial, you will create a custom add-on pack to package a sample Kubernetes application, Hello Universe, and deploy that application to a cluster. You will learn to create the pack in two ways, using manifest files and Helm charts.
After defining the custom pack, you will set up a registry server, publish the pack to that registry, and configure the registry server in Palette. Lastly, you will create a cluster profile that contains your custom pack and apply the profile to a cluster using either Palette or Terraform.
Prerequisites
To complete the tutorial, you will need the following items:
-
A Spectro Cloud account. Visit https://console.spectrocloud.com to create an account.
-
Tenant admin access to Palette for the purpose of adding a new registry server.
-
A cloud account, such as AWS, Azure, or GCP, added to your Palette project settings.
-
An SSH key created in the region where you will deploy the cluster.
-
Docker Desktop installed on your local machine to start the tutorials container.
-
Basic knowledge of Docker containers and Kubernetes manifest file attributes.
Set Up the Tutorial Environment
You will work in a Docker container pre-configured with the necessary tools for this tutorial. However, you can practice
this tutorial in any linux/amd64 or x86_64 environment by installing the
necessary tools and cloning the
GitHub repository that contains the tutorial files. Here are the steps to
start the tutorials container.
Start the Docker Desktop on your local machine and ensure the daemon is available by issuing a command to list the currently active containers.
docker ps
Download the ghcr.io/spectrocloud/tutorials:1.0.4 image to your local machine. The Docker image includes the necessary
tools.
docker pull ghcr.io/spectrocloud/tutorials:1.0.4
Next, start the container, and open a bash session into it.
docker run --name tutorialContainer --publish 7000:5000 --interactive --tty ghcr.io/spectrocloud/tutorials:1.0.4 bash
If port 7000 on your local machine is unavailable, you can use any other port of your choice.
Wait to exit the container until the tutorial is complete. Otherwise, you may lose your progress.
Tools and Starter Code
After opening a bash session in the active container, verify that the tools necessary for this tutorial are installed.
Check the Spectro CLI version.
spectro version
Check the Spectro registry server version.
registry --version
Check the Terraform version.
terraform --version
In addition to these tools, the tutorials container has other tools, such as ngrok, git, and nano.
Examine the directories that pertain to the current tutorial in the root directory.
.
├── packs
│   └── hello-universe-pack             # Contains the pack files
└── terraform
    └── pack-tf                         # Contains the .tf files for creating Spectro Cloud resources
The packs directory contains the pack files. The terraform directory contains the Terraform files used to create Spectro Cloud resources, which you will use later in this tutorial.
Build a Pack
Building a custom pack requires defining specific files. As outlined in the Adding Add-on Packs guide, you can define a custom pack in two ways: using manifest files or Helm charts. The file structure varies for manifest-based packs and Helm chart-based packs. Below is the reference file structure for each:
- Manifests-based pack
- Helm charts-based pack
.
├── pack.json           # Mandatory
├── values.yaml         # Mandatory
├── manifests           # Mandatory
    ├── manifest-1.yaml
    ├── manifest-2.yaml
│   └── manifest-3.yaml
├── logo.png            # Mandatory.
└── README.md           # Optional.
.
├── pack.json           # Mandatory
├── values.yaml         # Mandatory. Pack-level values.yaml file.
├── charts              # Mandatory
│   ├── chart-1         # Can have nested charts
│   │   ├── Chart.yaml
│   │   ├── templates
│   │   │   ├── template-1.yaml
│   │   │   └── template-2.yaml
│   │   └── values.yaml # Chart-level values.yaml file.
│   ├── chart-1.tgz
│   ├── chart-2
│   │   ├── Chart.yaml
│   │   ├── templates
│   │   │   ├── template-1.yaml
│   │   │   └── template-2.yaml
│   │   └── values.yaml # Chart-level values.yaml file.
│   └── chart-2.tgz
├── logo.png            # Mandatory.
└── README.md           # Optional.
To simplify this tutorial, we provide you with the manifest file for the Hello Universe application in the packs/hello-universe-pack folder. Change the directory to the packs/hello-universe-pack folder.
cd /packs/hello-universe-pack
Ensure you have the following files in the current directory.
.
├── pack.json           # Mandatory
├── values.yaml         # Mandatory
├── manifests           # Mandatory
│   └── hello-universe.yaml
├── logo.png            # Mandatory.
└── README.md           # Optional.
Pack File Structure
Go ahead and review each of the following five files in the pack.
-
pack.json - This file contains the pack metadata such as
addonType,cloudTypes, and thekubeManifestsarray that contains the list of manifest files:layer,name, andversion. Refer to the JSON Schema for a list of attributes and respective data types. The schema validation will happen when you push a pack to the registry.{
"addonType": "app services",
"cloudTypes": ["all"],
"displayName": "Hello Universe",
"kubeManifests": ["manifests/hello-universe.yaml"],
"layer": "addon",
"name": "hellouniverse",
"version": "1.0.0"
}
-
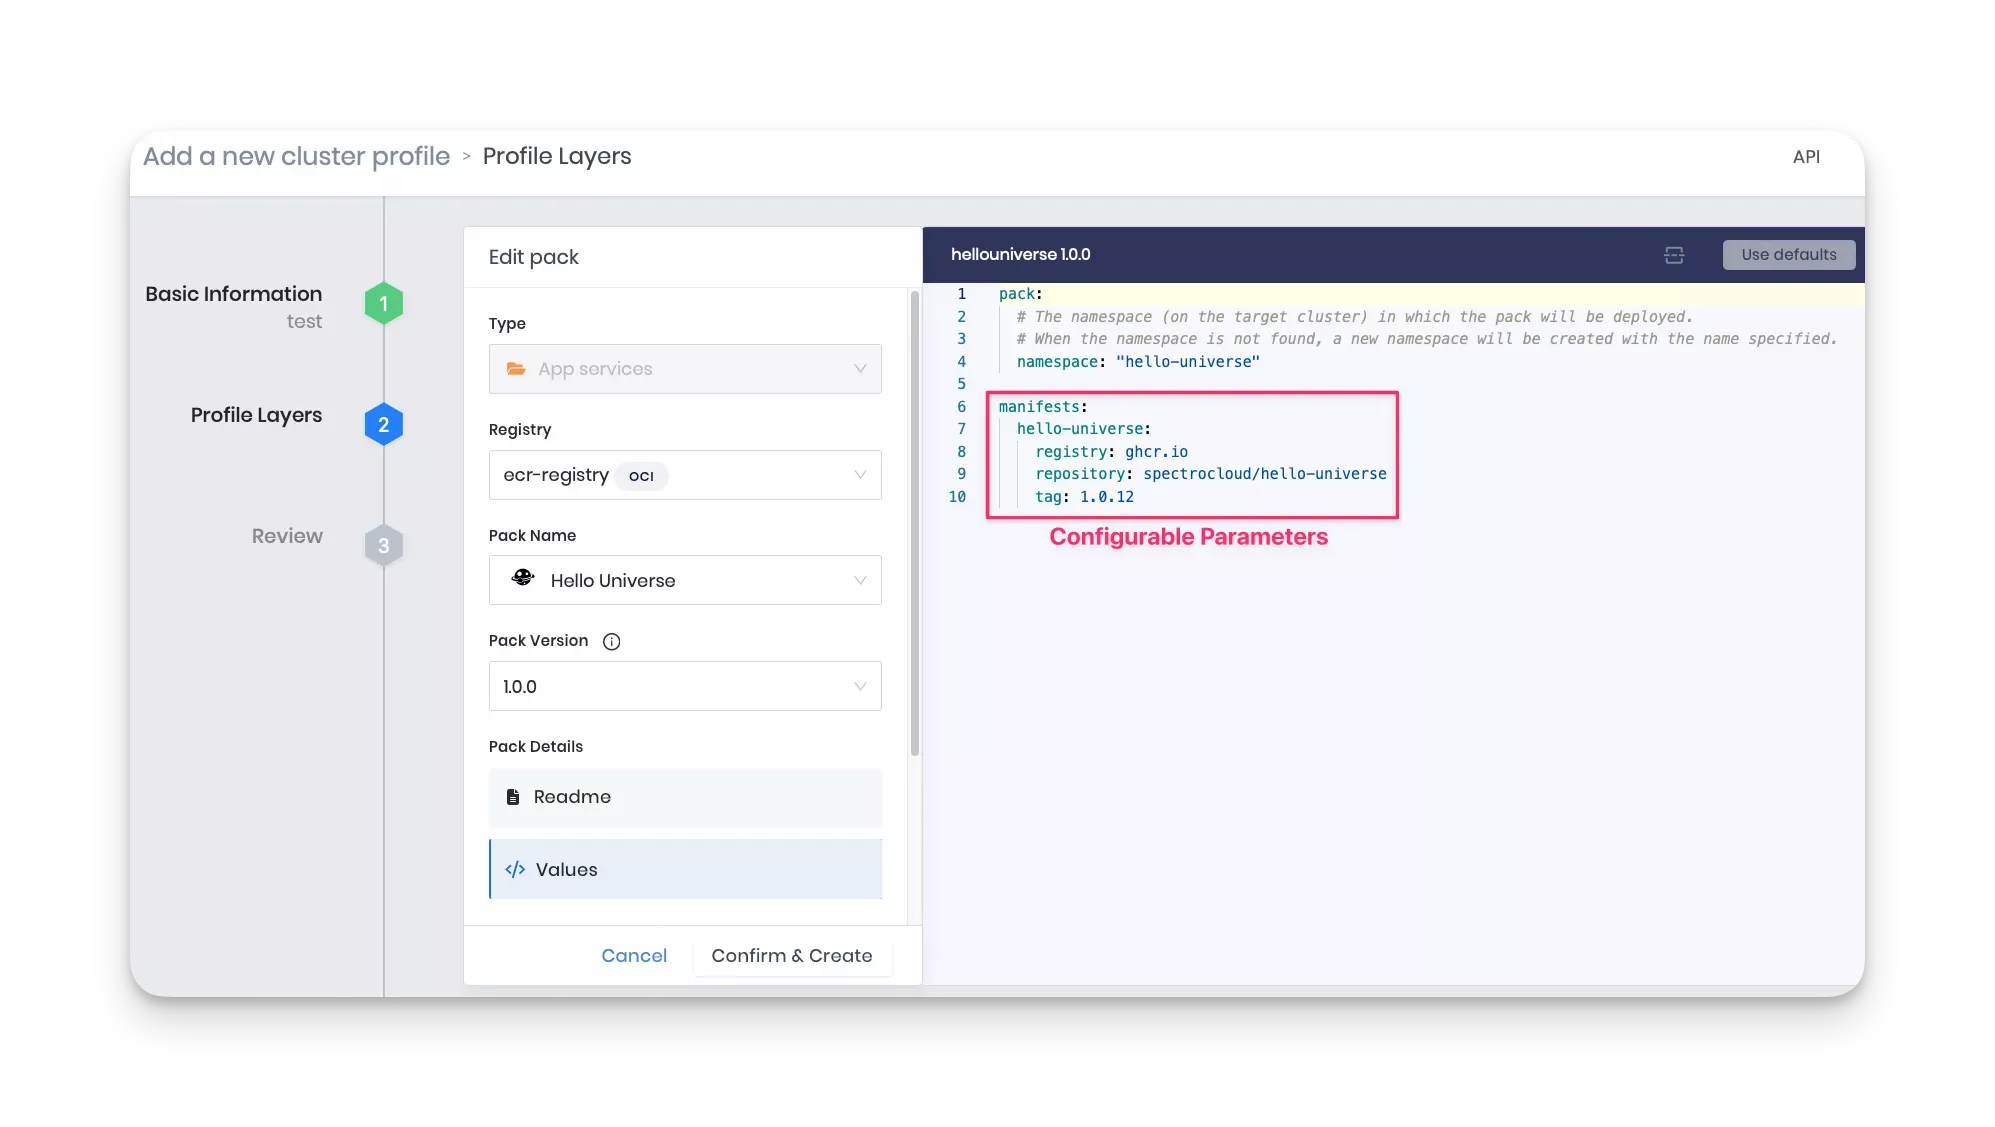
values.yaml - This file contains configurable parameters you can define while adding the current pack to a cluster profile. In the values.yaml file for this tutorial, the
pack/namespaceattribute specifies the namespace on the target cluster to deploy the pack. If the values.yaml specifies a namespace value, then Palette first checks to see if the namespace has been created. If so, Palette uses the existing namespace. If the namespace has not been created, Palette creates a new one using the value specified in the YAML file.If the values.yaml does not specify a namespace value, Palette deploys the application to the default namespace.
The
manifestssection exposes the configurable parameters for each manifest file listed in the manifests directory. For example, in the sample code snippet below, thehello-universeattribute exposes theregistry,repository, andtagparameters.
pack:
  namespace: "hello-universe"
manifests:
  hello-universe:
    registry: ghcr.io
    repository: spectrocloud/hello-universe
    tag: 1.0.12
You can optionally define presets, which are predefined values to use in the values.yaml. You define presets in a separate presets.yaml file. The presets become available when you create the cluster profile. Presets facilitate configuring the profile and avoid errors that can happen by manually editing the values.yaml file. Refer Pack Presets for details and examples of how to define presets.
The example below shows the parameters you can configure in the values.yaml for the
hello-universemanifest when you create the cluster profile.
-
manifests - This directory contains the manifest files for your Kubernetes application. This tutorial has only one file, hello-universe.yaml. Note that the values.yaml file has a corresponding
manifests/hello-universeelement with the same name as the YAML file. -
logo.png - This file contains a logo that displays when you create a cluster profile.
-
README.md - This file may contain the pack description, purpose, authors, and other relevant information. The README in the current example introduces the application used in the pack.
After finalizing all files in the pack directory, the next step is to set up a registry server and publish the pack to that registry, where you can access it directly from Palette.
Set Up the Registry Server
The tutorials environment already has the Spectro registry service and other necessary tools available. The following sections will guide you to start the registry server, expose the service to the external world using Ngrok reverse proxy, and log in to the registry server to push your custom add-on pack to it.
Start and Expose the Registry Server
Start the registry server by issuing the following command from the bash session you opened into the tutorials container.
registry serve /etc/spectro/config.yml > /var/log/registry.log 2>&1 &
The registry server will start in HTTP mode (not HTTPS). Refer to the Add a Custom Registry guide to learn more about deploying an HTTPS registry server.
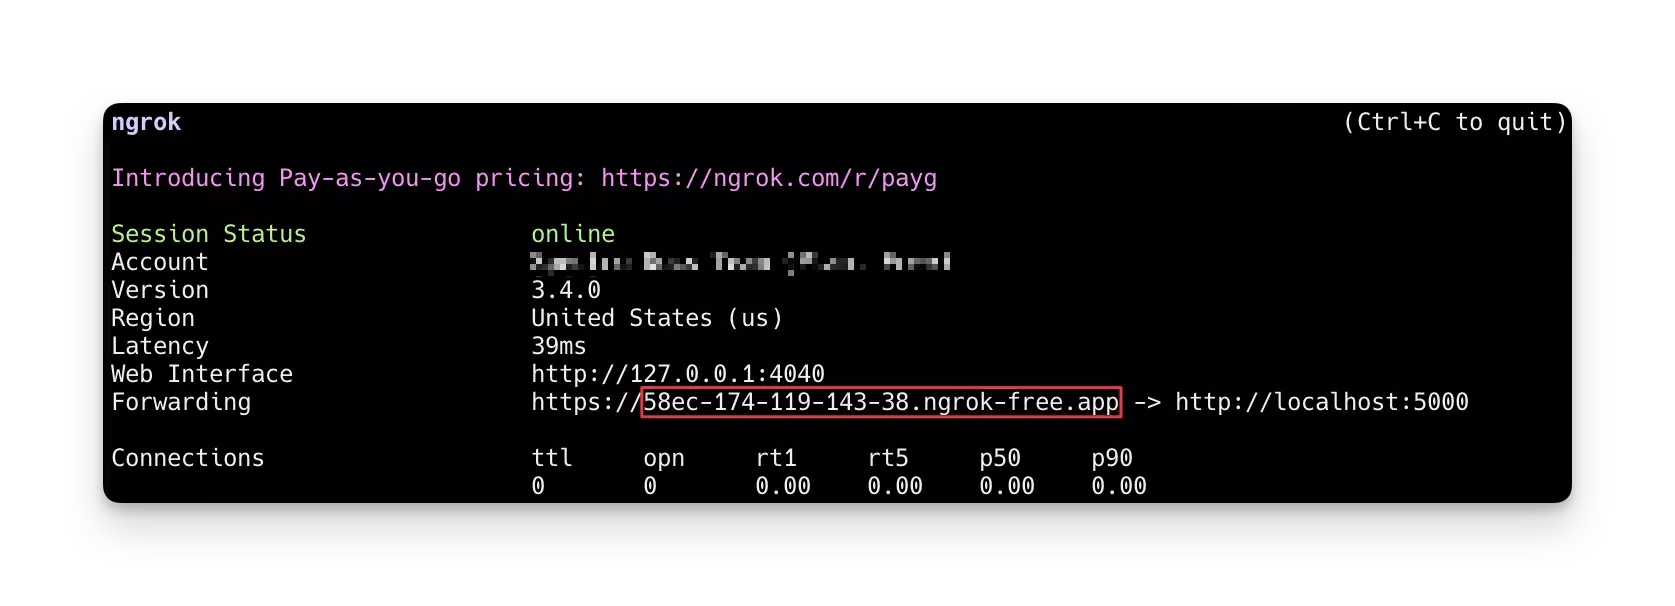
Next, expose the registry server to the public so that you can configure it later in Palette. Use Ngrok reverse proxy to expose the registry server listening on port 5000 via an HTTP tunnel using the following command.
ngrok http 5000 --log-level debug
The command above will reserve the current bash session and display the status of each HTTP request made to the Ngrok server later in this tutorial. The screenshot below shows the registry server successfully exposed via Ngrok.
Check if the registry server is accessible from outside the tutorial container by visiting the /health endpoint. Open
your browser and go to https://Your-URL-Here/health, replacing the base URL with the Ngrok URL output. You should get
a {"status":"UP"} response.
Verify the registry server is accessible from outside the tutorials container by visiting the /health endpoint. Access
the https://Your-URL-Here/health in your host browser. Replace the base URL with the Ngrok URL output you received.
You should receive a {"status":"UP"} response.
Log in to the Registry Server
Once the registry server's /health endpoint shows UP status, the next step is to log in and then push the pack to
it. The pack you will push is in the tutorials container. Open another bash session into the tutorials container from
your local terminal.
docker exec -it tutorialContainer bash
Log in to the registry server using Ngrok's public URL assigned to you. Issue the command below, but replace the URL
with your Ngrok URL. The command below uses these credentials to log in to the registry server:
{username: admin, password: admin}.
spectro registry login  --insecure --default --username admin --password admin \
f59e-49-36-220-143.ngrok-free.app
Do not use https:// or http:// keyword in the Ngrok URL. Using either of these keywords will result in an authorization issue.
You will receive a Login Succeeded response upon successful login.
# Output condensed for readability
WARNING! Your password will be stored unencrypted in /root/.spectro/config.json.
Login Succeeded
Push the Pack to the Registry Server
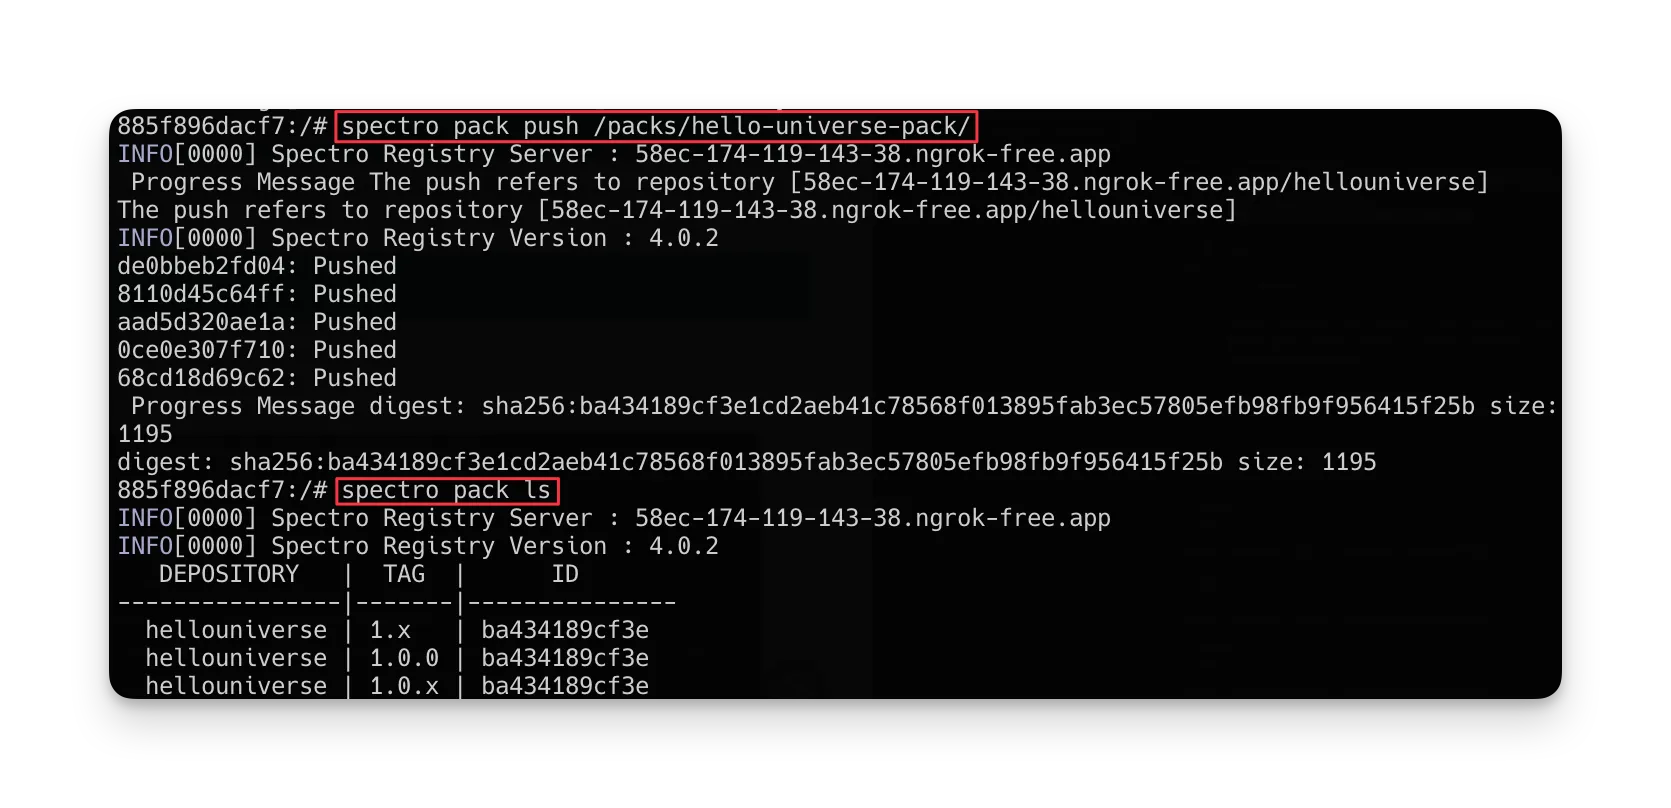
When you are logged in, push the pack to the registry server using the following command.
spectro pack push /packs/hello-universe-pack/
You can verify that the pack is in the registry by using the ls command. This command lists all packs in the registry.
spectro pack ls
Verify the pack you pushed is listed, as shown in the screenshot below.
If you need help with the Spectro CLI commands, such as deleting a pack, refer to the Spectro CLI commands guide.
Configure the Registry Server in Palette
After you push the pack to the registry server, log in to Palette and configure the registry service so that you can access it when you create your cluster profile.
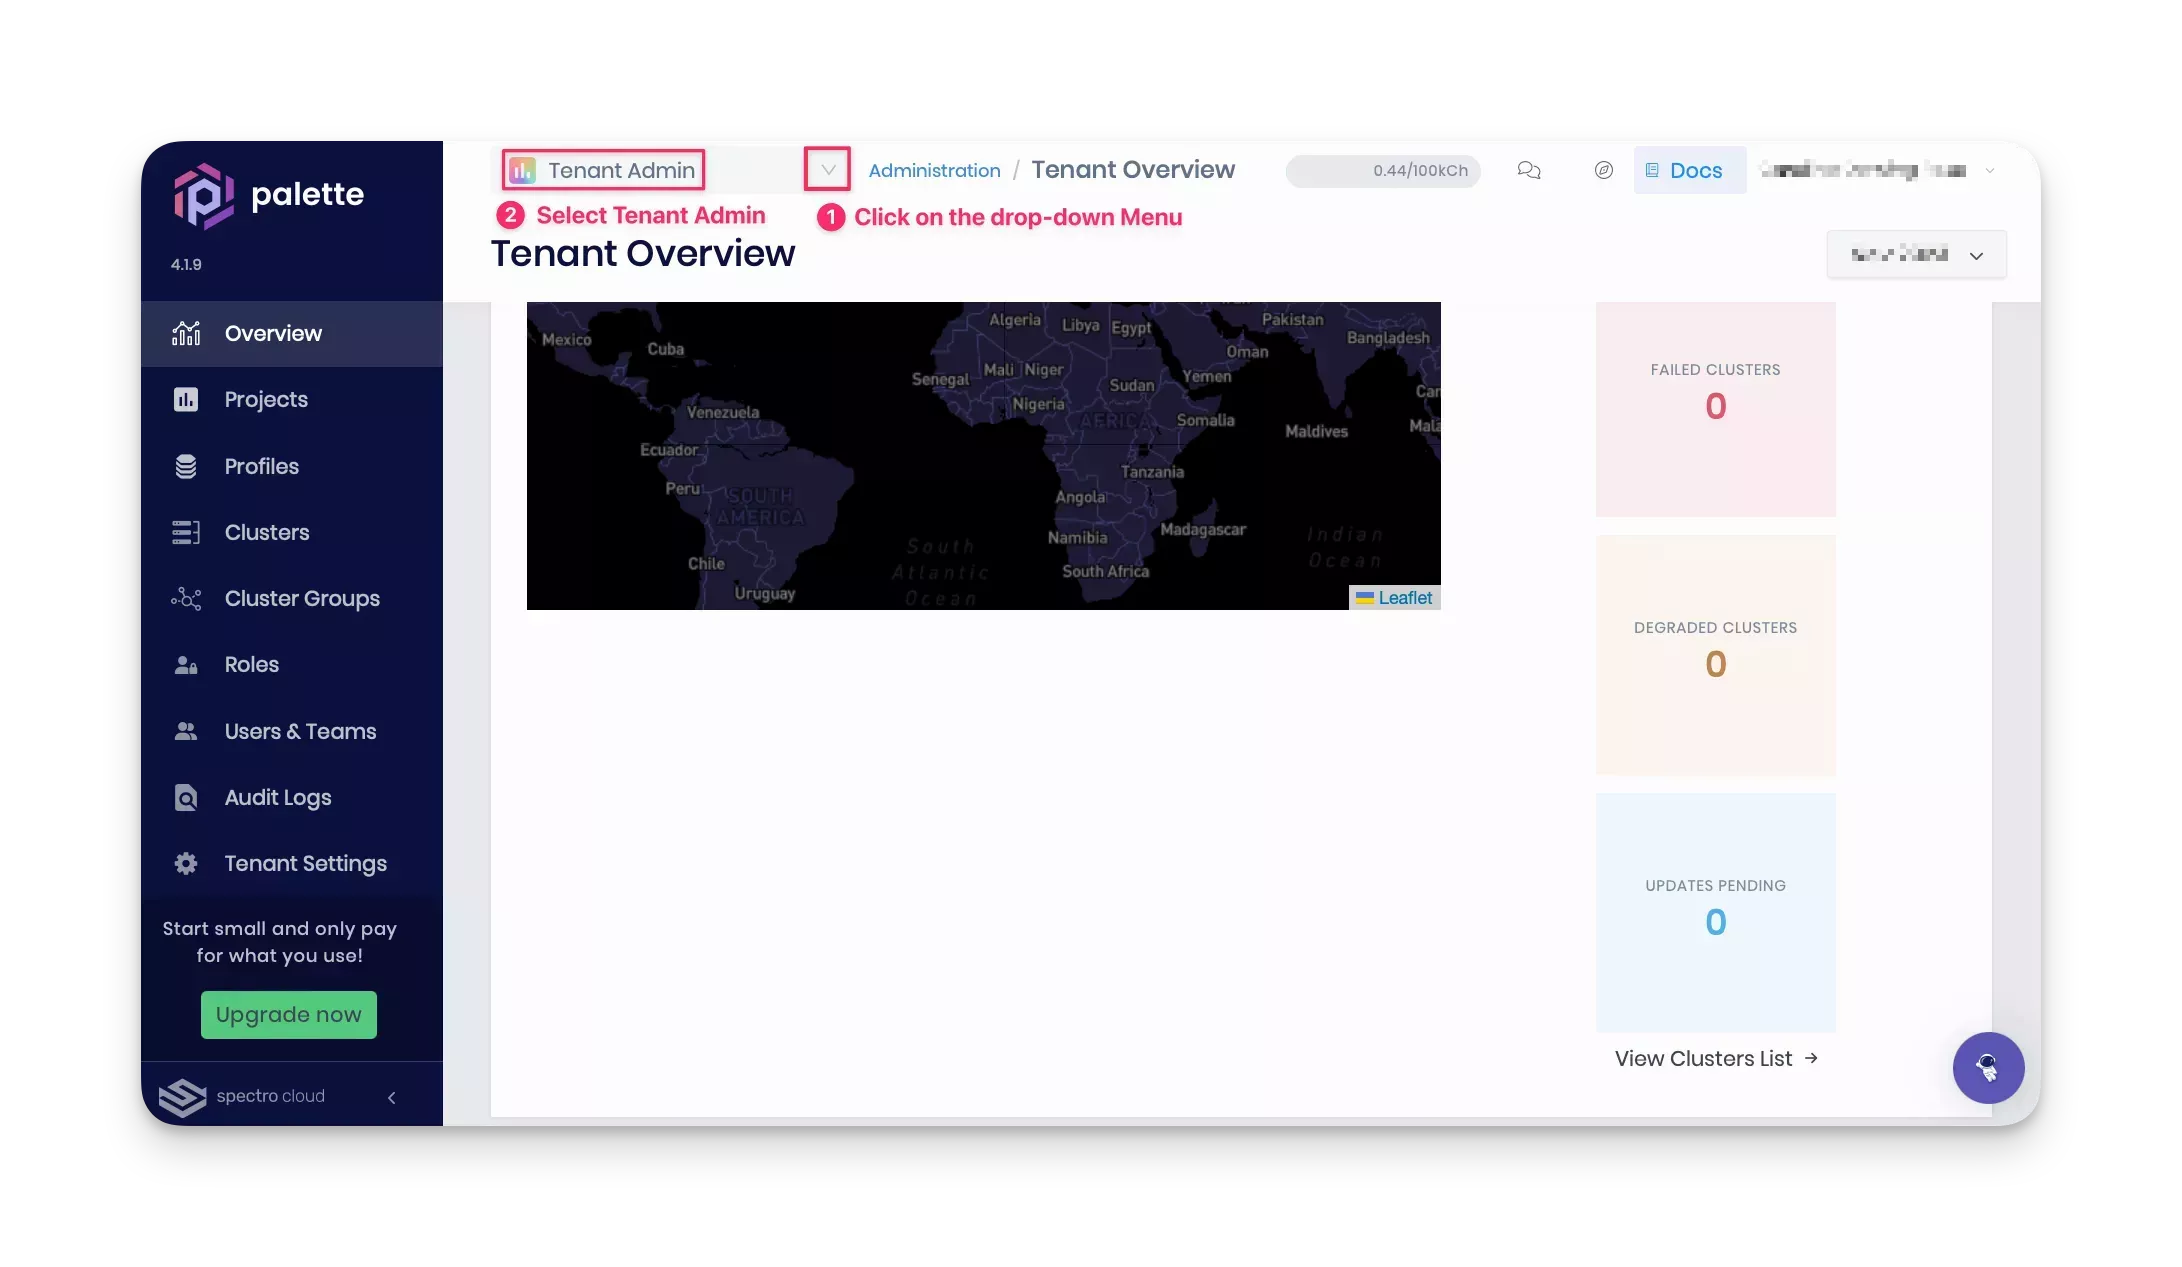
Log in to Palette, and switch to the Tenant admin view.
Navigate to Tenant Settings > Registries > Pack Registries section. Click on the Add New Pack Registry. Palette will open a pop-up window asking for the fields to configure a custom pack registry, as highlighted in the screenshot below.
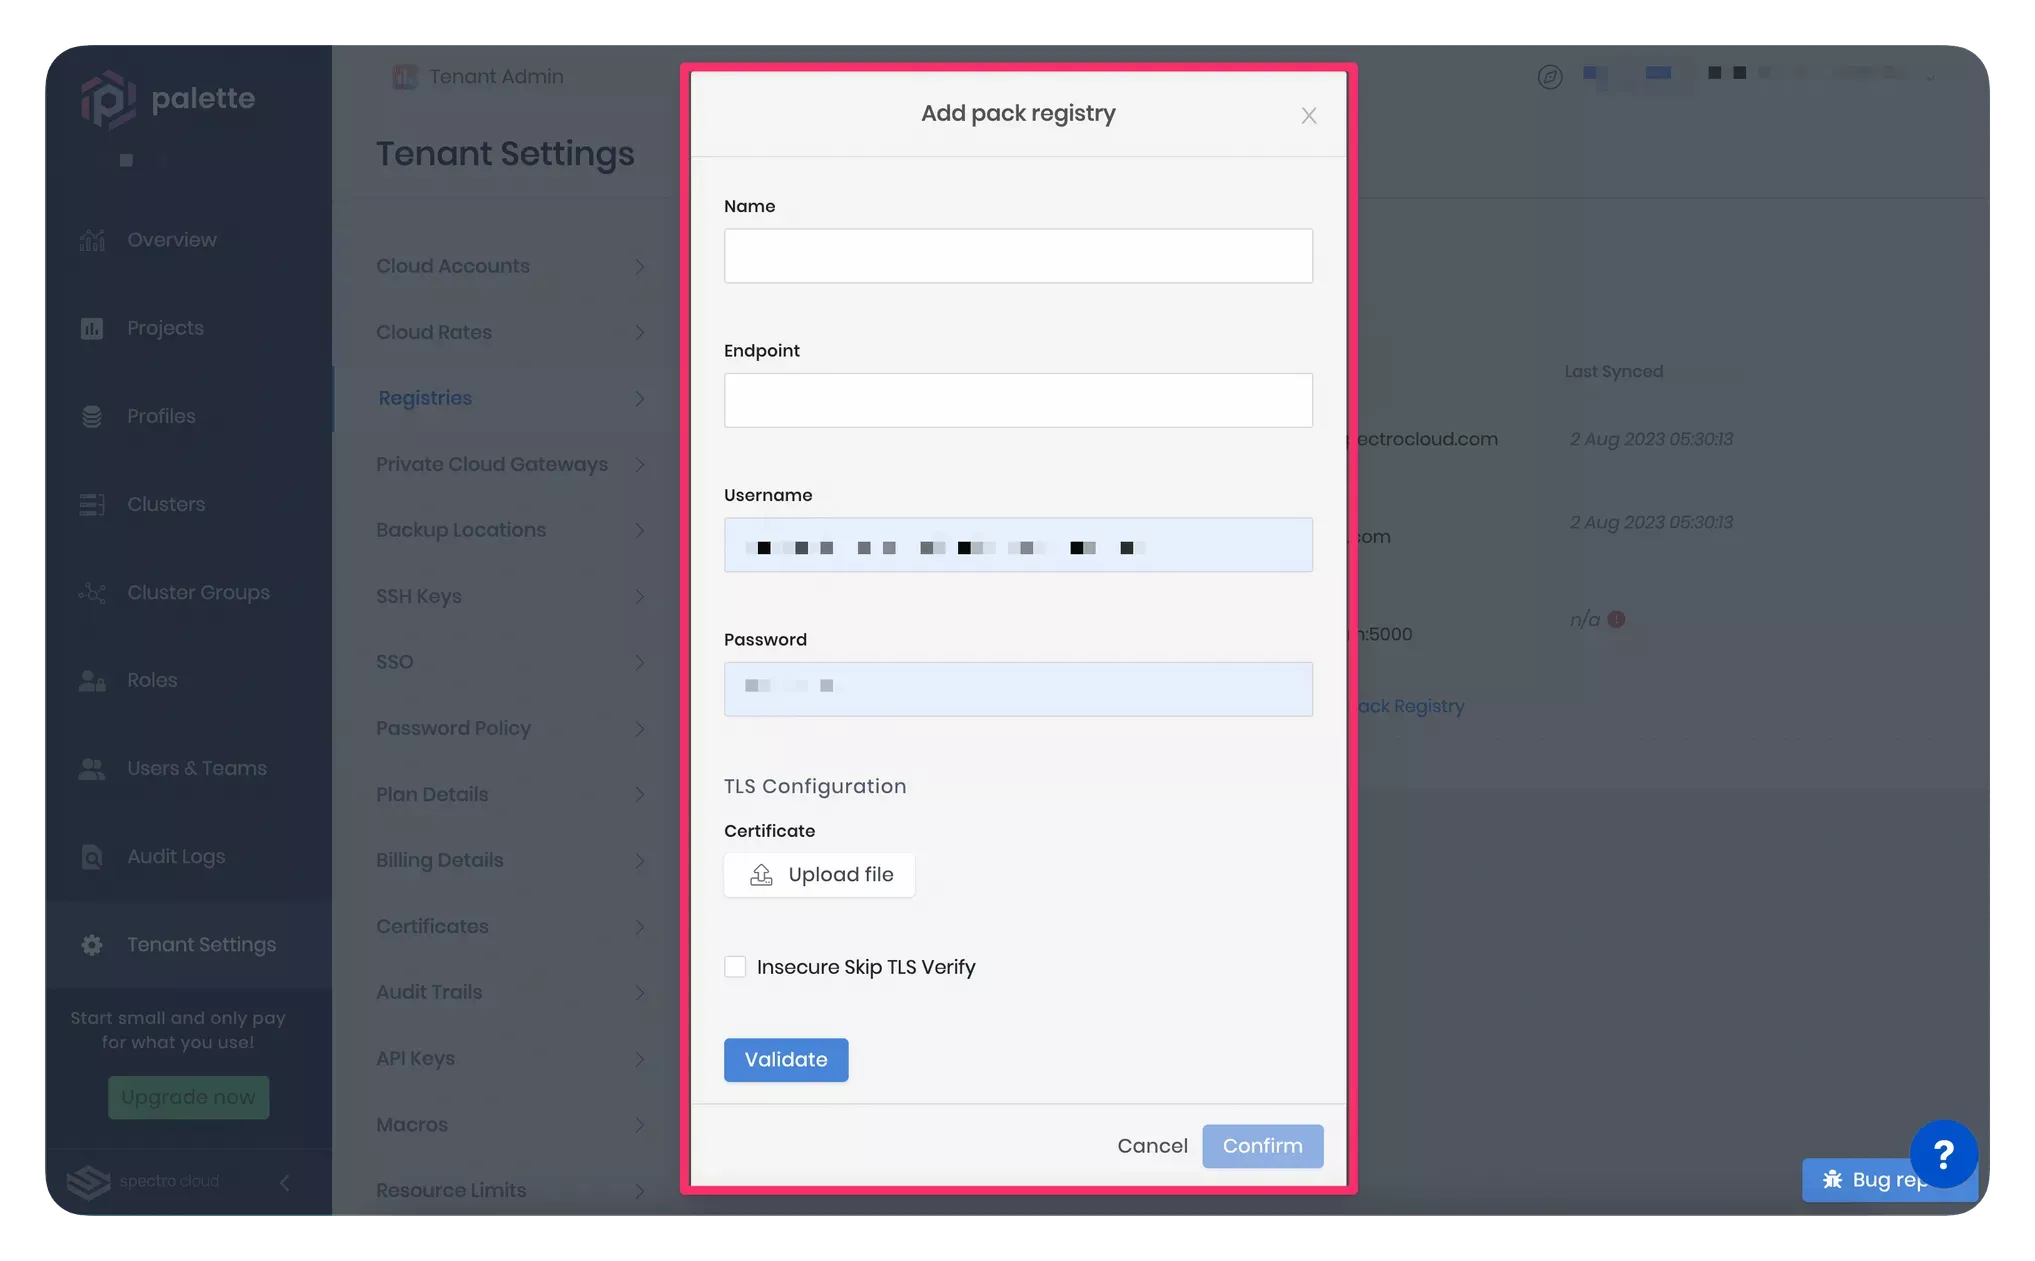
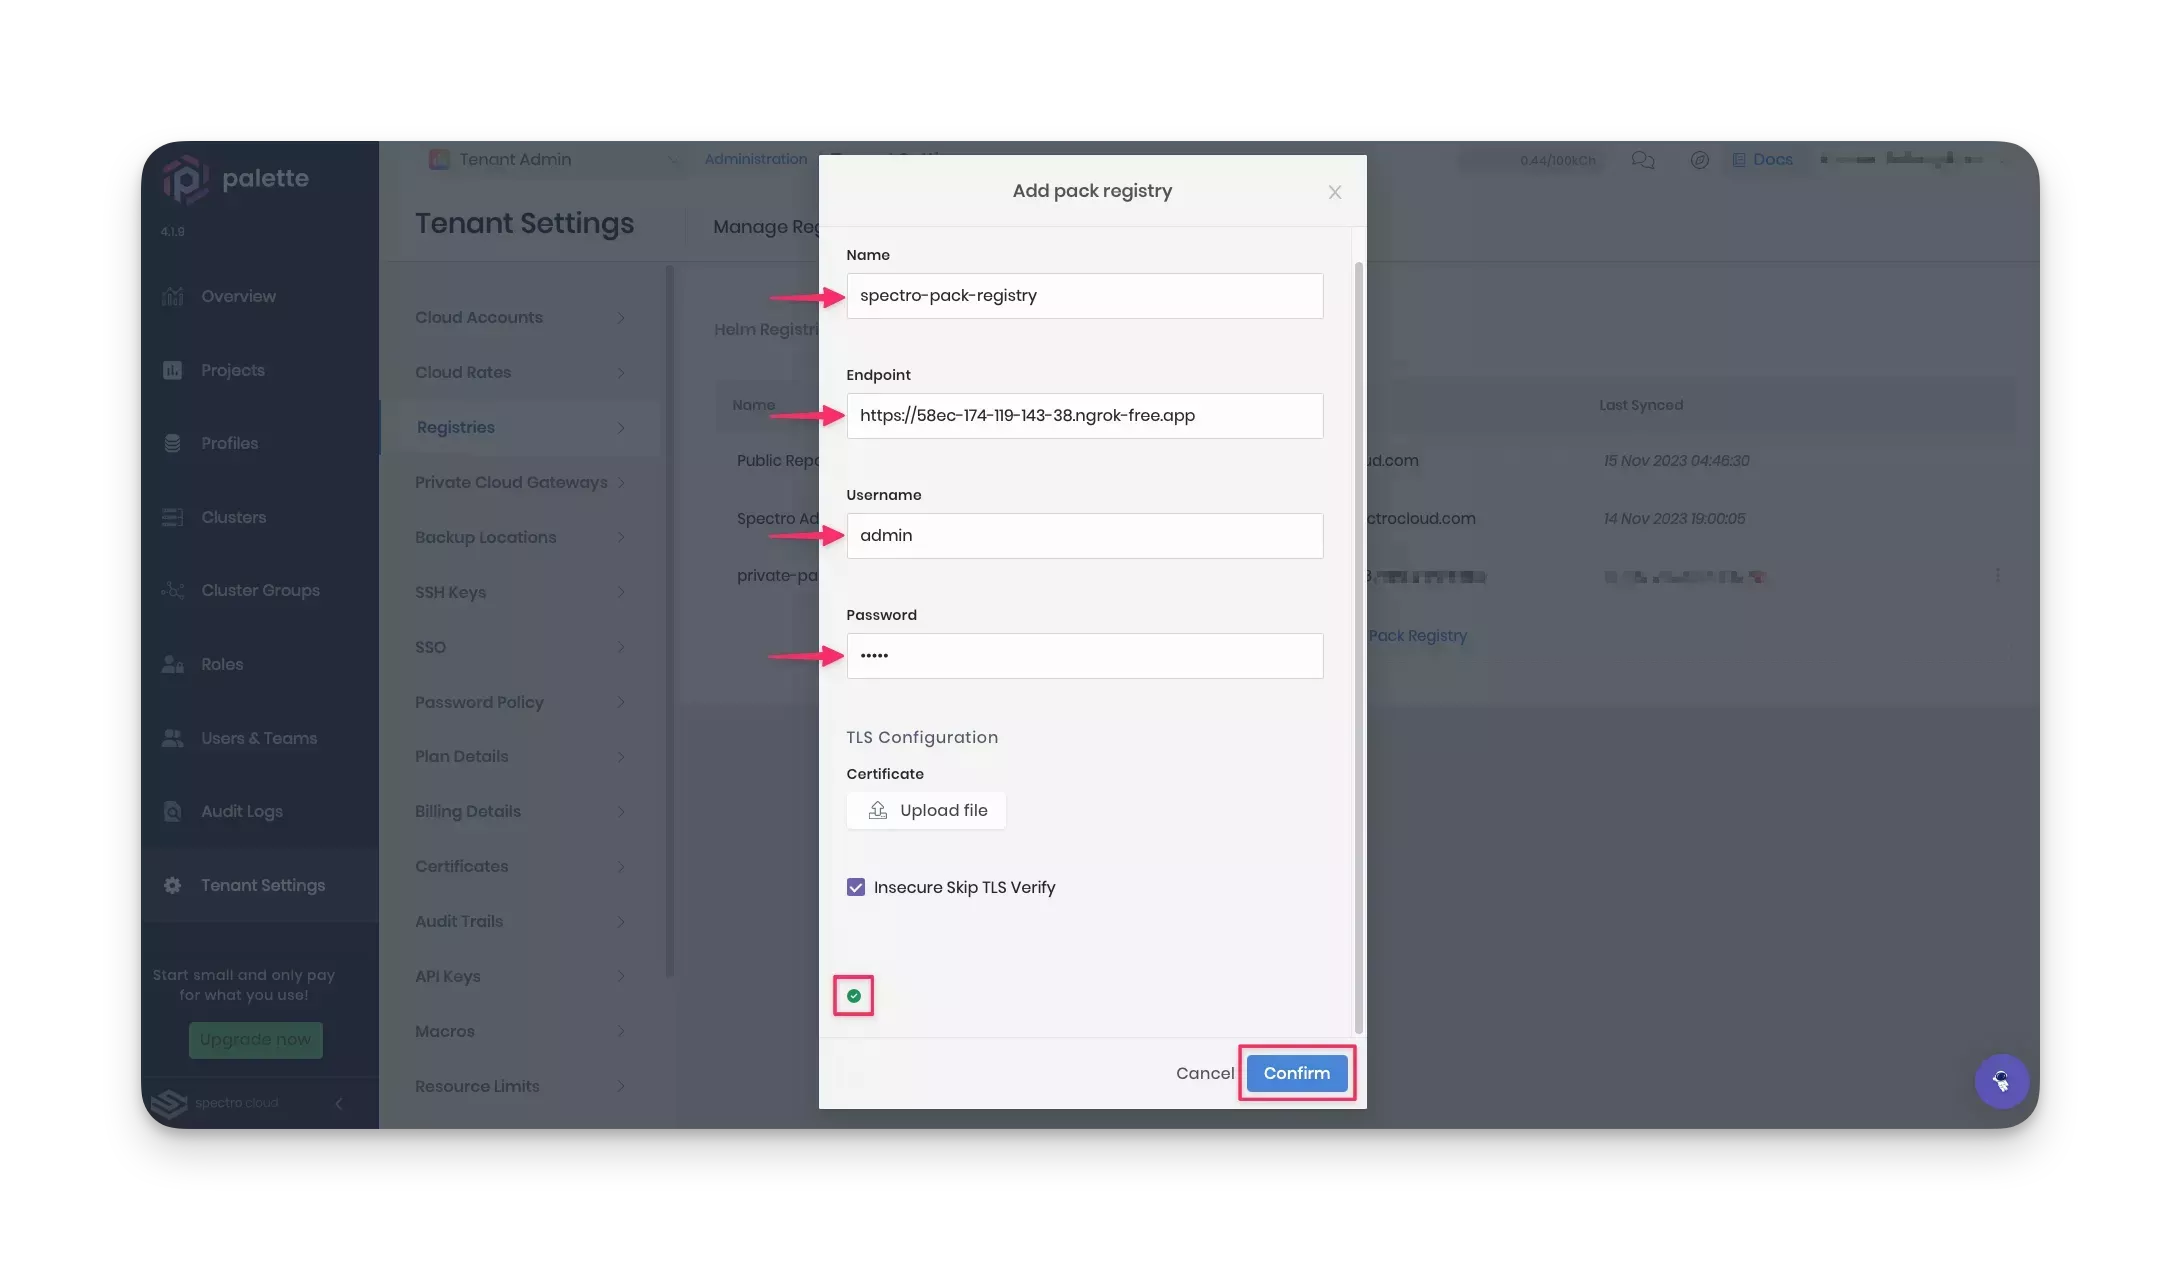
Provide the pack registry name, endpoint, and user credentials in the pop-up window. For a consistent experience in this tutorial, we suggest using the name private-pack-registry. Use your Ngrok URL as the pack registry endpoint. Ensure to use an "https://" prefix in the pack registry endpoint.
In the TLS Configuration section, select the Insecure Skip TLS Verify checkbox. This tutorial does not establish a secure HTTPS connection between Palette and your pack registry server. Therefore, you can skip the TLS verification. Instead, this tutorial uses an unencrypted HTTP connection. However, in a production environment, you can upload your certificate in the TLS Configuration section if you need Palette to have a secure HTTPS connection while communicating with the pack registry server.
Click on Validate to ensure the URL and credentials are correct, then click on Confirm to finish configuring the registry server.
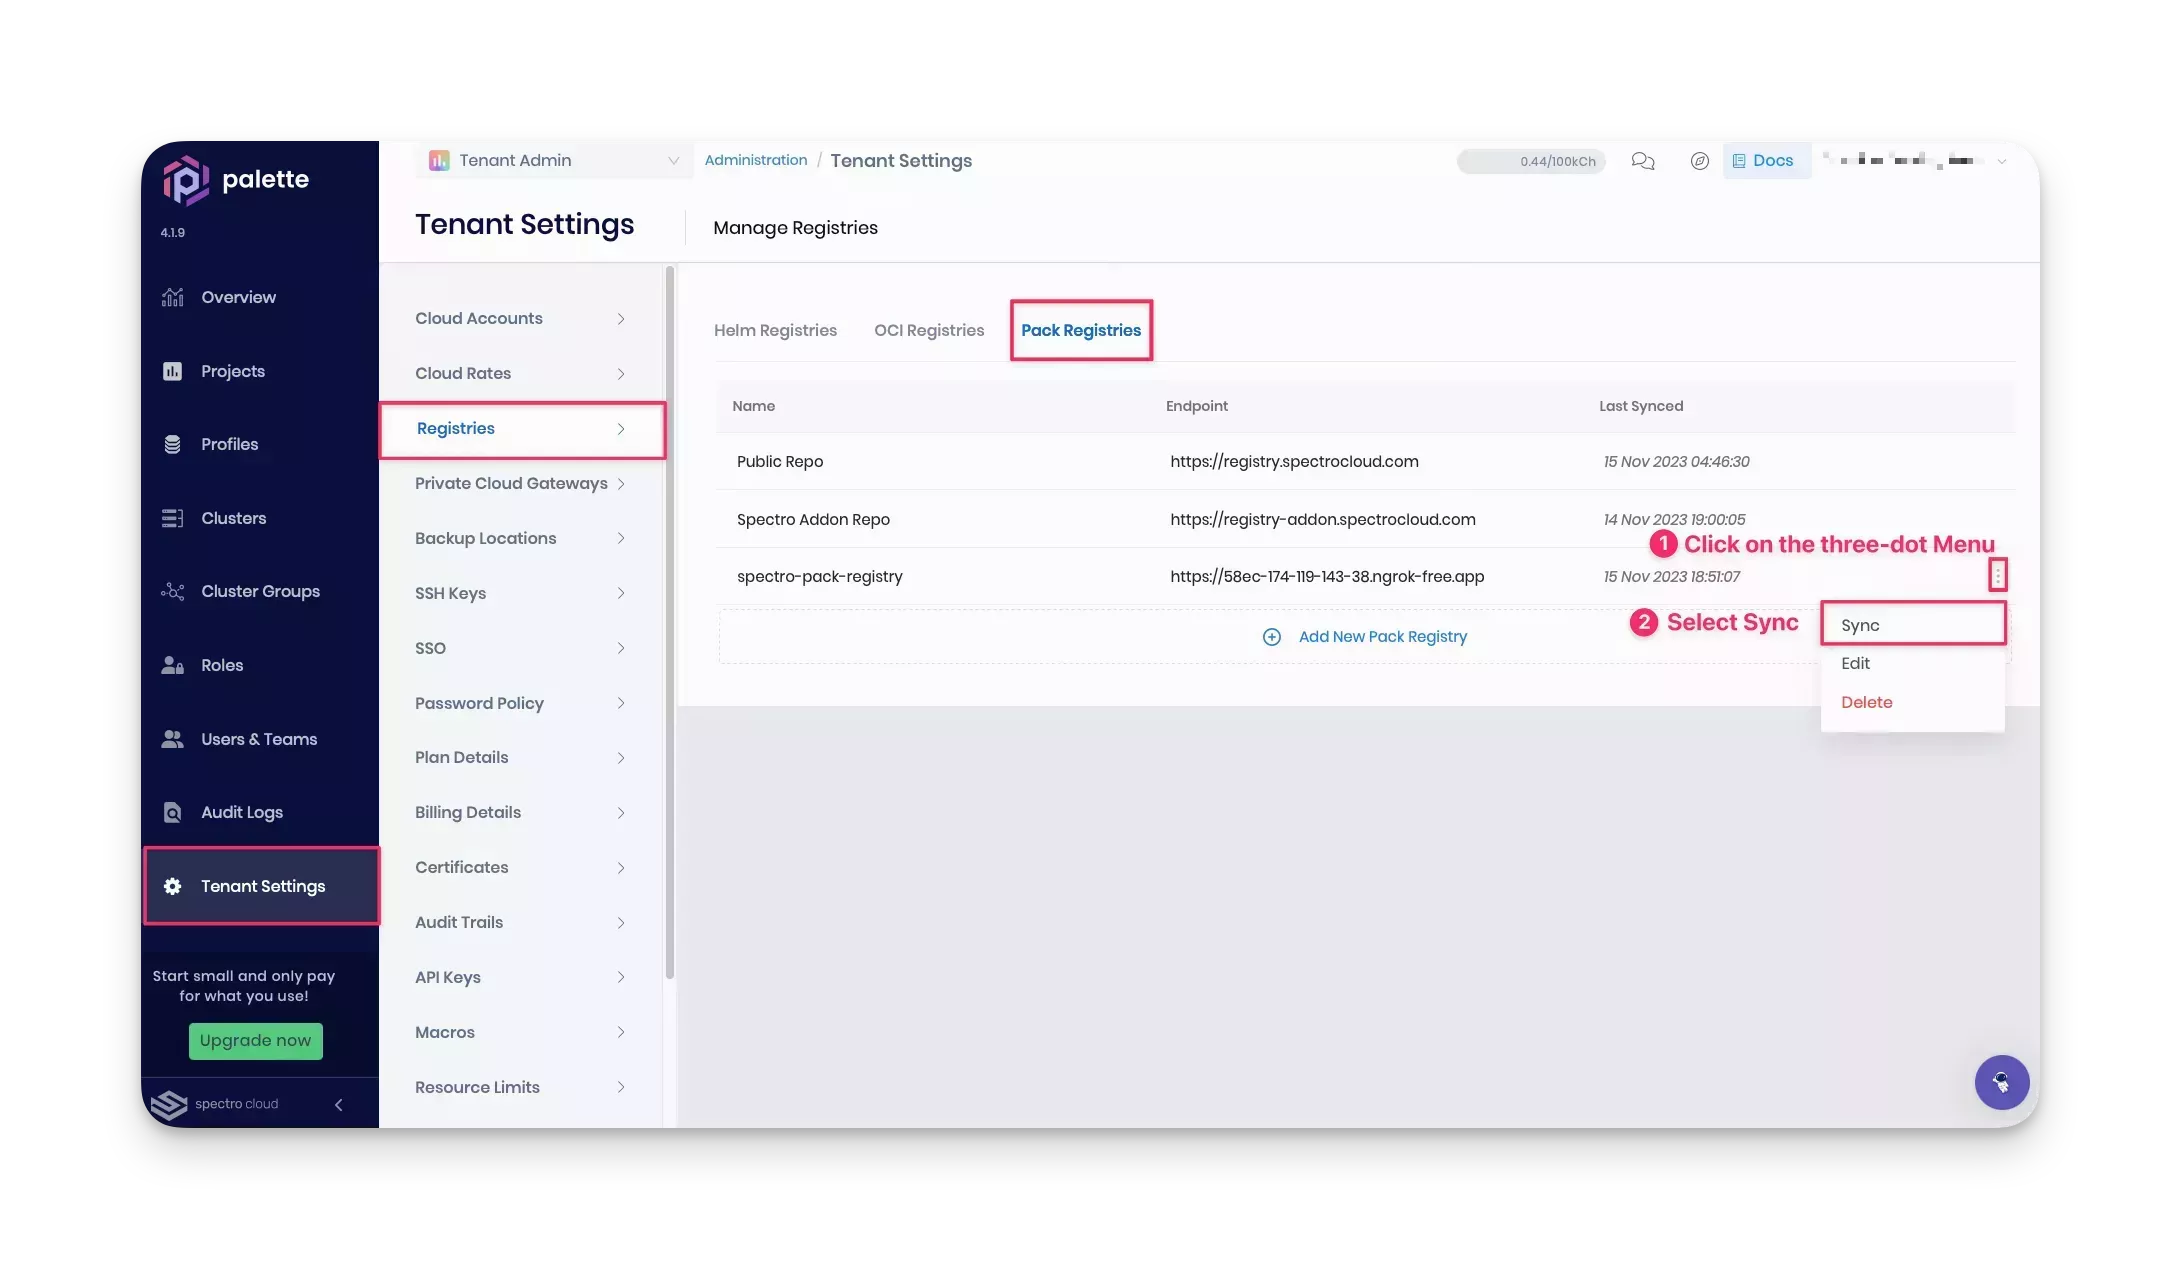
Palette syncs the registry server periodically. However, you can sync it manually the first time you add a server by clicking the three-dot Menu next to the registry server name and selecting Sync.
Create a Cluster Profile and Deploy a Cluster
This tutorial guides you to create a cluster profile for AWS. However, you can choose any other cloud service provider, provided you configure the following two items:
-
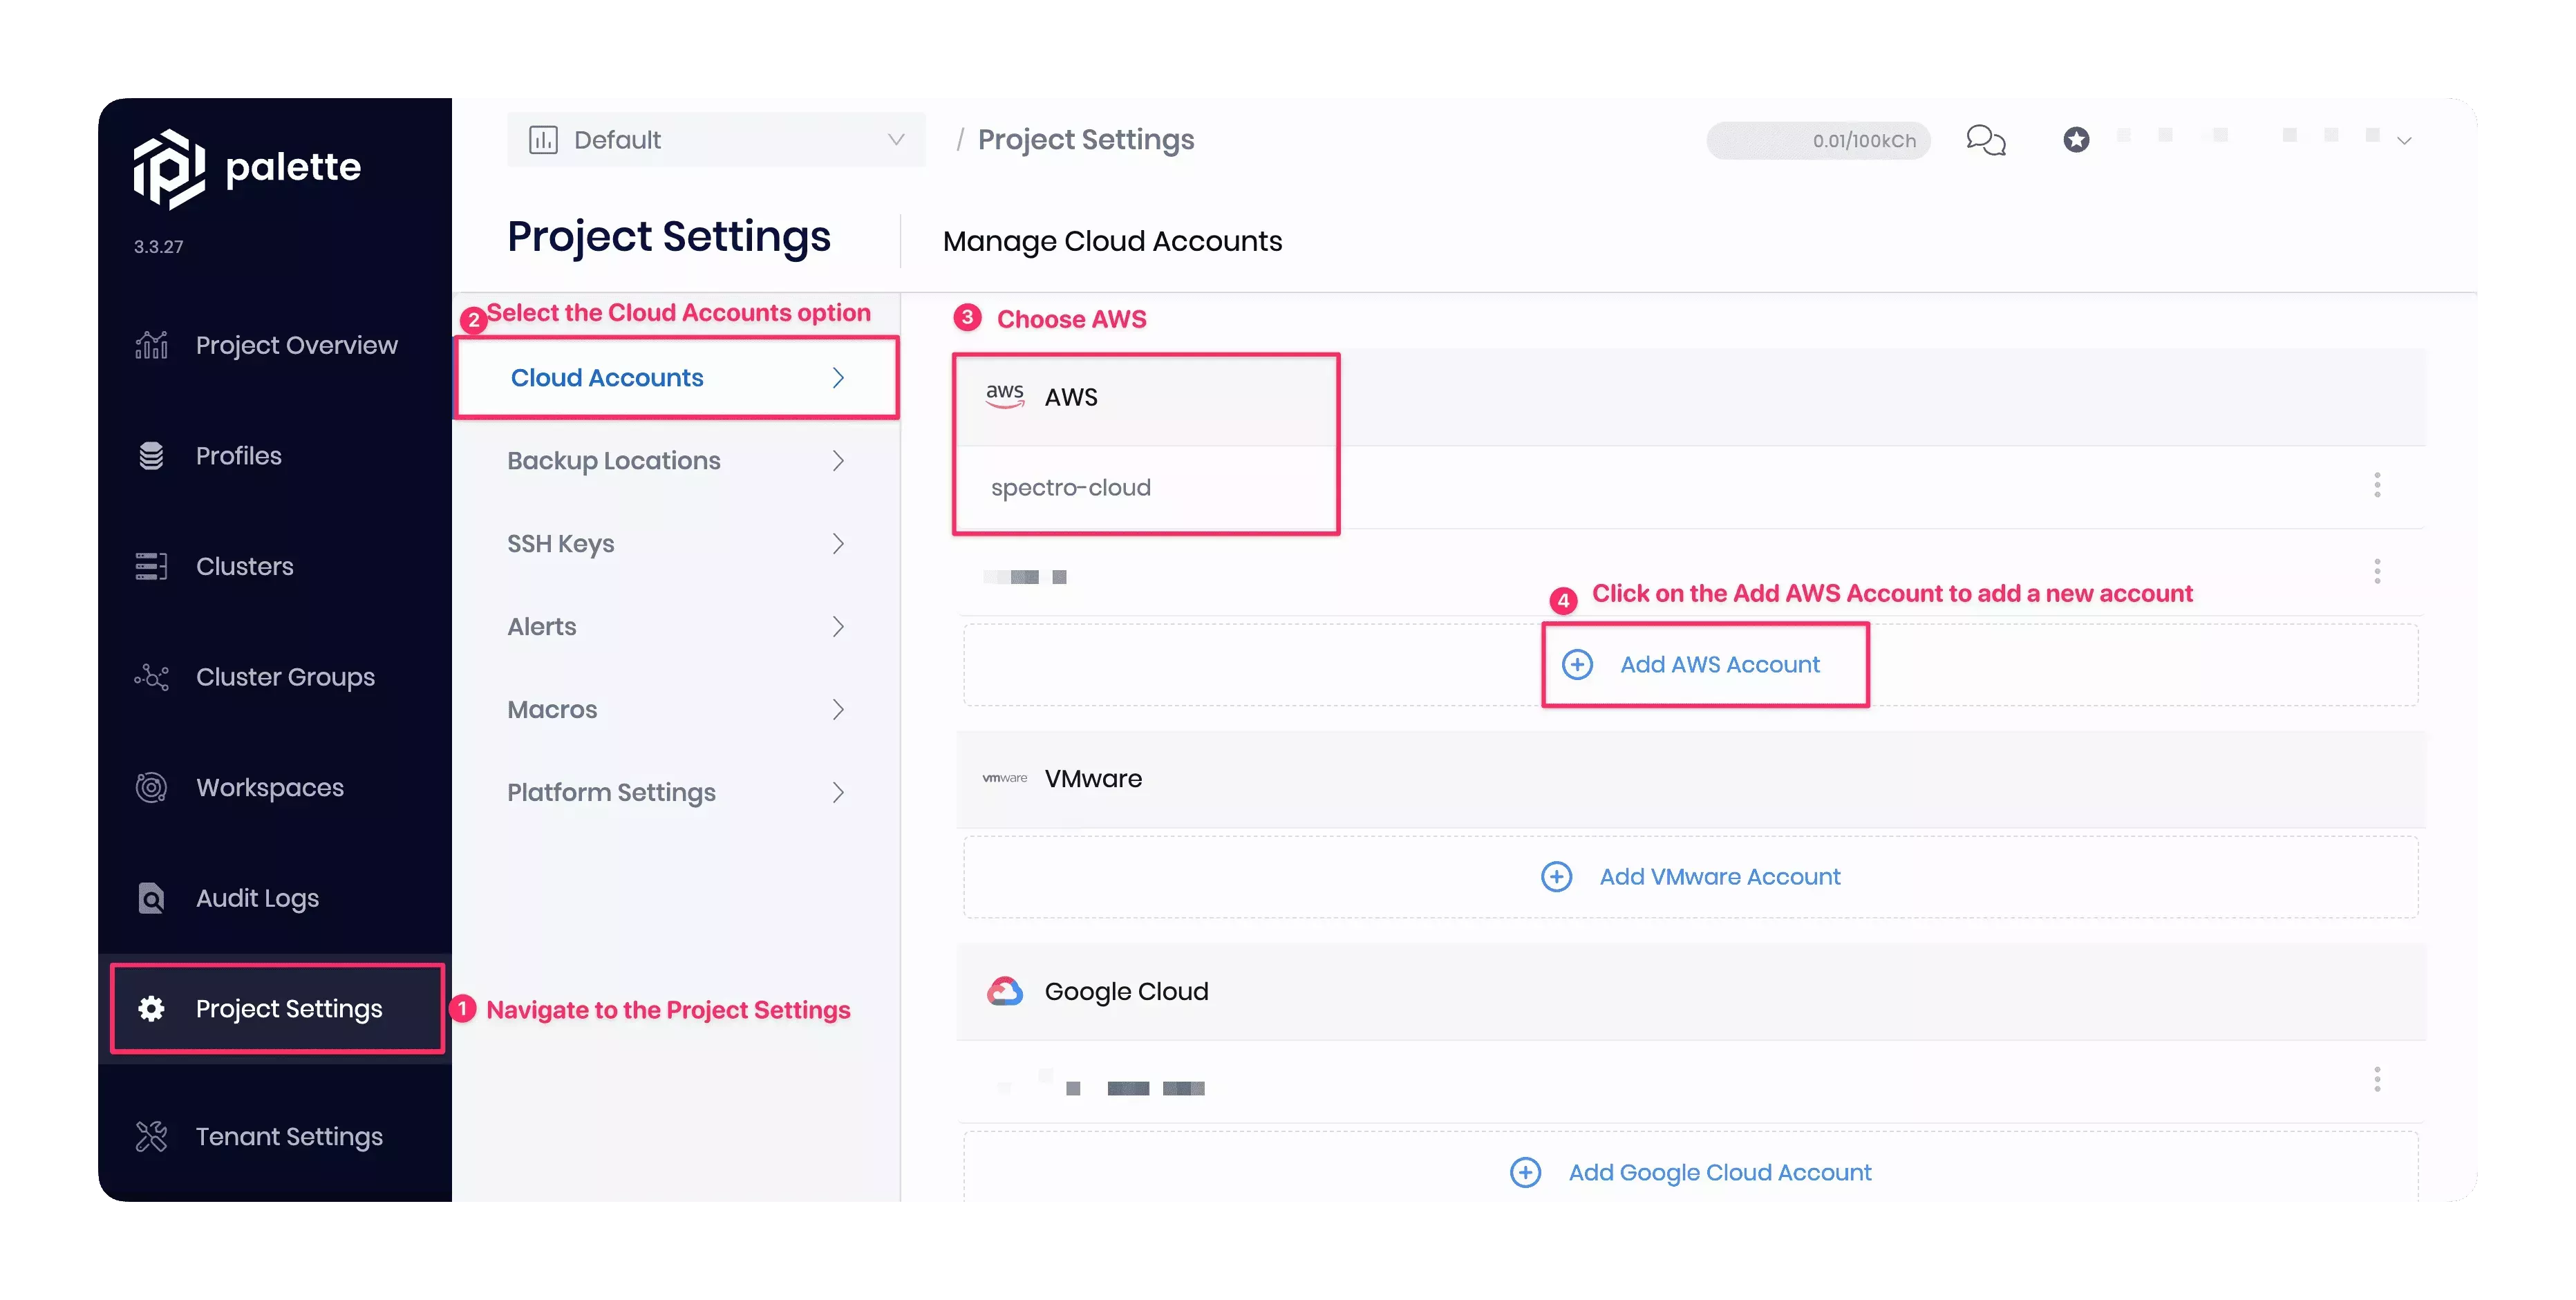
Cloud account: A cloud account added to your Palette project settings.
The AWS cloud account name in this tutorial example is spectro-cloud. You can choose another name if desired. The screenshot below shows how to add and verify the AWS cloud account with your project. Navigate to Project Settings > Cloud Accounts > AWS > Add AWS Account in Palette. Check out the Register and Manage AWS Accounts guide for additional help.
-
SSH key: An SSH key created in the region where you will deploy the cluster.
This tutorial example will deploy the cluster in the us-east-2 region, and the SSH key name used in this example is aws_key_sk_us_east_2. You must choose the desired region and the available SSH key name from your AWS account.
Create a cluster profile and deploy it to a cluster using either Palette or Terraform code.
UI Workflow
Create a Cluster Profile
Switch to the Default project scope for creating a cluster profile.
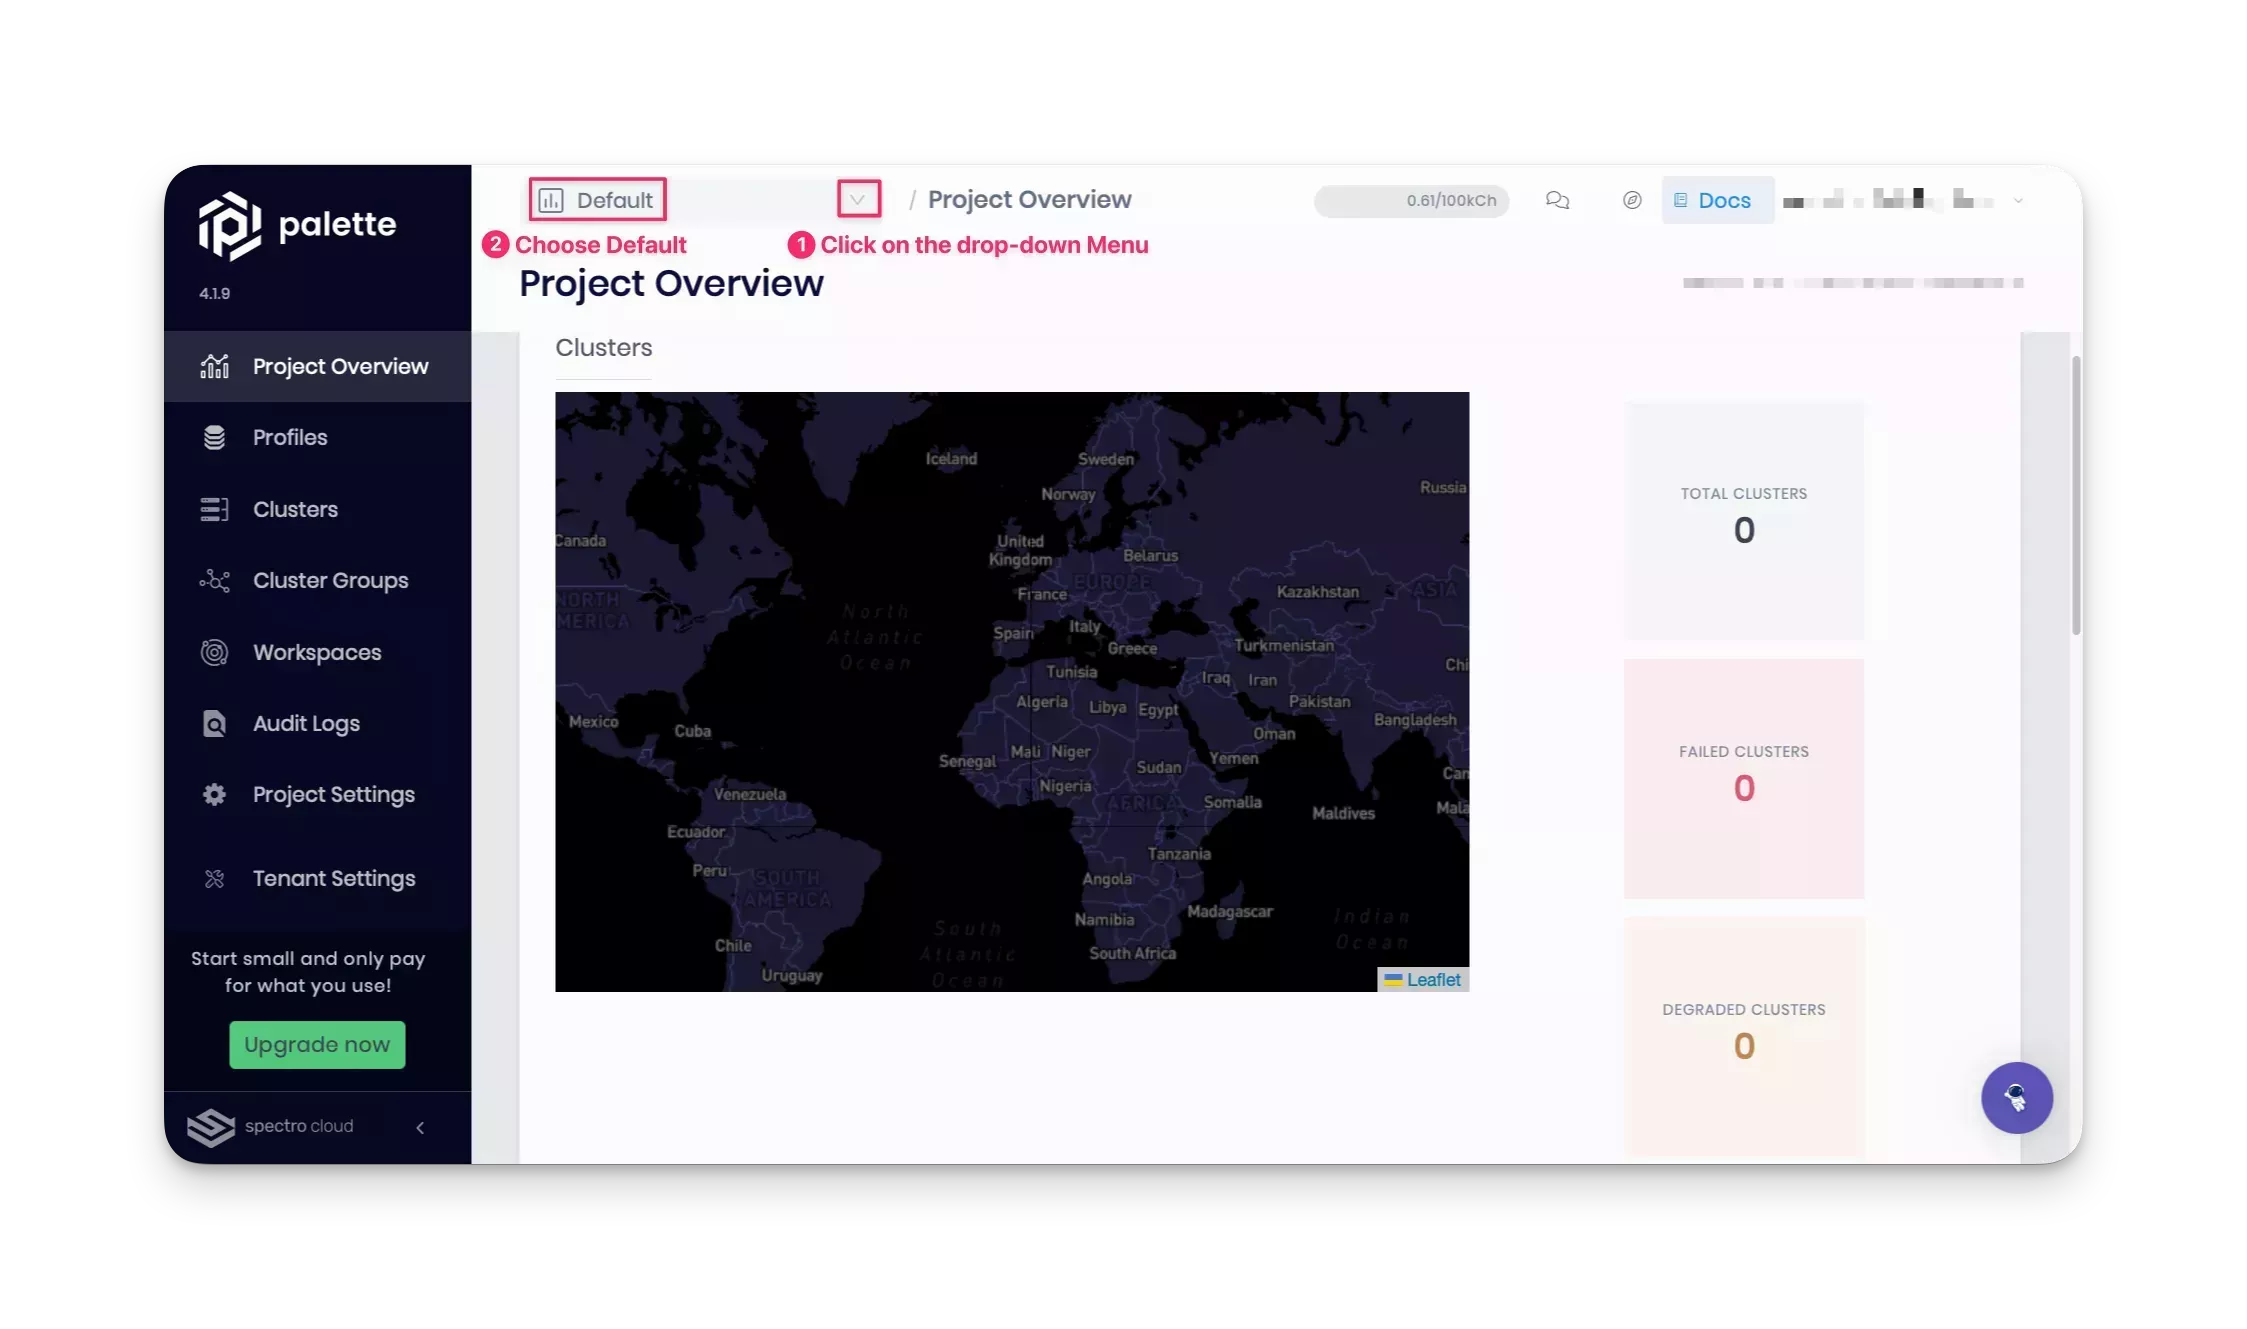
Select the Profile section in the left Main Menu to create a cluster profile that will combine the core infrastructure and add-on layers. Click on the Add Cluster Profile button, and provide the details in the wizard that follows. The wizard displays the following sections.
Basic Information
Use the following values in the Basic Information section.
| Field | Value |
|---|---|
| Name | pack-tutorial-profile |
| Version | 1.0.0 |
| Description | Cluster profile as part of the pack tutorial. |
| Type | Full |
| Tags | spectro-cloud-education, app:hello-universe, terraform_managed:true |
Click on Next to continue.
Cloud Type
In the Cloud Type section, choose AWS as the infrastructure provider for this tutorial, and click on Next at the bottom to move on to the next section.
If you choose a different cloud service provider, the core infrastructure layers options, as outlined in the Profile Layers section below, will differ from this tutorial.
Profile Layers
In the Profile Layers section, add the following core infrastructure layers if you have chosen the AWS cloud service provider. To deploy your resource to Azure or Google Cloud, use the core infrastructure layers outlined in Cloud Service Provider Configurations.
| Pack Type | Registry | Pack Name | Pack Version |
|---|---|---|---|
| OS | Public Repo | Ubuntu | LTS__20.4.x |
| Kubernetes | Public Repo | Kubernetes | 1.24.x |
| Network | Public Repo | Calico | 3.25.x |
| Storage | Public Repo | Amazon EBS CSI | 1.16.x |
As you add each layer, click on the Next layer button. After you add the Storage layer, click on the Confirm button to complete the core infrastructure stack. Palette displays the newly created infrastructure profile as a layered diagram. You can select any layer to make further edits or change the version if desired.
Now you are ready to add the add-on layers. Click the Add New Pack button.
Add the Spectro Proxy pack to enable a reverse proxy to connect to the cluster's API. Adding this pack is optional, but it will help connect your local machine to the cluster's API for debugging. Refer to the Spectro Proxy guide for more details.
| Pack Type | Registry | Pack Name | Pack Version |
|---|---|---|---|
| Authentication | Public Repo | Spectro Proxy | 1.3.x |
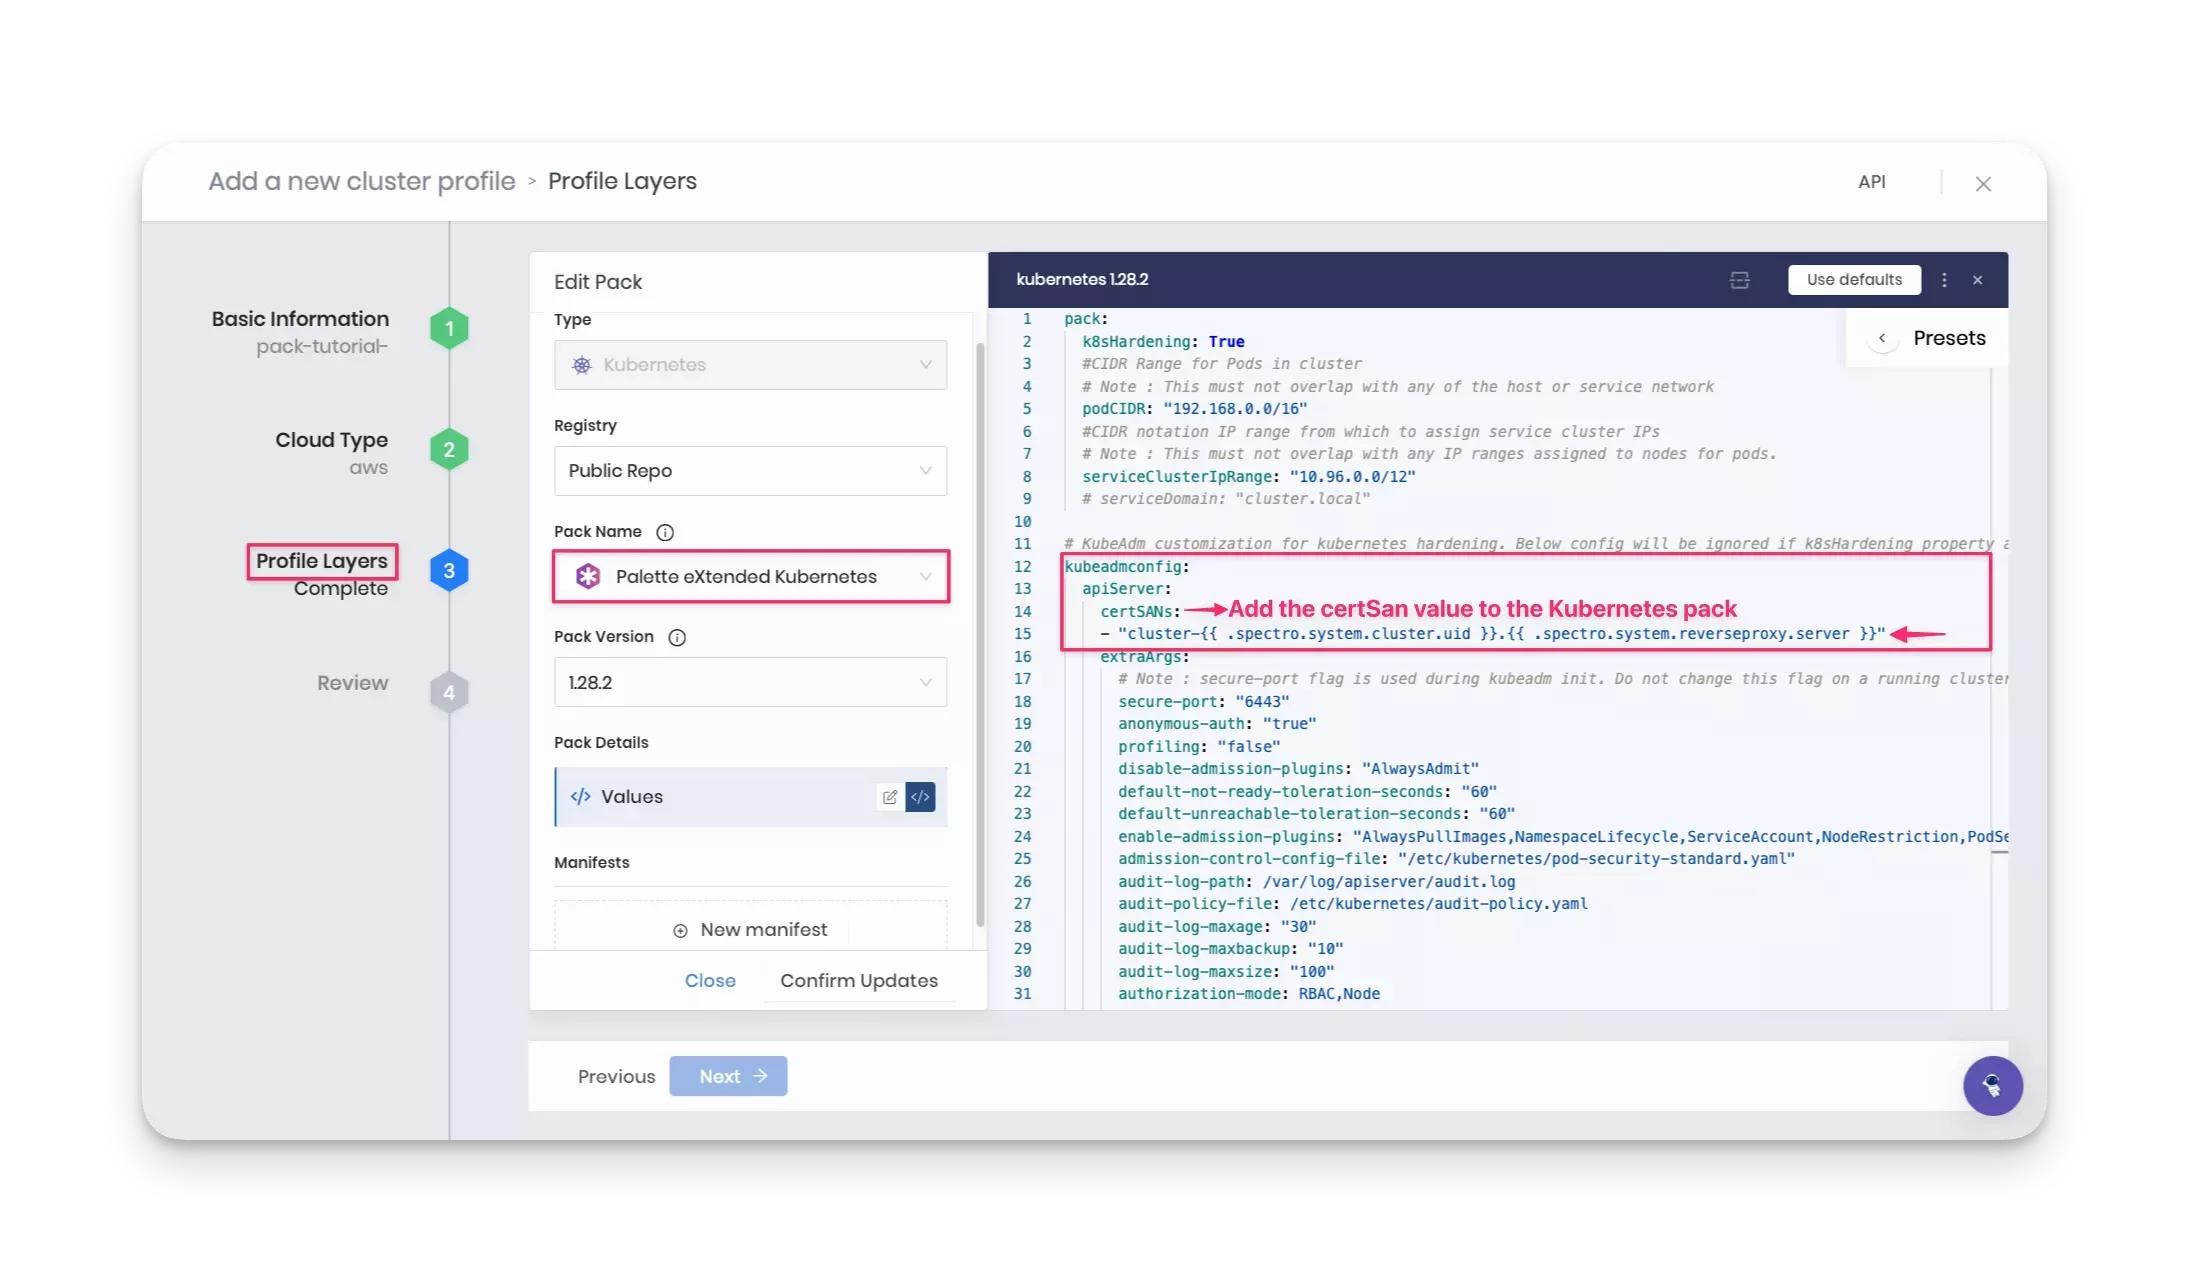
Click on the Confirm & Create button to finish adding the Spectro Proxy pack. Also, add the following certificate
Subject Alternative Name (SAN) value to the Kubernetes pack under the apiServer parameter section to configure the
Spectro Proxy pack.
certSANs:
  - "cluster-{{ .spectro.system.cluster.uid }}.{{ .spectro.system.reverseproxy.server }}"
Next, add the following Hello Universe pack. This is the custom add-on pack you defined and pushed to the private-pack-registry earlier in this tutorial.
| Pack Type | Registry | Pack Name | Pack Version |
|---|---|---|---|
| App Services | private-pack-registry | Hello Universe | 1.0.x |
Click on the Confirm & Create button to finish adding the Hello Universe pack.
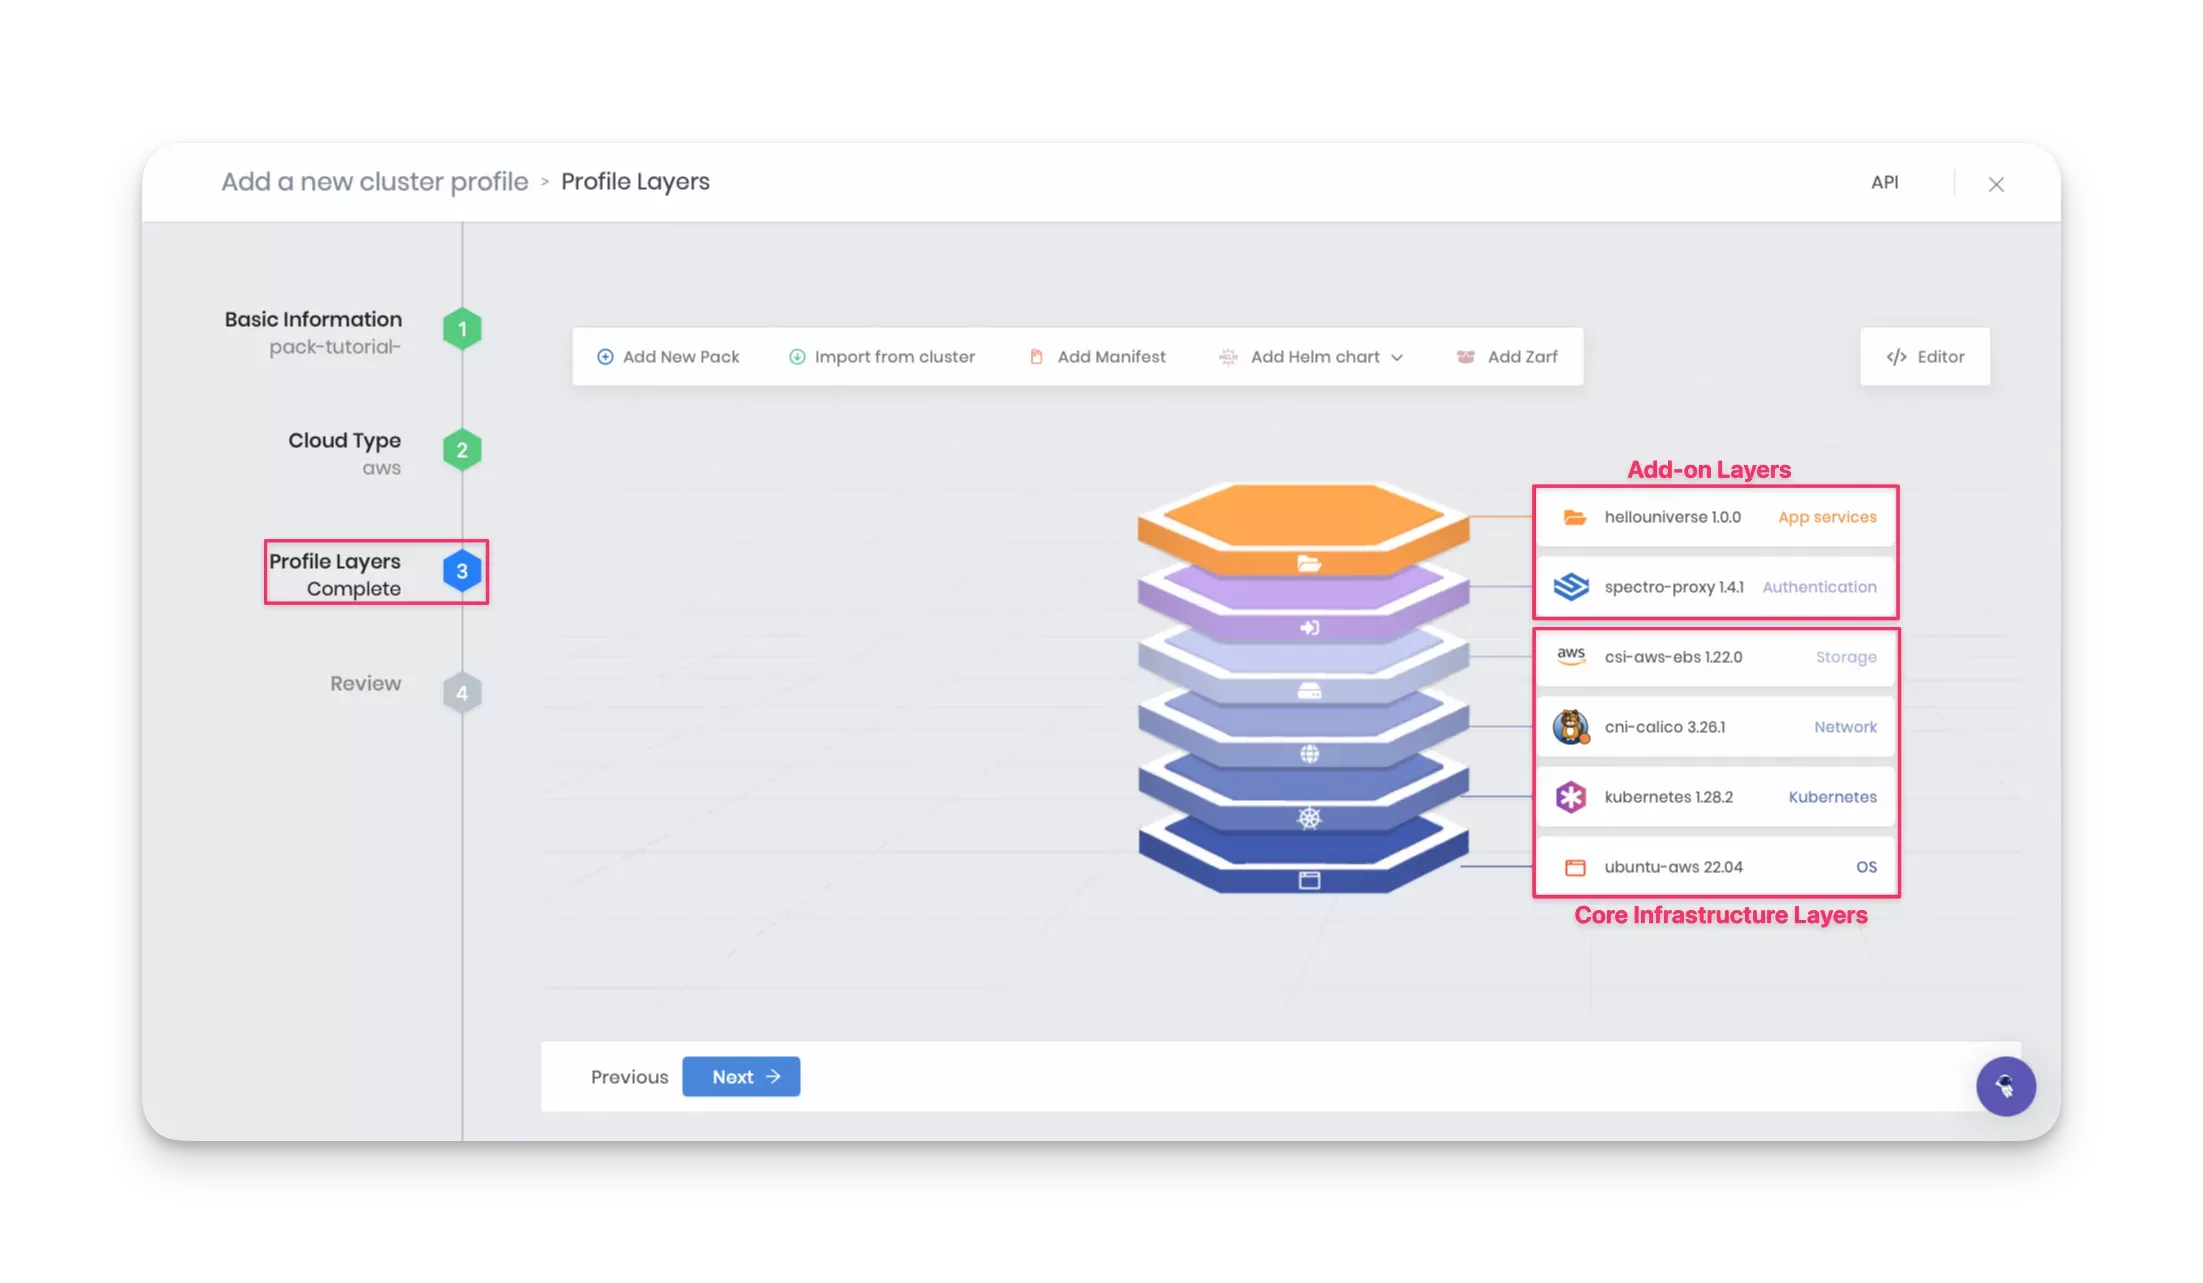
If there are no errors or compatibility issues, Palette displays the newly created full cluster profile. Verify the layers you added, and click Next.
Review
Review once more and click Finish Configuration to create the cluster profile.
Create a Cluster
From the Profile page, click on the newly created cluster profile to view its details page. Palette displays all the layers and allows you to edit any of them.
Click the Deploy button to deploy a new cluster. The cluster deployment wizard will displays the following sections.
Basic Information
Use the following values in the first section, Basic Information.
| Field | Value |
|---|---|
| Cluster name | pack-tutorial-cluster |
| Description | Cluster as part of the pack tutorial. |
| Tags | spectro-cloud-education, app:hello-universe, terraform_managed:true |
| Cloud Account | spectro-cloud |
Note that the AWS cloud account name in this tutorial example is spectro-cloud. If you used a different cloud account name, choose the name configured in your Palette's project settings.
Click Next to continue.
Parameters
The Parameters section allows you to change the profile configurations. For example, clicking on the Hello
Universe 1.0.x layer allows you to configure the registry, repository, and tag parameters defined in the
values.yaml file.
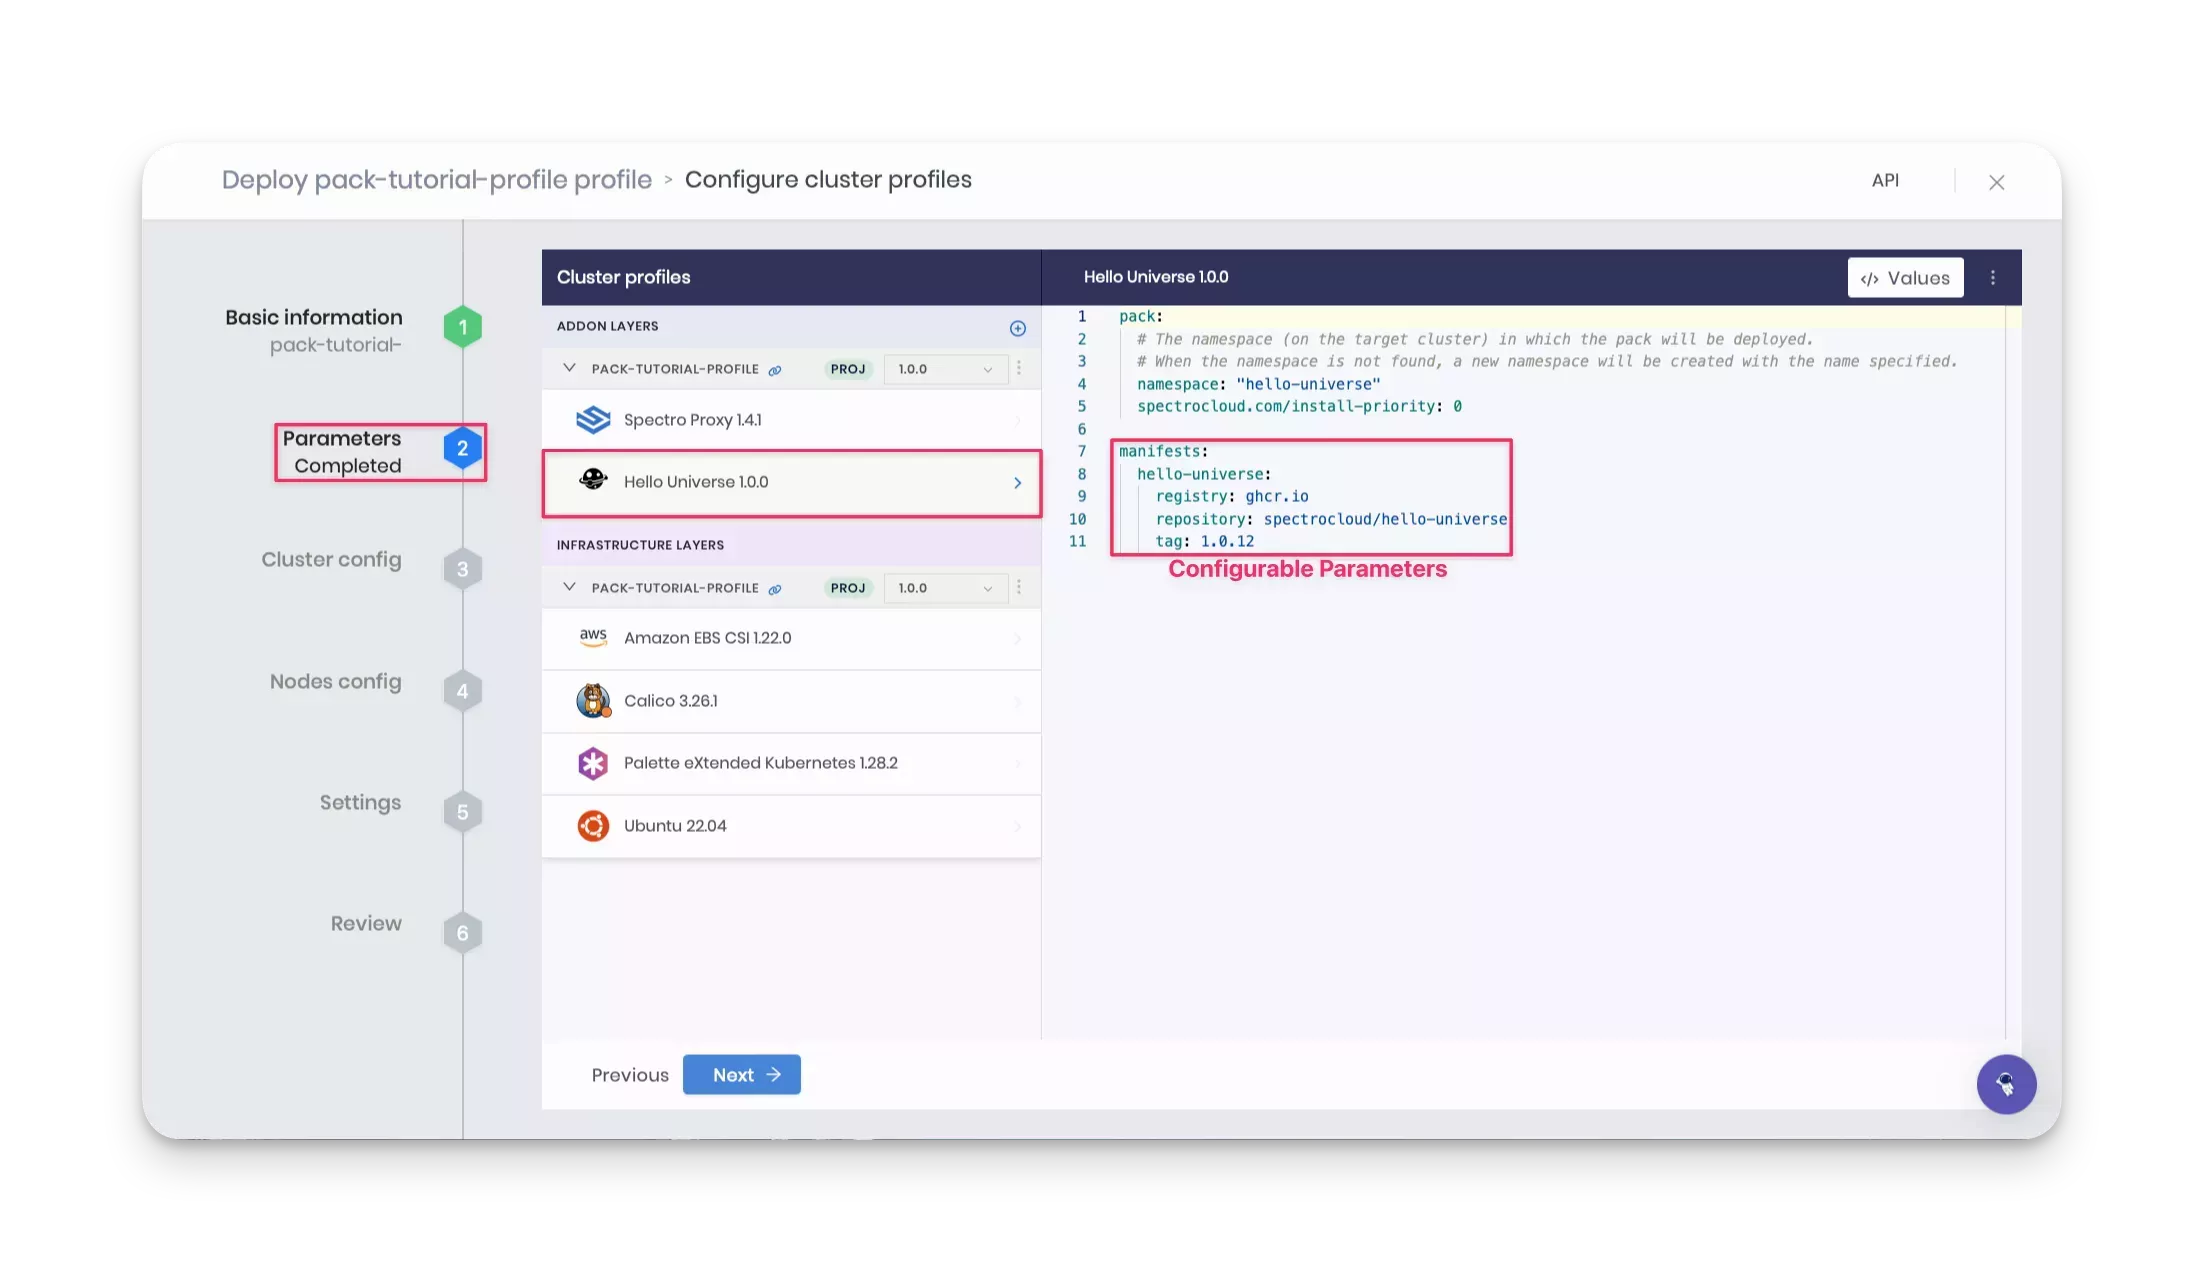
Keep the default values and click Next.
Cluster config
In the Cluster config section, ensure the Static Placement field is unchecked. If checked, the Static Placement will deploy the cluster in an existing VPC, and you will need the Amazon Resource Names (ARNs) for the existing subnets, roles, and other resources. For this tutorial, we will use dynamic placement, where Palette creates a new VPC and all other resources needed for the cluster.
For the Region field, select the region of your choice. The tutorial example will deploy the cluster in the us-east-2 region. For the SSH Key Pair Name field, choose the SSH key pair name from the selected region. You must have an SSH key created already in the AWS region where you will deploy the cluster.
Click Next to continue.
Nodes config
In the Nodes config section, provide the details for the control plane and worker pools. For this tutorial, you can use the following minimal configuration:
| Field | Value for the control-plane-pool | Value for the worker-pool |
|---|---|---|
| Node pool name | control-plane-pool | worker-pool |
| Number of nodes in the pool | 1 | 1 |
| Allow worker capability | Checked | Not applicable |
| Enable Autoscaler | Not applicable | No |
| Rolling update | Not applicable | Expand First. Launch a new node first, then shut down the old one. |
Keep the Cloud Configuration the same for both control plane and worker pools.
| Field | Value |
|---|---|
| Instance Type | General purpose m4.xlarge A minimum allocation of four CPU cores is required for the control plane node. |
| Availability zones | Choose any one availability zone. This tutorial uses the us-east-1a availability zone. |
| Disk size | 60 GiB |
Click Next to continue.
Settings
The Settings section displays options for OS patching, scheduled scans, scheduled backups, and cluster role binding. Use the default values, and click on the Validate button.
Review
Review all configurations in this section. The Review page displays the cluster name, tags, cloud account name, node pools, layers, and an estimated hourly cost. If everything looks good, click on the Finish Configuration button to finish deploying the cluster. Deployment may take up to 20 minutes to finish.
While deployment is in progress, Palette displays the cluster status as Provisioning. While you wait for the cluster to finish deploying, you can explore the various tabs on the cluster details page, such as Overview, Workloads, and Events.
Terraform Workflow
The Spectro Cloud Terraform provider allows you to create and manage Palette resources using Infrastructure as Code (IaC). This offers such advantages as automating infrastructure, facilitating collaboration, documenting infrastructure, and keeping all infrastructure in a single source of truth.
Starter Code
Navigate back to your tutorials container bash session to locate the starter Terraform files. If you have closed the terminal session, you can reopen another bash session in the tutorials container using the following command.
docker exec -it tutorialContainer bash
Switch to the /terraform/pack-tf directory, which contains the Terraform code for this tutorial.
cd /terraform/pack-tf
Set Up the Spectro Cloud API Key
To get started with Terraform code, you need a Spectro Cloud API key to authenticate and interact with the Palette API endpoint. To add a new API key, log in to Palette, click on the user User Menu at the top right, and select My API Keys, as shown in the screenshot below.
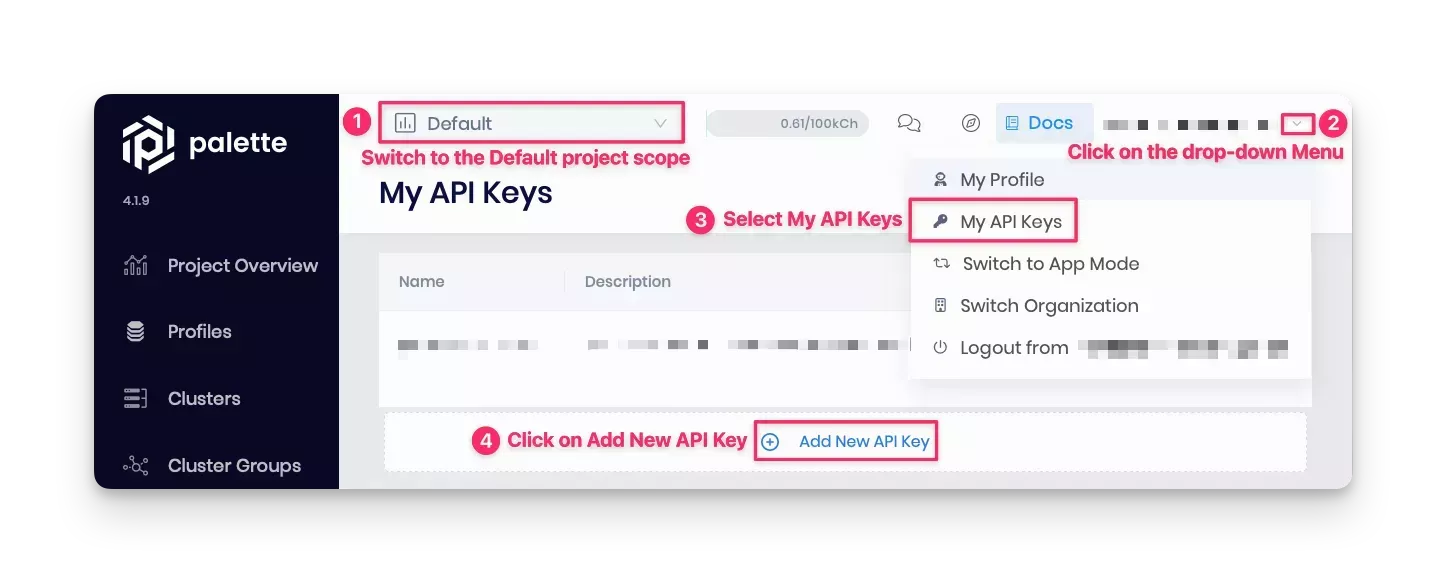
Below are the steps to add and export an API key:
-
Fill in the required fields, such as the API key name and expiration date, and confirm your changes.
-
Copy the key value to your clipboard, and switch back to the tutorials container environment.
-
Export the API key as an environment variable in the tutorials container bash session so the Terraform code can authenticate with Palette API.
export SPECTROCLOUD_APIKEY=<Your-Spectro-Cloud-API-key>
Review Terraform Files
Ensure you have the following files in the current working directory.
.
├── profile.tf		# Resource
├── cluster.tf		# Resource
├── data.tf			  # Spectro Cloud data resources
├── inputs.tf		  # Input variables
├── terraform.tfvars  # Variable definitions file
├── outputs.tf		# Output variables
└── provider.tf		# Spectro Cloud Terraform provider
Note that the Terraform code will deploy the resources to AWS.
We recommend you explore all Terraform files. Below is a high-level overview of each file:
-
profile.tf - contains the configuration for the
spectrocloud_cluster_profileresource. Review the core infrastructure layers that make up thespectrocloud_cluster_profileresource. -
cluster.tf - contains the configuration for the
spectrocloud_cluster_awsresource. The cluster resource depends upon thespectrocloud_cluster_profileresource. -
data.tf - contains the configuration for the resources to retrieve data from Palette dynamically. The table below lists the pack details required for each pack layer in order to deploy the
spectrocloud_cluster_profileresource.Pack Type Registry Pack Name Tag Version OS Public Repo ubuntu-awsLTS__20.4.x20.04Kubernetes Public Repo kubernetes1.24.x1.24.10Network Public Repo cni-calico3.25.x3.25.0Storage Public Repo csi-aws-ebs1.16.x1.16.0Note that using this Terraform code will deploy the resources to AWS. To deploy your resource to Azure or Google Cloud, use the layer details outlined in [Cloud Service Provider Configurations] (https://github.com/spectrocloud/tutorials/tree/main/terraform/pack-tf/README.md#cloud-service-provider-configurations).
-
inputs.tf - contains the variables used in the tutorial such as the names of cluster profile, cluster, cloud account, SSH key name, AWS region, pack name, and registry server.
Some variables have a default value, but you must provide the values for
cluster_cloud_account_aws_name,aws_region_name,ssh_key_name, andprivate_pack_registryvariables. You will find a#ToDotag next to each variable to update. Provide the values for these variables in a separate file, terraform.tfvars. Use default values for the remaining variables. -
terraform.tfvars - contains the variable definitions. The list of variables is outlined in the code block below. You must specify the values for all variables that are marked
"REPLACE ME". Read the inline comments below to understand each variable.- For example, the value for
cluster_cloud_account_aws_namewill be the name of the cloud account added to your Palette project settings. In this tutorial example, the cloud account name is spectro-cloud. - For
aws_region_name, you can choose any AWS region for your deployment. This tutorial example uses us-east-2 region. - The value for
ssh_key_namewill be the name of the SSH key available in the region where you will deploy the cluster. The SSH key name used in this example is aws_key_sk_us_east_2. - Lastly, provide your registry server name for the
private_pack_registryvariable. You can provide the private-pack-registry as the value if you have followed the same naming convention as this tutorial.
cluster_cloud_account_aws_name = "REPLACE ME"   # Name of the cloud account added to your Palette project settings
aws_region_name = "REPLACE ME"                  # Use "us-east-2" or any other AWS region
ssh_key_name = "REPLACE ME"                     # Name of the SSH key available in the region where you will deploy the cluster
private_pack_registry = "REPLACE ME" # Your registry server name. This tutorial uses "private-pack-registry". - For example, the value for
-
outputs.tf - contains the output variables to expose information.
-
provider.tf - contains the provider configuration and version.
Deploy Terraform
After you update the terraform.tfvars file and carefully review the other files, initialize the Terraform provider.
terraform init
The init command downloads plugins and providers from the provider.tf file. Next, preview the resources Terraform
will create.
terraform plan
The output displays the resources Terraform will create in an actual implementation.
# Output condensed for readability
Plan: 2 to add, 0 to change, 0 to destroy.
Finish creating all the resources.
terraform apply -auto-approve
It can take up to 20 minutes to provision the cluster. When cluster provisioning completes, the following message displays.
# Output condensed for readability
Apply complete! Resources: 2 added, 0 changed, 0 destroyed.
You can observe the cluster deployment progress in Palette by navigating back to Palette.
Check the In-Progress Deployment
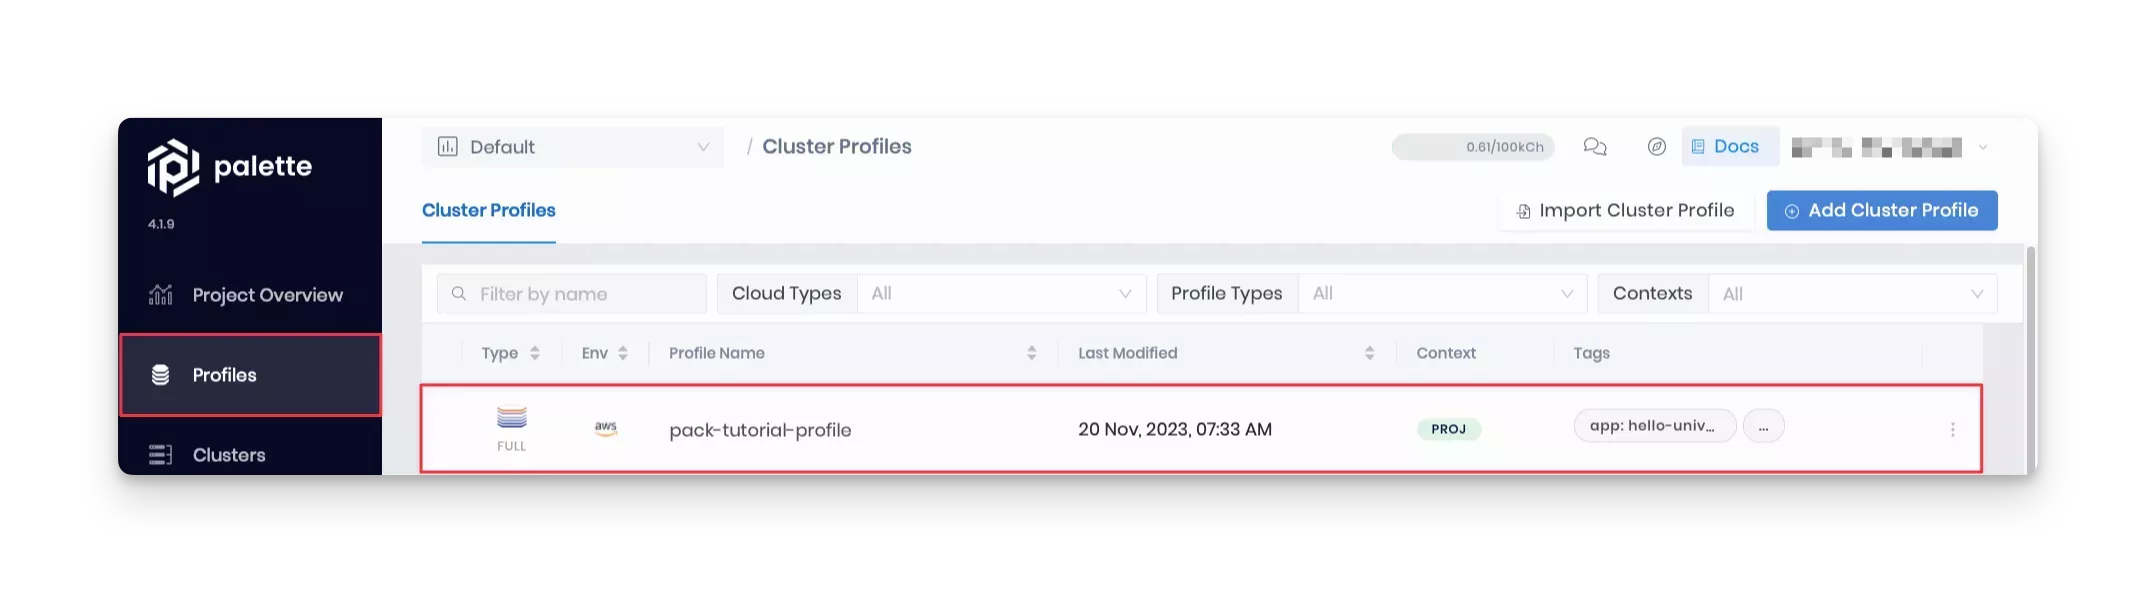
Log into the Palette, and navigate to the Profile section in the left Main Menu. If the Terraform deployment is successful, the newly created cluster profile is displayed as shown in the screenshot below.
Validate
In Palette, navigate to the left Main Menu and select Clusters. Next, select your cluster to display the cluster Overview page and monitor cluster provisioning progress.
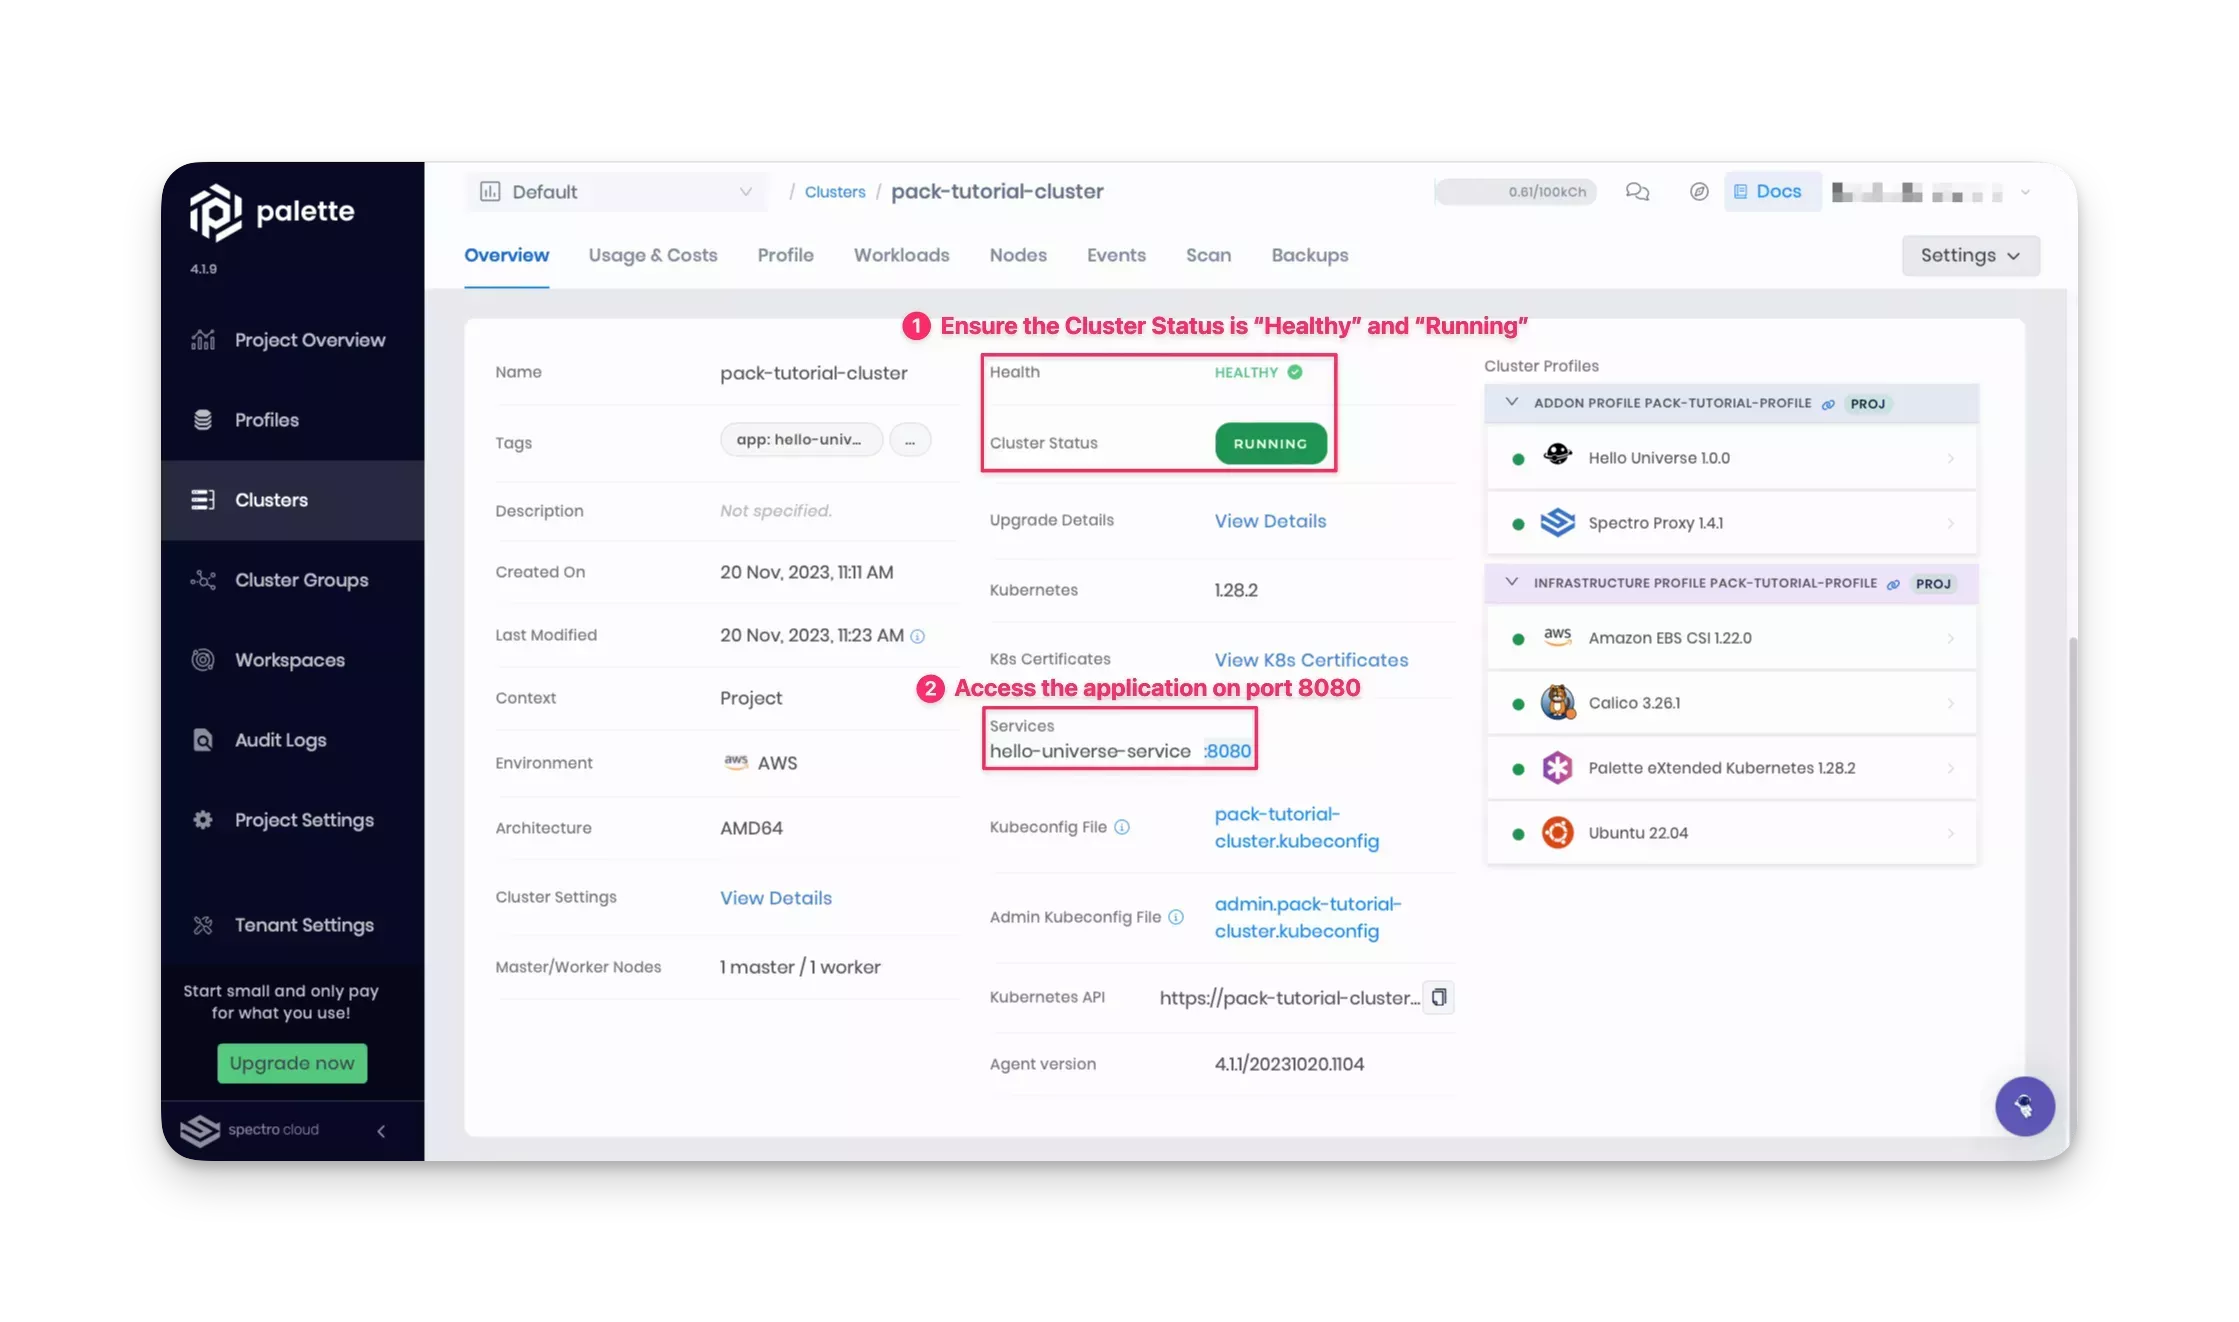
When cluster status displays Running and Healthy, you can access the application from the exposed service URL with the port number displayed. For the Hello Universe application, port 8080 is exposed. Click on the URL to access the application.
We recommend waiting to click on the service URL, as it takes one to three minutes for DNS to properly resolve the public load balancer URL. This prevents the browser from caching an unresolved DNS request.

You can also look at real-time metrics, such as CPU and memory consumption, in the cluster's Overview tab in Palette.
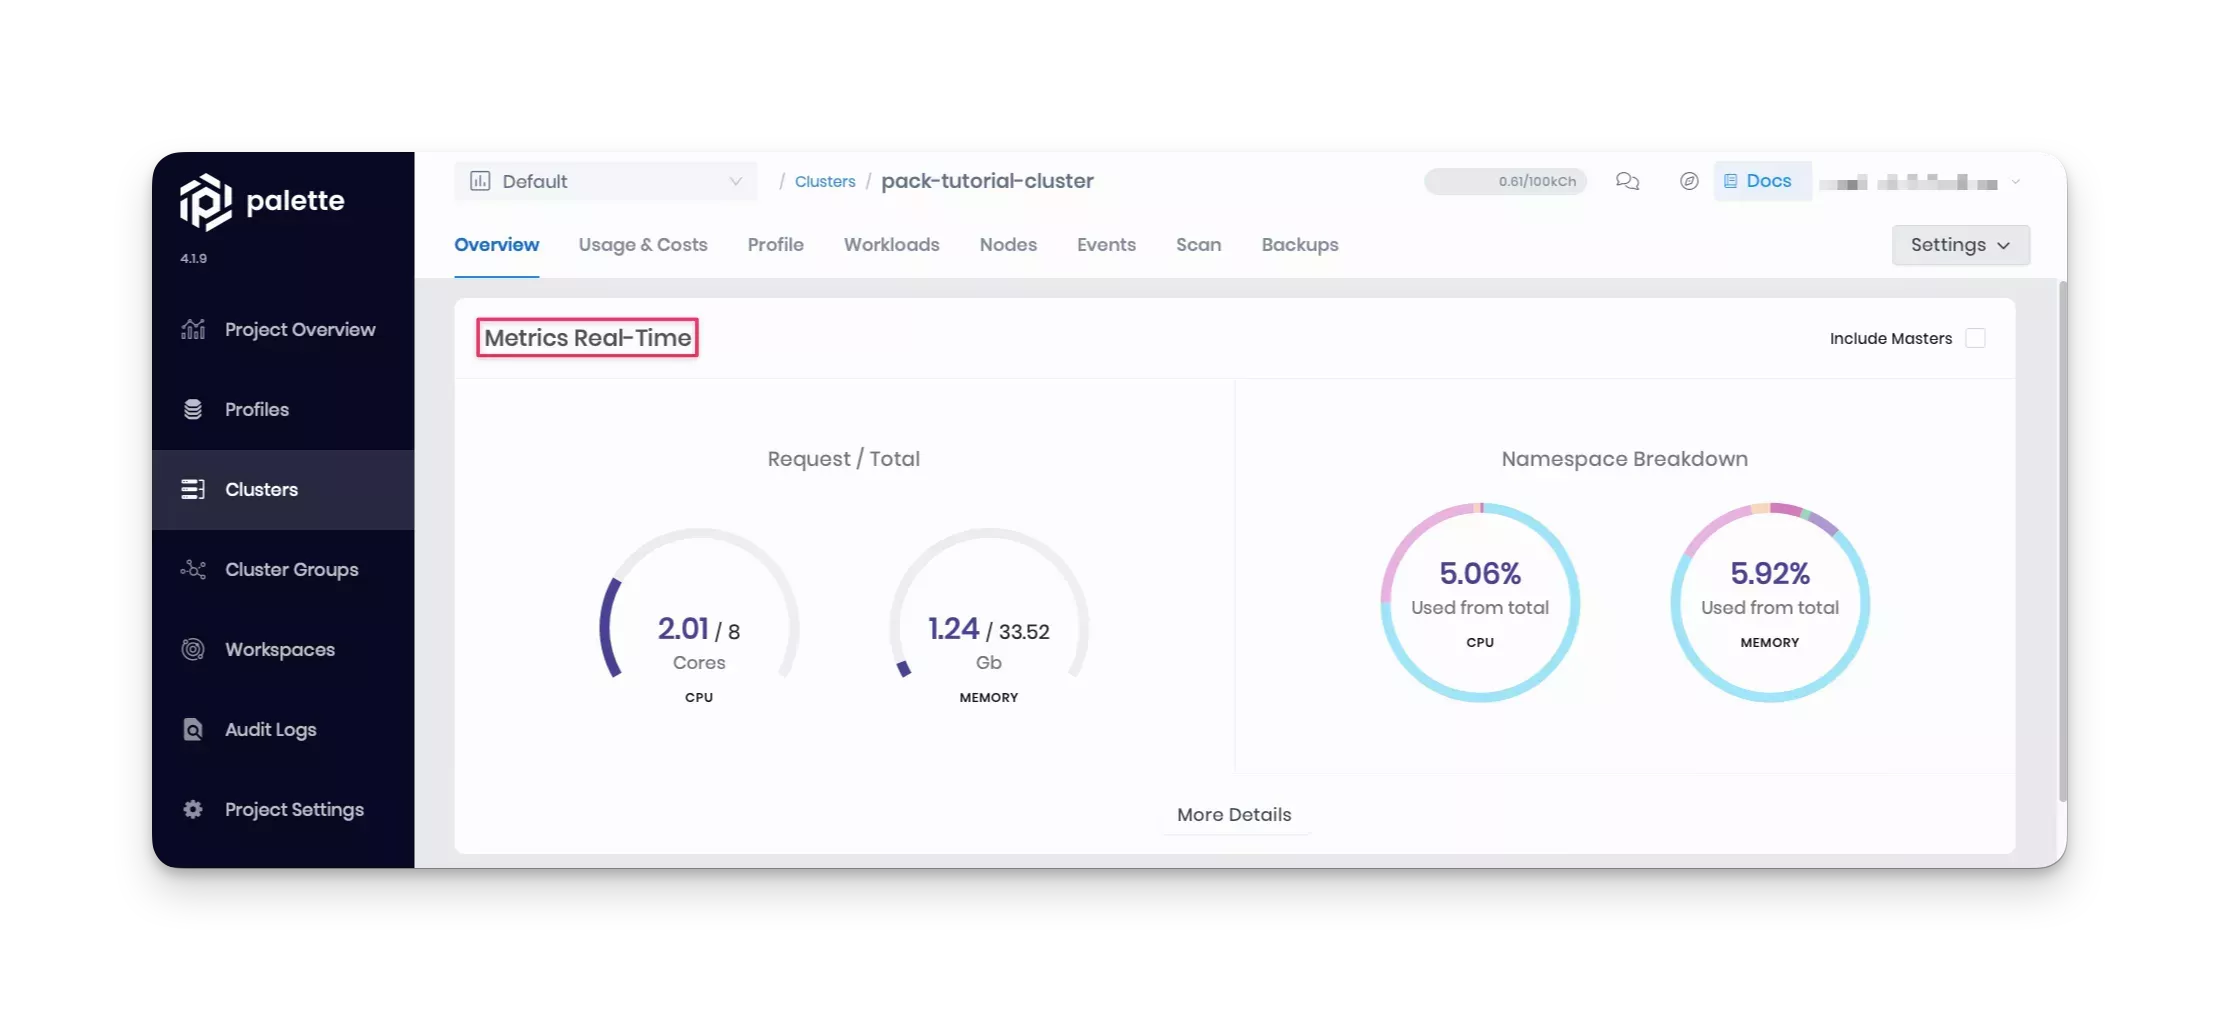
Using your custom pack in the cluster, you have successfully deployed the Hello Universe application to the cluster.
Cleanup
Delete the cluster, cluster profile, and registry server, and remove the registry service configuration from Palette's settings.
The following steps will guide you in cleaning up your environment. Follow the steps for Palette if you used Palette to deploy the cluster. Use Terraform commands to delete the cluster if you used Terraform for deployment.
- Palette
- Terraform Code
Delete the Cluster and Profile using Palette
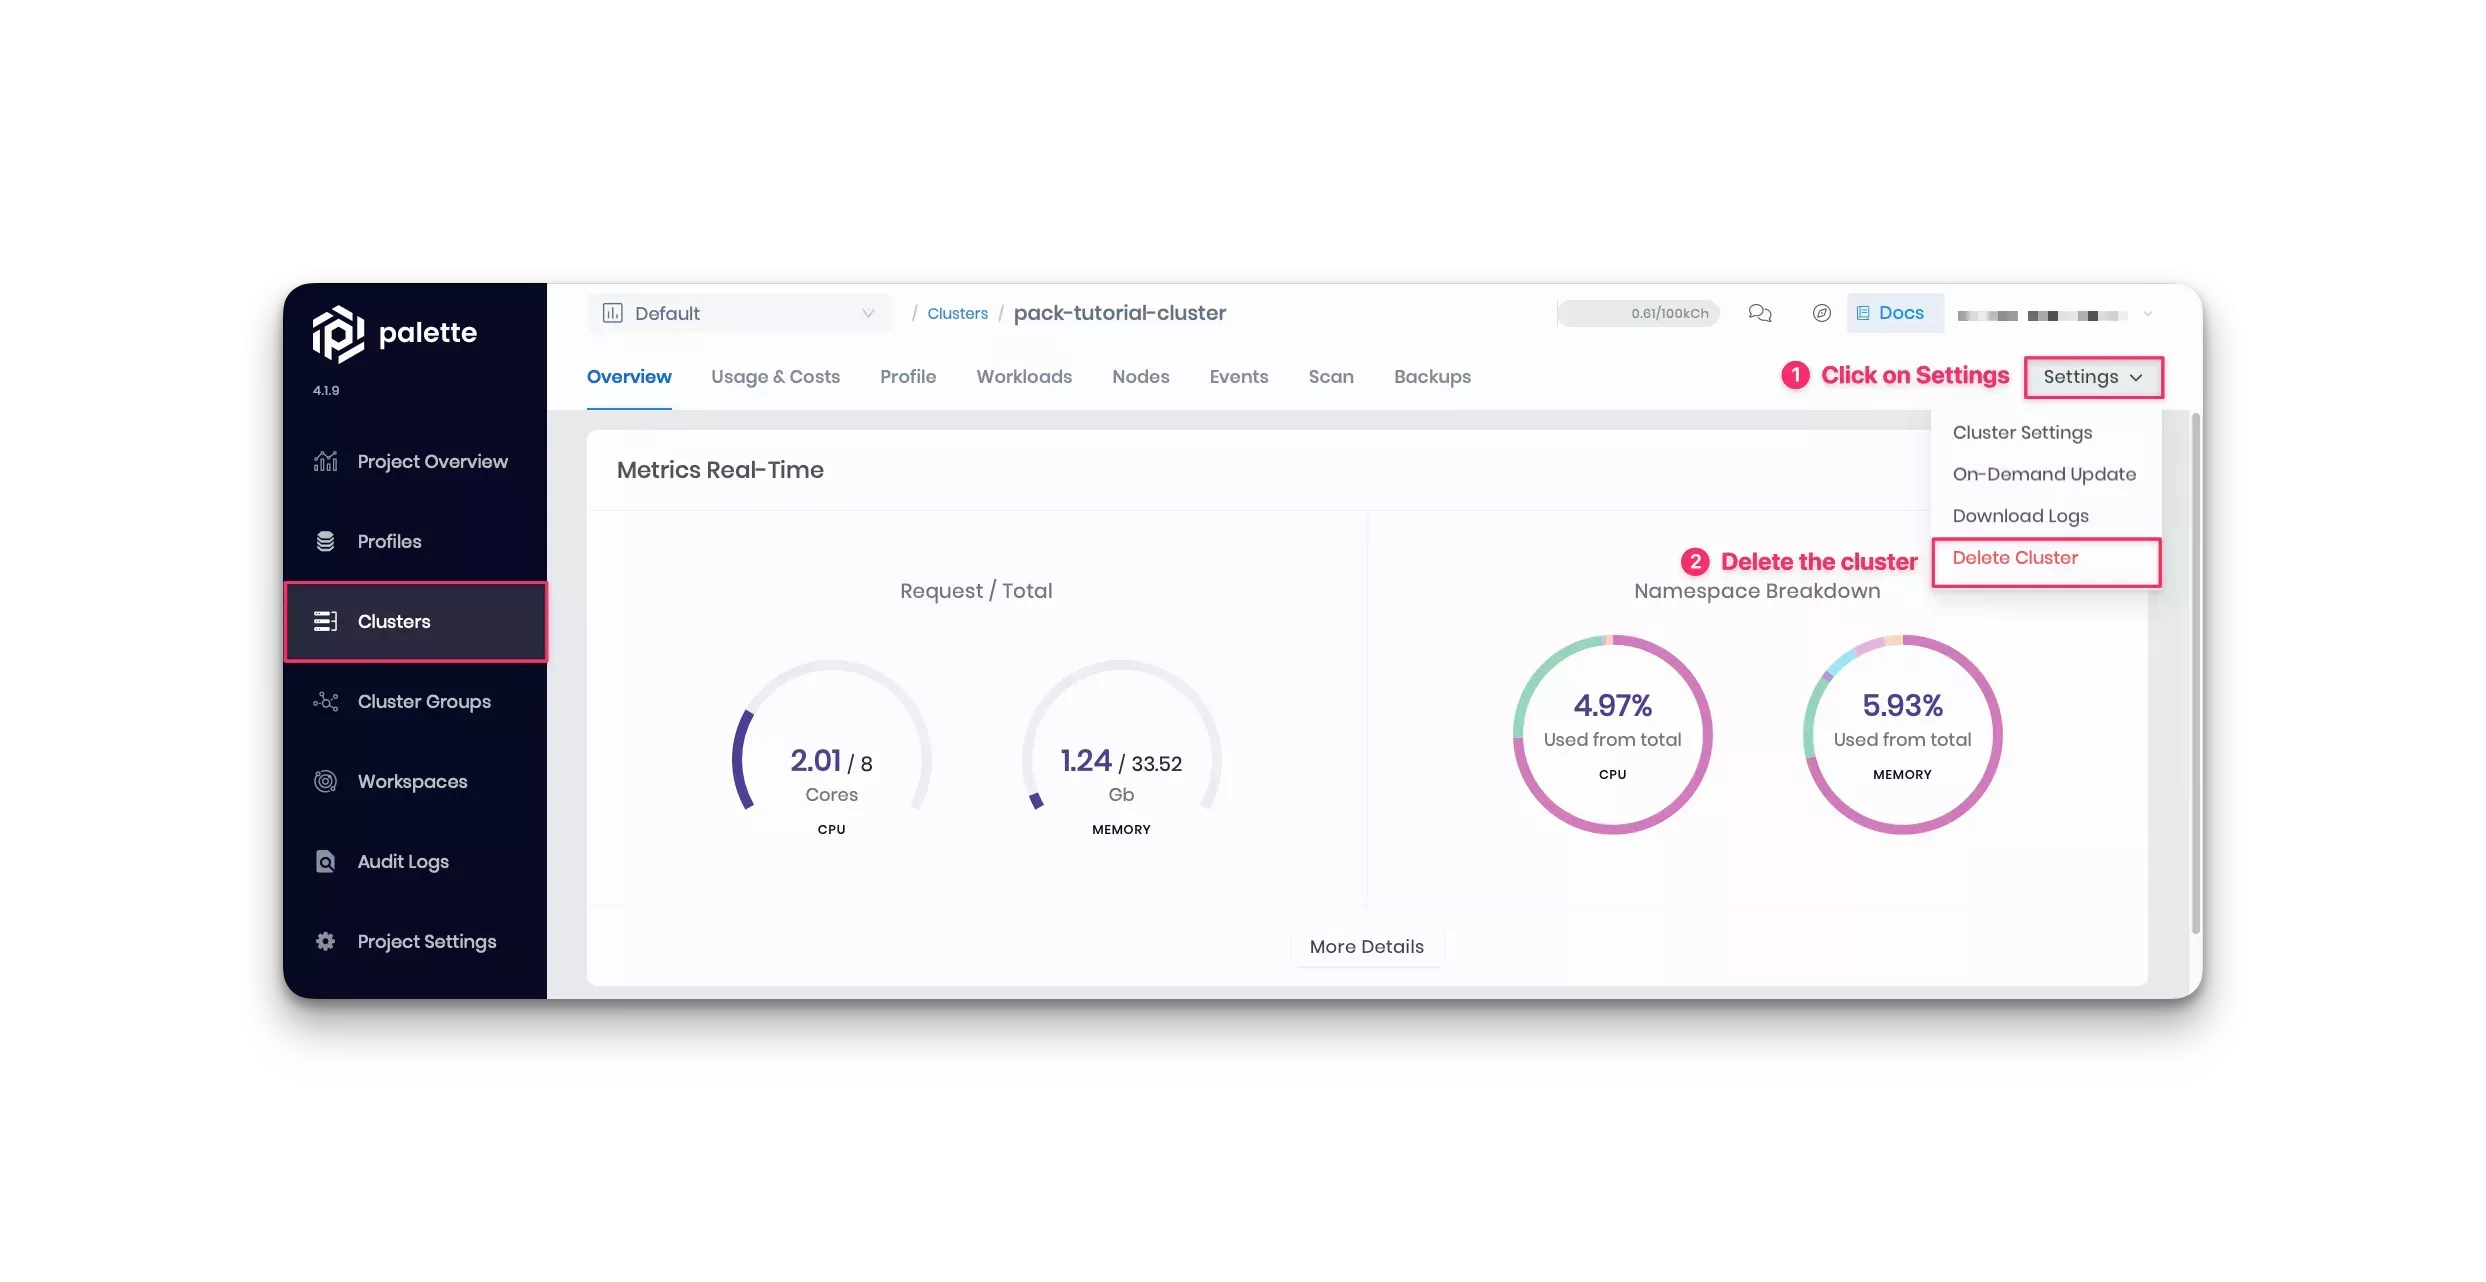
Navigate to the Cluster section in Palette's left Main Menu, and view the details page of the pack-tutorial-cluster. To delete the cluster, click on the Settings button to expand the drop-down Menu, and select the Delete Cluster option. Palette prompts you to enter the cluster name and confirm the delete action. Type the cluster name to proceed with the delete step.
The cluster status displays Deleting. Deletion takes up to 10 minutes.
If a cluster remains in the delete phase for over 15 minutes, it becomes eligible for force deletion. Navigate to the cluster's details page and click on Settings. Select Force Delete Cluster. Palette automatically removes clusters that are stuck in the cluster deletion phase for over 24 hours.
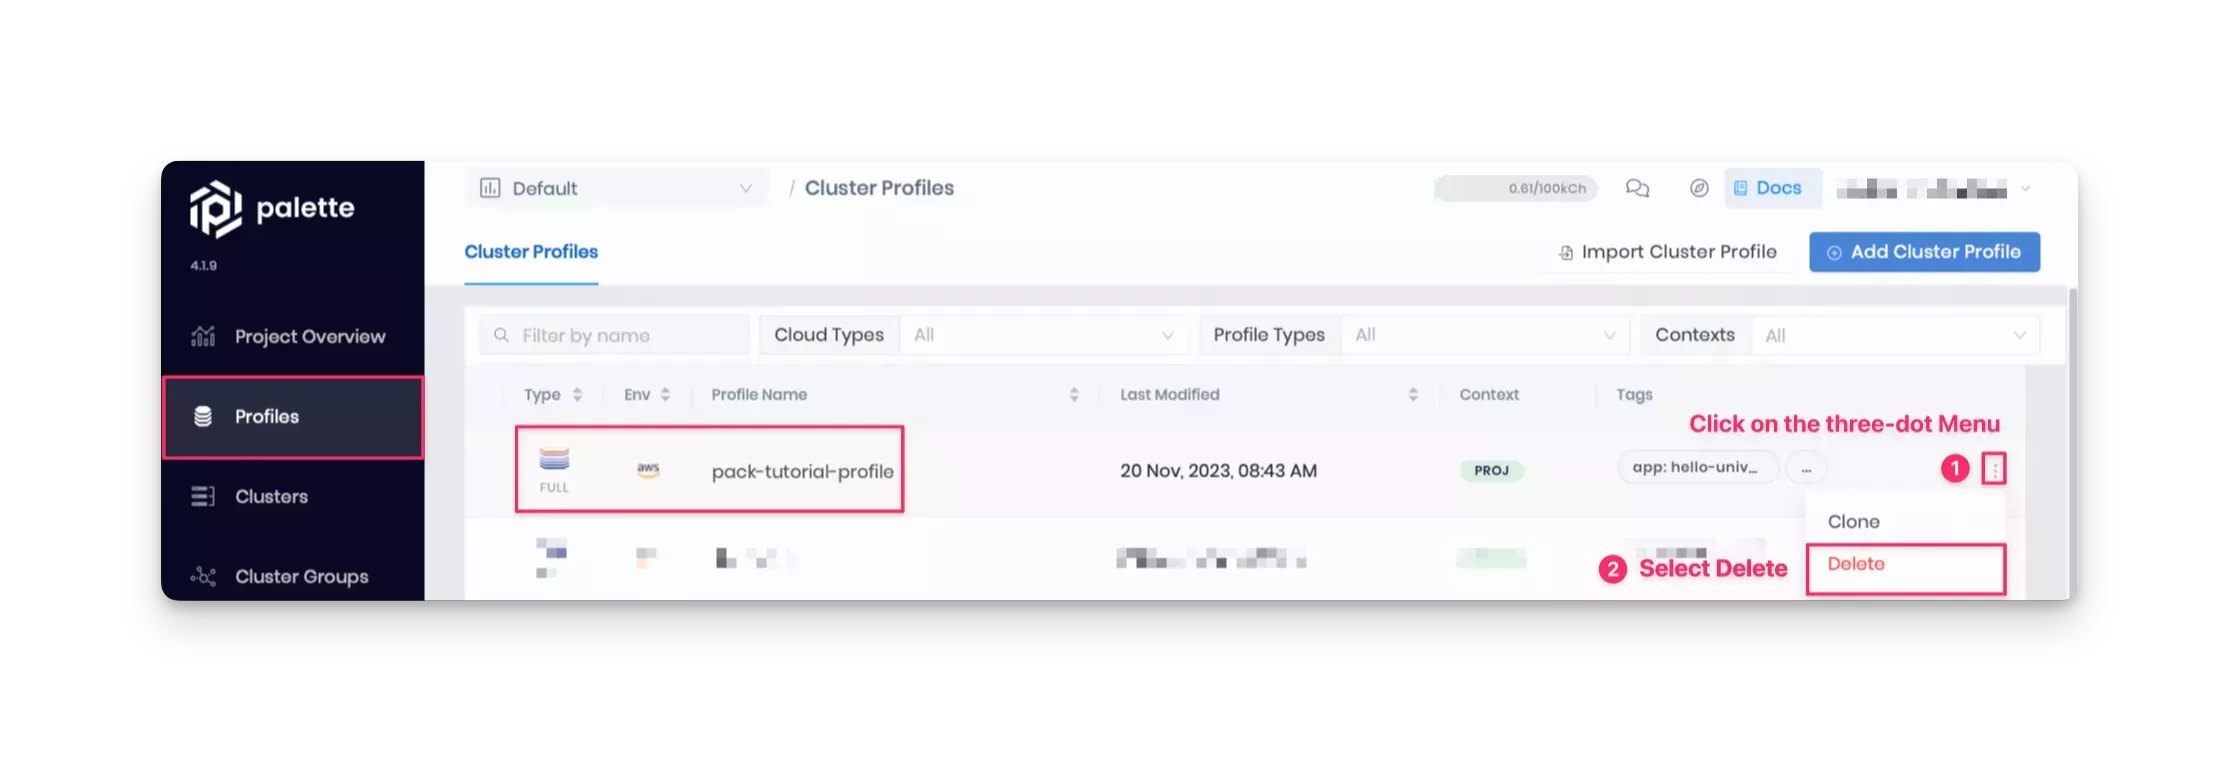
After you delete the cluster, go ahead and delete the profile. From the left Main Menu, click Profiles and select the profile to delete. Choose the Delete option in the three-dot Menu.
Wait for the resources to clean up and ensure they are successfully deleted.
Delete the Cluster and Profile using Terraform
If you've used Terraform to deploy the cluster, switch back to the tutorials container, and issue the following command from within the /terraform/pack-tf directory:
terraform destroy -auto-approve
Wait for the resources to clean up. Deleting the Terraform resources may take up to 10 minutes.
# Output condensed for readability
Destroy complete! Resources: 2 destroyed.
Delete the Registry Server
After deleting the cluster and cluster profile, navigate to Tenant Settings > Registries > Pack Registries to delete the registry service configuration from Palette.

Stop the registry server by closing the tutorials container bash session that serves the Ngrok reverse proxy server. At this point, you can close all the bash sessions. To remove the container and the image from the local machine, issue the following commands:
docker container rm --force tutorialContainer
docker image rm --force ghcr.io/spectrocloud/tutorials:1.0.3
Wrap-Up
In this tutorial, you learned how to create a custom pack using manifest files. You packaged up an application in a custom pack that you pushed to a private registry server and added to Palette.
Next, you created a cluster profile that included all the core infrastructure layers, such as the OS, Kubernetes distribution, and more. You also added your custom pack to the cluster profile so your application could be deployed to a Kubernetes cluster.
Packs are the building blocks of cluster profiles, allowing you to customize your Kubernetes clusters. Palette enables you to use different packs to create multiple cluster profiles, each for specific purposes. As a result, you can ensure all Kubernetes deployments contain all the required dependencies and applications without developing complicated deployment scripts. All you need to do is maintain the cluster profiles.
To learn more about packs in Palette, we encourage you to check out the reference resources below.